Tuesday, 14 November 2023

'Dog & Bunny Picnic Fun' Chocolate Macarons and Cake

 I made this cake for a girl who loves food, bunnies, her Maltipoo pooch and chocolatey stuff with crunchy bits so I created this for her birthday!
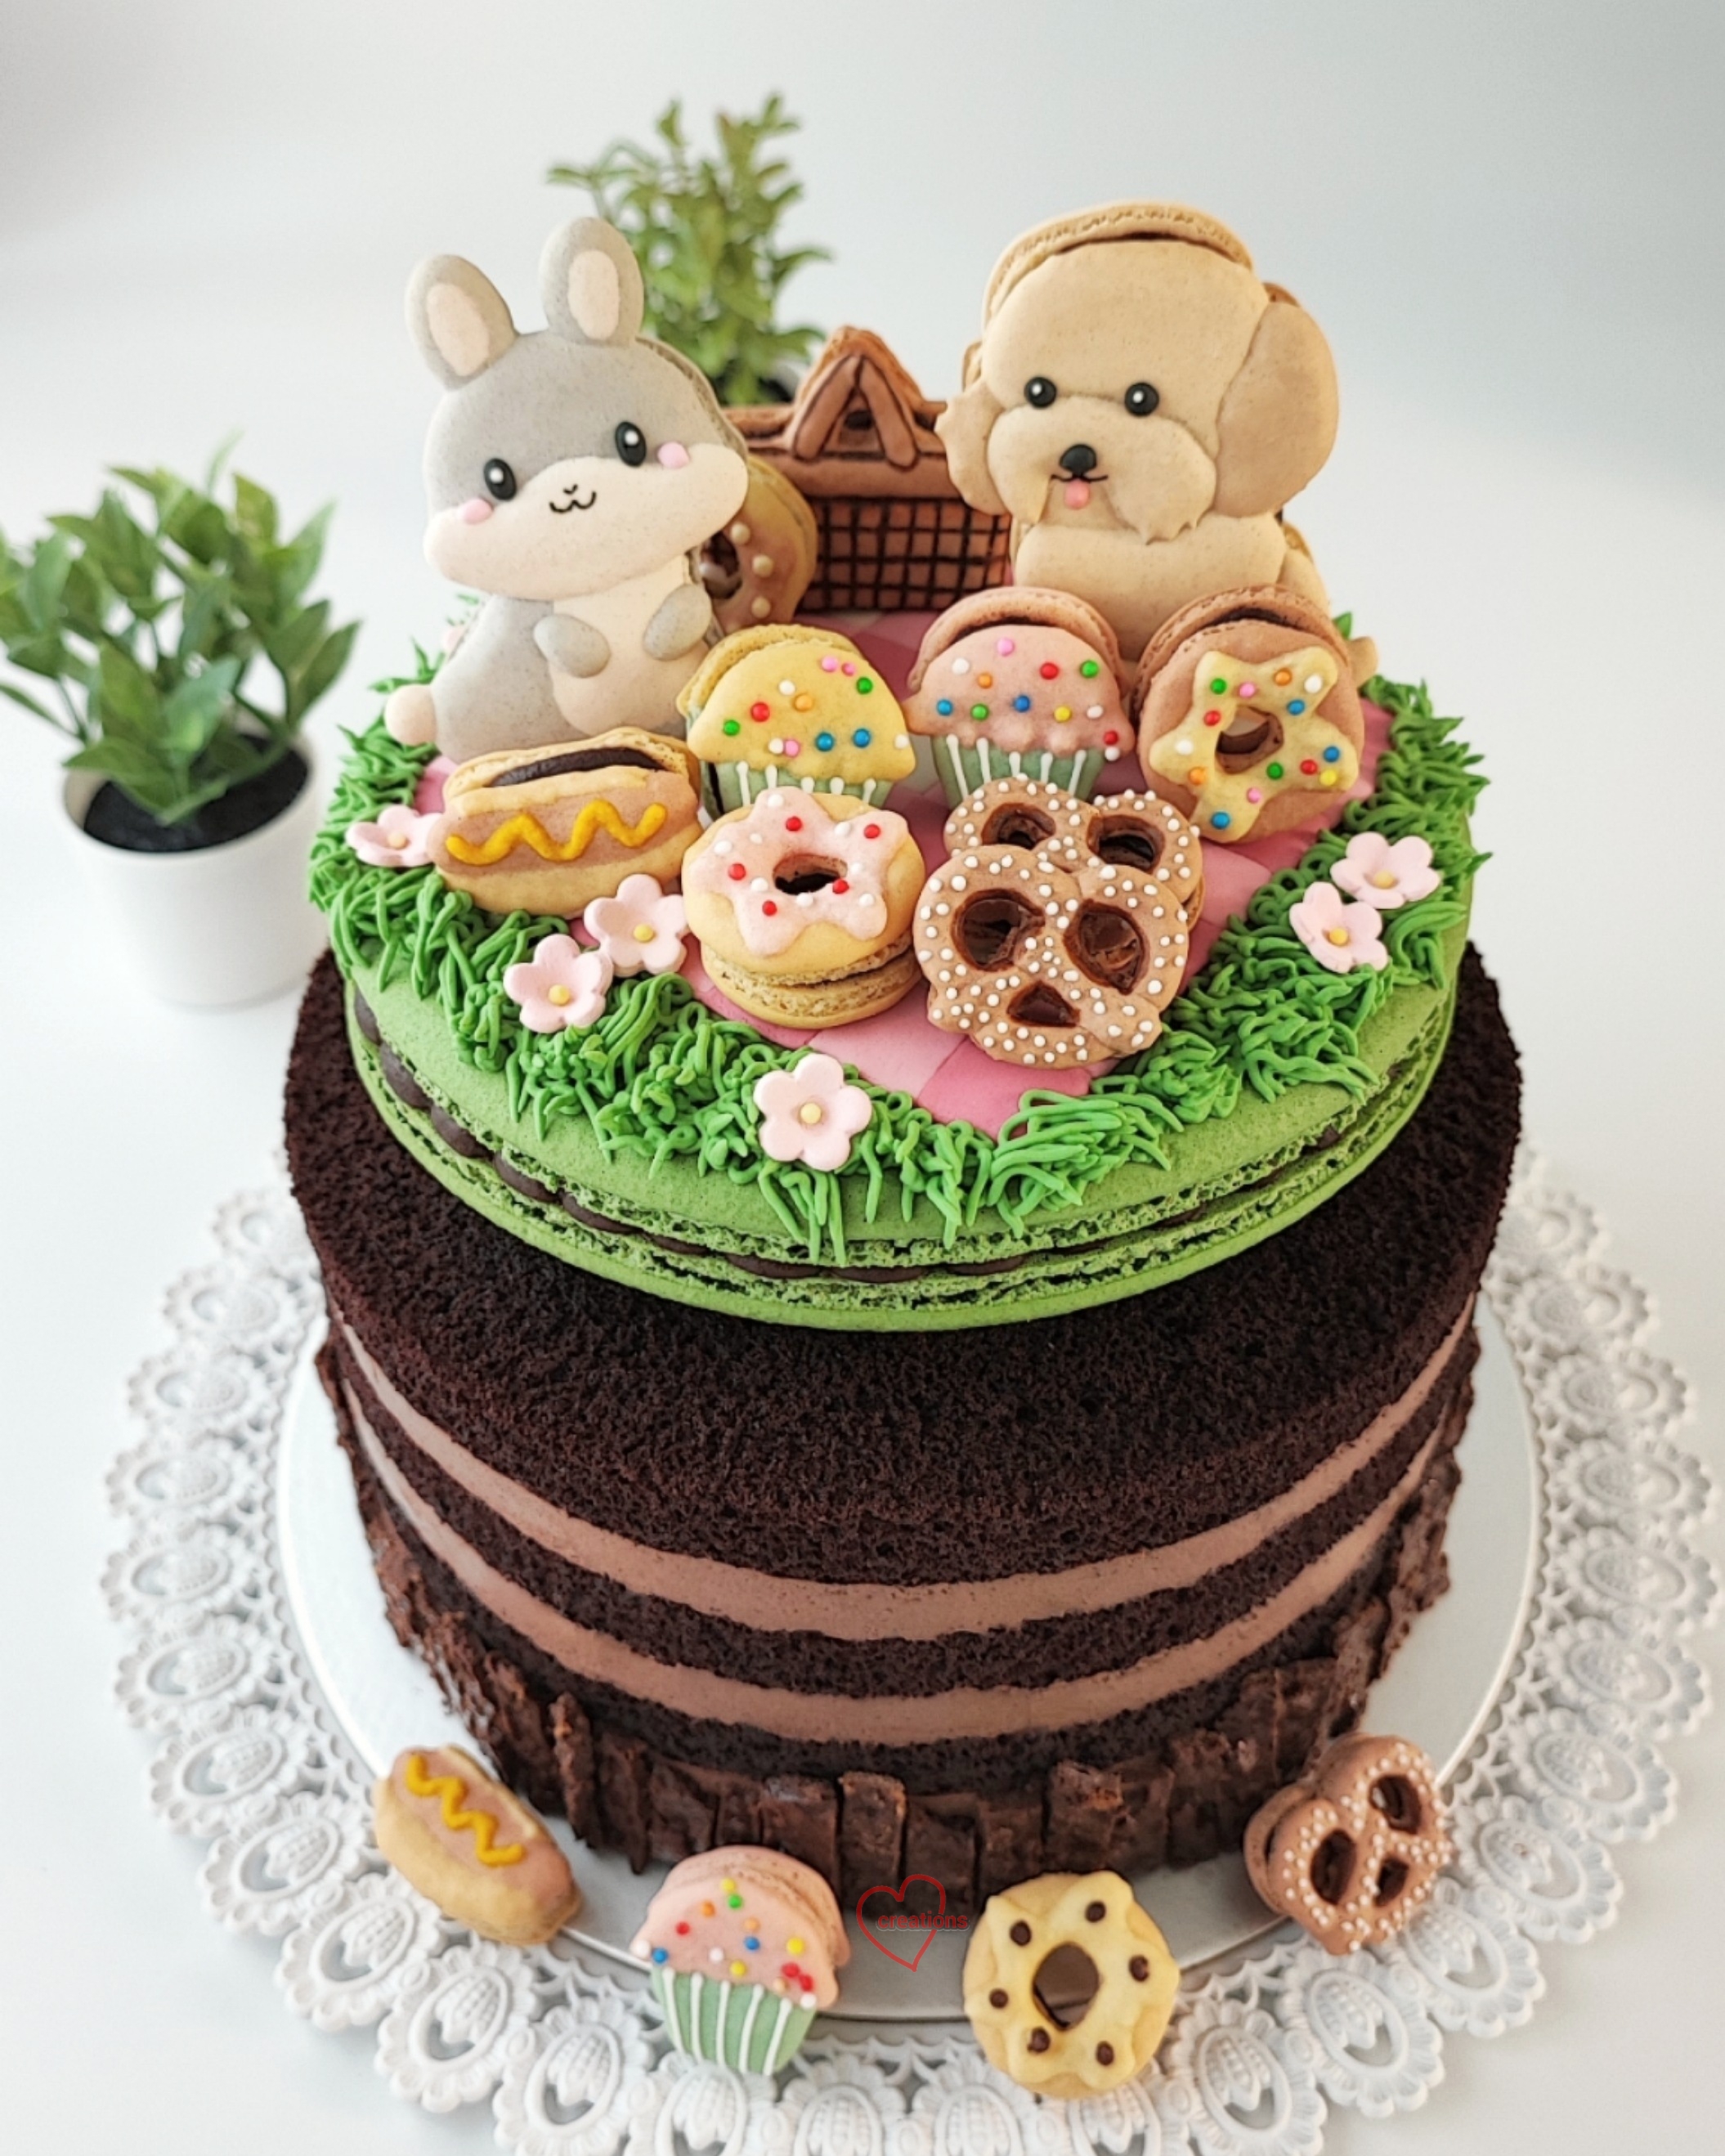

I used my default Swiss meringue method recipe for this bake but I split this bake into three separate sessions and applied different variations of my Swiss method recipe to different batches. For the large green base, picnic basket and mini food items, I used all the egg whites in the Swiss meringue. For the bunny and dog, I split the egg whites into unwhipped to mix with dry ingredients to form a paste, and whipped in the Swiss meringue. I made extra pieces in case of accidental uglification.

I used edible markers and royal icing to add in the details. The sprinkles on cupcakes and donuts were added after the macaron batter was piped but before baking.

The picnic mat was made from leftover homemade fondant that I froze from an earlier project.

The fondant is glued onto the macaron shell with a little brush of water

The following are recipes for the individual components for this bake.

Chocolate feuilletine crunch

I made chocolate feuilletine crunch to add the chocolatey crunch goodness that the birthday girl likes. You may make the feuilletine from scratch but because I had so many components to make for this bake, I bought mine from Redman in Singapore. I melted a mix of milk and dark chocolate and mixed it with the feuilletine in the ratio of 1:3 for feuilletine:chocolate by weight. The fat from chocolate coats the feuilletine flakes and prevents them from turning soggy when sandwiched between ganache in the macarons or diplomat cream in the cake. Simply spread the mixture of melted chocolate and feuilletine in a thin layer on baking tray lined with parchment paper and freeze it until it is time to assemble.

I used 70g feuilletine and 210g chocolate to spread into a 10 x 12" tray

Dark chocolate ganache

I made the chocolate ganache slightly differently from my usual by adding a little corn syrup and gelatin.

150g Dark chocolate couverture 
60g Heavy cream
6g Light corn syrup (optional)
12g unsalted butter, softened
1 gelatin sheet bloomed in ice water (optional)
Pinches of salt
1/2 tsp vanilla extract
1/2 tsp Kahlua coffee liqueur 

Steps:

1. Heat chocolate in microwave/double-boiler until softened and slightly melted. Set aside.

2. Heat cream, salt and light corn syrup in small saucepan until it just starts to bubble at the edges. Pour over softened chocolate and let it sit for a minute.

3. Stir the chocolate in one direction until melted.

4. Melt bloomed gelatin after squeezing out excess water. Add to ganache and stir gently until well combined.

5. Add softened butter, vanilla and coffee liqueur. Mix well. Cover with cling wrap.

6. Set aside to firm up at cool air-conditioned temperature or in the fridge until toothpaste consistency.

7. Transfer into piping bag and fill the macarons. I didn't whip the ganache this time like I usually do for a lighter texture.


Mixed berry jam

I used frozen strawberries and freeze-dried raspberry powder as I couldn't get hold of fresh/frozen raspberries. You may use any mix or either type of berries for the jam. I tend to use only a little sugar and no pectin, to keep the berry flavours strong and without "fillers". I take my time to reduce the jam over low heat (about 30 minutes or more) until it is thickened to jam consistency. The sugar I use is 10% of the original weight of fruit.

400g strawberries
40g sugar
5g freeze-dried raspberry powder (you may add more if you wish)
Pinches of salt

I cooked until thickened and fruit is reduced to about 60% of its original weight. But for the macaron filling portion, I reduced the jam further to reduce the amount of water content even more.

Chocolate chiffon sponge

I used the default chocolate cake recipe from my ultimate chocolate cake, which was adapted from Rose Levy Beranbaum's German chocolate cake recipe. I whipped the egg whites portion like the meringue for chiffon cakes although Mdm Rose's recipe doesn't whip up the egg whites. Instead of steam baking, I tried baking at a lower temperature of 120C with the oven fan on for about 50min, and then increasing the temperature to 160C for 8min. The resulting cake was still moist and fluffy with flat tops. I sliced each sponge horizontally into half.

Chocolate diplomat cream

This recipe is similar to my default chocolate diplomat cream but I changed the ingredient amounts a little for some of the ingredients and changed the process of cooking a little.

220g + 30g milk
35g sugar
2 egg yolks
18g cornflour
12g cocoa powder
1/2 tsp vanilla extract
1/2 tsp Kahlua coffee liqueur
1/8 tsp salt
15g unsalted butter
40g dark chocolate couverture
100g whipping cream* (I used 15g dairy + 85g non-dairy)

* you may use full dairy, full non-dairy or a mix like I did in whatever ratios you like depending on climate and your taste preference. It is awfully hot in Singapore nowadays so I limit the amount of dairy cream.

Steps:

1. Heat 220g milk until steaming hot but not boiling. I just put my hand over the saucepan and once I can feel the heat and see steam rising from the milk.

2. In the meantime, whisk egg yolks, sugar, salt, cornflour, cocoa powder and 30g milk together in a heatproof jug. 

3. Once the milk is hot, pour in a thin stream into the egg yolk mixture while whisking continuously. Pour everything back into saucepan.

4. Whisk the custard over medium-low heat until it starts to thicken. Remove from heat and continue whisking until smooth. Put it back on  heat and continue whisking and cooking. Once it starts to bubble, continue whisking over heat for 1 minute before removing from heat.

5. Add chocolate couverture and butter. Whisk until smooth. Add extracts and mix well.

6. Transfer pastry cream into bowl and press cling wrap on surface. Refrigerate overnight or at least 2h.

7. When ready to assemble cake, whip whipping cream of choice until firm peaks. Briefly whip the chocolate pastry cream until loosened. Fold whipped cream into pastry cream in a few additions. Transfer into a large piping bag.


Macaron Assembly

I filled the large green macaron with dark chocolate ganache, followed by a disc of chocolate feuilletine crunch, some more ganache and mixed berry jam.


The dog, bunny and basket are filled with chocolate ganache and chocolate crunch. The mini food items are filled with just the ganache as they are really tiny.


The macarons were glued on with more royal icing onto the picnic mat


Cake Assembly

The cake is made of four layers of chocolate sponge with three layers of filling. The filling consists of chocolate diplomat cream, mixed berry jam, crunchy chocolate balls and chocolate feuilletine crunch. I brushed the sponge with some syrup (1:2 sugar:water) before layering on the filling as shown in the picture below.

From top left to bottom right:
1. Place chiffon sponge in acetate sheet ring. Brush the surface with some syrup.
2. Spread a thin layer of diplomat cream in the middle.
3. Pipe a ring of diplomat cream to the desired height you want.
4. Place chocolate feuilletine crunch in the middle.
5. Place a ring of crunchy chocolate balls around the chocolate feuilletine crunch. Add more diplomat cream if necessary.
6. Cover the crunch layer with a little diplomat cream.
7. Add a layer of berry jam.
8. Add a little diplomat cream over jam layer.

Repeat all steps until last top sponge is in place. Brush the surface with more syrup. Cover the top of the acetate ring with cling wrap before freezing for 2-3 hours. Carefully remove the acetate sheet.

I added more crunch around the base and on top of the cake, as well as more crunchy chocolate balls on the top.


As the sponge is soft and the macaron topper is heavy, I added 6 skewers in the cake as dowels under the crunch layer on top.

Here's a reel for this bake! I didn't document the whole process in detail because I didn't want the fuss of having to edit a tonne of content or have the joy of being in the moment of the bake the whole time.

https://www.instagram.com/reel/Czle4FLSjGL/?igshid=dzllM2lwcGNiYWpr

Thank God the cake was very well received! Here's a lovely picture of the birthday girl and her family along with the cake! I have permission from my client to share this picture.


with love,

Phay Shing

Read More »

Tuesday, 7 November 2023

Baby Jesus and Angel Cookies

 This is the third year our church's Culinary Arts Ministry is having a cookie giveaway project. And for this year, we decided to tell the Christmas story through cookies! Several of us are involved in baking hundreds of cookies so this takes some co-ordination and planning in advance. With many of us having busy schedules, using royal icing transfers is one way to make a big project more manageable. I am in charge of making the angel cookies and a couple of other members have kindly volunteered to make the baby Jesus cookies. We have sheep, heart, star and candy cane (representing shepherd's staff) as part of the cookie storytelling too! Of the whole collection, baby Jesus and the angels will be made using icing transfers as they can be made way in advance and the use of templates makes it easier for those of us who cannot pipe by freehand. Here are some of the icing transfers and sample cookies I made.


I chose to use my default brown sugar cookie as the cookie base as it is actually adapted from a gingerbread cookie recipe which does well being exposed for long periods, has a long shelf-life, and has a soft chewy texture that is still great after being softened by royal icing. I coloured and flavoured it by substituting 10% of plain flour with black cocoa powder. I wanted the cookie to appear like the angels against the night sky as they brought the good news of Jesus' birth to the shepherds. As the cookies are smaller (about 4-4.5cm), baking time should be around 10-12 min at 170-180C. Cookie and royal icing recipe is in the link for my default brown sugar cookie recipe. 


Here are the templates for baby Jesus and the angels.


Resize the templates to fit on A4 paper before printing. Please acknowledge me if you use the templates and share your work 😊. The icing transfers can be used on cookies that are 4-4.5cm in diameter. Feel free to change the hairstyles if you wish like what I did for some of the angels. I crafted the design with simplicity in mind for those of us who need to produce hundreds of cookies but have limited time. So if you have the bandwidth, feel free to embellish your icing transfers with more details like halo, rosy cheeks etc.

You may refer to my reel or YouTube video for the piping steps (will update the post soon with the video links). 

Here's the angel royal icing transfers I made in advance! I will be baking the cookies and sticking the transfers on nearer the date. This method of making the design really makes the work more manageable when you have to make so many!


Here are some tips and pointers you may find helpful.

How long can I store royal icing transfers?

They can be stored in airtight conditions at room temperature for a few months with no issues if they are thoroughly dried and sealed. This means that you can already prepare the icing transfers right now in early- mid November if you intend to give out the cookies at Christmas time. You may stick the transfers to the cookies a week or even two weeks before the giveaway.

What surface can I pipe the icing transfers on?

You may use parchment paper, teflon sheets, silicone mats or even acetate sheets. Refrain from using warm oven to dry the icing transfers if you are using acetate sheets.

Royal icing transfer tips and Instructions

- Store unused icing in the fridge covered in airtight container and with cling wrap touching surface of icing. You may prepare the royal icing in advance and it can be stored in the fridge for a month.

- Stir icing thoroughly before transferring into piping bag or OPP (oriented polypropylene) cone for use. Do not overfill OPP cone if using.

- Make sure consistency of icing for baby Jesus/angel is at flooding consistency I.e. when you try to draw streaks of icing in the mixing bowl, it should disappear within 10 -15 seconds. If it does not, add a few drops of drinking-safe water at a time and stir thoroughly before testing the consistency again.

- Make sure consistency of icing for the hay is stiff. i.e. when you try to make any peaks of icing in the container, it should stand up straight without curling over.

- Cut a hole about 2mm in size in piping bag for piping baby Jesus' swaddle, angel's body, the face and hair. Cut a 1mm hole in OPP cone for the nose, angel wings and eyes (if piping dots for eyes instead of stamping with toothpick). 

- Use a skewer to nudge the icing where necessary. 

- Use a damp paper towel to quickly erase any mistakes before the icing sets. 

- Make sure icing for face is hardened on the surface before you pipe/ stamp out the nose and eyes. Use the blunt end of a toothpick to stamp out the eyes for a quick way to ensure that the eyes are consistently round and the same size. Use fan or oven with fan mode at 60-70C to speed up drying process.

- Make sure icing transfer is thoroughly dried before attempting to remove it from the parchment paper. Icing may appear dry on the surface but inside could still be soft and wet so it may be safer to err on the side of drying for a longer time. Overnight drying in the open is definitely safe.

- Store icing transfer in airtight condition before use.

- After baked cookie has cooled down completely, you may pipe the hay using the stiff icing in piping bag fitted with a #233 tip with adapter for attaching baby Jesus icing transfer. Pipe a swirl starting from the circumference and ending in the middle of the cookie. Gently but firmly press the icing transfer onto the hay.  Pipe a small dollop of icing to stick the angel onto the cookie. (See video tutorial)

- Please switch piping tips once the holes of #233 tip starts becoming clogged. Quickly wash and dry thoroughly before using again. Using a tip adapter helps you to make the switch more seamlessly because stiff royal icing hardens much faster than flooding consistency icing.  

- Dry in the open overnight before storing/packing. Alternatively, you may dry in oven at 60-70C for 15 minutes + 30 minutes in the open or until icing is dry. Cool completely before packing.  It is not recommended to dry the icing with the cookie for too long in the oven as it may cause oil from cookie to seep into the icing.

Troubleshooting

1. Help! My piped icing is bumpy and not smooth!

Icing consistency may be too thick so you may need to thin it out a little. Be careful not to over-thin it or you may experience issue number 2 below. Try to work in a more humid area that has no draft to prevent the icing from setting too fast on the surface. Resist the urge to prod the piped icing too much with a skewer once you have piped it as the longer it stays piped, chances are a thin crust has already formed and disturbing the icing will cause the surface to appear bumpy.

2. My piped icing surface is smooth but after sitting out for a while, the middle starts to sink in and form a crater/crack.

There are 3 possibilities:

a) Your icing consistency is too runny

b) You didn’t stir the stored icing sufficiently before transferring into piping bag 

c) You left the piped icing sitting out for too long and the meringue structure of the royal icing breaks down before a crust starts forming on the surface 

For issue with c), try splitting the templates into smaller quantities to work with e.g. pipe only 4 or 8 at a time before sending into 60-70C oven to quickly dry the surface. This is what I practice at home to prevent the cratering effect. I set up 2 or more trays and keep rotating them between oven and work surface, piping only a few to several transfers at a time. Oven drying for about 2-4 minutes helps the crust to quickly form, preventing the cratering effect.

3. Help! I broke the icing transfer! Is there anyway to rescue it?

That depends on how bad the damage is. I would usually discard because trying to fix it and still make it look nice is difficult. Prepare to make extras because icing transfers are generally fragile and time consuming to make. Accidents usually happen while removing transfers from parchment paper and while transferring it from place to place. The risk of breakage only stops happening once it is stuck on the cookie where it belongs! If a clean crack happens across the swaddle, you may use white icing to pipe across it so it appears like part of the design on the swaddle. If the crack happens across the face, sorry you may have to discard the transfer.

4. Help! I accidentally thin out my royal icing with too much water!

Add icing sugar a little at a time until royal icing reaches the correct consistency.


I am not a cookie decorating expert but I have made iced cookies since about 9 years ago. Hopefully what I shared is helpful for you if you intend to make large batches of Christmas cookies!


with lots of love,

Phay Shing

Read More »

Wednesday, 1 November 2023

Chiffon Cake Longevity Peaches (no artificial colouring added) on Pandan Kaya Cake

 I have been making longevity peach chiffon cakes for the past 9 years and this is the first time I decided to make it as naturally coloured as possible for my grandmother's 88th birthday. You may click on this link to see my past bakes that are longevity peach themed and made in various flavours like lychee rose and yuzu. Grandma likes to celebrate her birthday according to the lunar calender so the actual date we celebrate is not fixed each year. Because of this, I had to make the cake for her at a rather busy period so I kept things simple but yummy.

Here's this year's longevity peach cake for grandma!

The peaches sit on top of my signature pandan kaya cake!

Here's a better look at the peaches!


The peaches are almost naturally coloured, not 100% naturally coloured, because the bottled pandan paste I used for the leaves already has artificial green colouring added. In the past I had to use white colouring to make the peaches appear whiter instead of yellow, and used pink gel colouring to add on the pink. This time round I used a chiffon cake recipe adapted from Mimi that doesn't use any egg yolks to omit the use of artificial white colouring, and I used diluted fresh dragonfruit puree to colour the peaches pink naturally. The peaches were made a week in advance and frozen due to my busy schedule, but they still appeared and tasted as good as new!

You may refer to this post for my reduced sugar pandan kaya cake that is still tasty and refreshing at the same time. I increased the amount of sugar/gula melaka by about 20% for both the chiffon sponge and pudding to suit the tastebuds of my grandma and the whole clan of the extended family since this request was not a "siew-siew-siew-siew dai" (less-less-less-less sweet in colloquial Singapore) order 😆, but is still less sweet than commercially sold cakes in general. My cousin commented that it tastes better than Bengawan Solo's signature pandan kaya cake!

Chiffon cake longevity peaches (makes about 12-15 mini peaches):

Egg yolk batter
35g cake flour
Pinches of salt
10g caster sugar
15g vegetable oil (I used canola)
40g milk
1/4 tsp vanilla extract
1/8 tsp cocoa powder
1/4 tsp pandan paste

Meringue*
2 large egg whites (about 38-40g each egg white)
30g caster sugar
1/4 tsp cream of tartar

Decoration
Pink dragonfruit puree, sieved & diluted with water 
Water or simple syrup** 
Cake glue or melted marshmallow

* I split ingredients in half as the leaves & peach body have different baking time & temperature profiles

** Make simple syrup by dissolving sugar in hot water in 1:2 ratio. Using syrup instead of water helps to keep the sponge moist longer during storage

Steps:
1. Line a baking tray (or 2) with teflon sheet or parchment paper. Size of tray doesn't matter as we just need to spread the batter as thin a layer as possible for the leaves. Lightly grease heart shaped silicone molds with a little oil. You may use egg shells if you don't have the heart molds, and carve out the shape after baking. Wash and air dry eggshells thoroughly if using them. Preheat oven to 125C with fan on.

2. Make egg yolk batter. I know the name seems somewhat inappropriate because there is no egg yolk used but this is the same portion that is in all chiffon cake recipes where the yolk normally goes. In a mixing bowl, use an electric mixer to mix oil, milk, vanilla, salt and sugar together. Sift in flour and whisk until well combined. Divide into 2 equal portions. Add sifted cocoa powder and pandan paste to one portion, cover with cling wrap and set it aside. Cocoa powder is added to deepen the green colour and make it appear less neon bright.

3. Make one portion of meringue with one egg white portion of ingredients. In a clean metal bowl, beat egg white with cream of tartar until firm peaks, gradually adding sugar once the egg whites are foamy. Take your time to build up a stable, tight and glossy meringue at medium speed. Going high speed all the way creates large air bubbles and the meringue is not as stable.

4. Quickly but gently fold the meringue into the white egg yolk batter in 3 additions. Transfer into piping bag. Fill the mold until full.

5. Bake for 25-35 min. Increase temperature to 150-160C and bake for another 5 min. Cool completely before unmolding. Note that the baking profile is just a guideline and is dependent on mold size and oven so adjust accordingly.

6. Preheat oven to 170C with the fan on. 

7. Prepare another batch of meringue. Fold meringue into green egg yolk batter. Pour into lined baking tray and spread as thin a layer as possible.

8. Bake for 30 seconds. Turn off the oven fan and continue baking for 8-9 min or until done. Keep an eye on it as it can go from done to brown within a minute or less. Immediately flip onto fresh parchment paper and cool completely before cutting out the leaves with cookie cutter. You may use scissors/knife and a homemade template if you don't have an appropriate cutter.

9. Use scissors to trim off browned parts of the peach body. You may also use scissors or a small fruit knife to carve the shape if you used egg shells to bake.  Use the back of the knife to make an imprint in the middle of the peach.

10. Brush the tip of the peach with diluted dragonfruit puree. I didn't measure the dilution ratio as the exact measurement is not important. I go by the colour I get visually. You can always apply another coat if the colour is too faint, or add a little more puree to your paint. Don't use undiluted puree as the colour is too dark. Use some water to blend the pink colour towards the white parts of the peach. In the past I used a toothbrush spray to create the ombre pink effect but this method is much cleaner!

11. Glue the leaves onto the peach body using cake glue or melted marshmallow. Store in airtight condition in the fridge or freezer until ready to consume.

Here's the reel of the process of making the peaches!

https://www.instagram.com/reel/CzJF8h9y0VV/?igshid=MzRlODBiNWFlZA==

I had leftover pandan sponge and pudding so I assembled a few pandan kaya cupcakes. 

Looking cute!


I think I am going to stick with this method of making chiffon cake longevity peaches from now on with the exception of substituting the milk with some other liquids for flavour variation. I hope this post is helpful for those of you who want to create healthier versions of longevity peaches for your loved ones that minimizes artificial food colouring. You may use matcha powder for the leaves to make it fully naturally coloured but I wanted the peaches to match the flavour profile of the cake below. Maybe I shall try that next time! 


Update: I did an Instagram poll and majority are in favour of a longer, more detailed video tutorial so I made a youtube video version of it and you may see it here:

https://youtu.be/-qU4WdBn6DQ?si=6iTMFX7E4kkrj-wv


with lots of love,

Phay Shing

Read More »

Tuesday, 24 October 2023

Green Hatchling's Play Date (A whimsical marshmallow creation)

 My younger kid is an early teen now, doing various things that teenagers do. But he is still very attached to his special green Angry Bird hatchling plushie. Actually the whole family treats that furry green creature as part of the family too because it has so much character after a few years 😆. So for my kid's birthday bake, I decided to include the bird again for the third consecutive year but along with other friends for a fun day out!


Here's a picture of the plushiemallows along with the real plushies!


Actually there are 3 duck plushies but I only took a photo of them with the whole creation toasted on a giant brown sugar cookie with crunchy Biscoff spread.

Looks terrible but marshmallows toasted are another level yummy compared to untoasted ones!

I would have used chocolate instead of Biscoff spread for a classic S'mores but the birthday boy is not a fan of chocolate.

If the shark plushiemallow looks like a slipper to you, that's because I used the cute shark slippers that people wear as my inspiration. I made the shark plush (Blahaj from Ikea) in the slipper form.

How do I get such ideas you may ask? I usually give myself time to muse over concepts and ideas by daydreaming now and then. This idea had me giggling so it's an "Aha! This is it!" moment. See the stop motion video of what I imagined and you know what I mean 😉.

https://www.instagram.com/reel/CyvXtaSyEAt/?igshid=MzRlODBiNWFlZA==

Here's the process of making it with most frames sped up by 10x as I needed to fit everything into 1 min or less 😅.

https://www.instagram.com/reel/Cy0jUOoSNVI/?igshid=MzRlODBiNWFlZA==

For those of you who prefer to slow down and view some still shots, here are some pictures of the in between process...


I didn't take any video footage of piping the eyes because I didn't want to have the camera in the way of something so delicate.


I made a spare flap for the Blahaj slipper just in case I accidentally uglify one.

If you want to know what recipe I use, how I created the furry texture on the hatchling or how to create marshmallow plushies (plushiemallows) of your own imagination, grab a copy of my newly launched book Deco Marshmallows!


with lots of love,

Phay Shing

Read More »

Monday, 23 October 2023

Sanrio Strawberry Shortcake Bites


Strawberry Shortcake 🍰🍓 transformed into blanket cuddles with sweet Sanrio friends✨💖! Assembly video here


Have a great week! 

Love, 

Susanne 
Read More »

Saturday, 14 October 2023

Monkeys with Apple Tree Macaron Ferris Wheel

I have an interesting request and challenge for a monkey themed macaron ferris wheel bake. This was what I made!


It's my first attempt at changing the ferris wheel design while retaining the working mechanism. I also made use a stiffer macaron batter to create textures for the tree foliage and trunk. I used my default Swiss Meringue method recipe but in two ways for this bake. I used all the egg whites for the Swiss meringue for the ferris wheel frame, small parts and base to create sturdier shells as well as create the textures by underfolding the batter. I used part of the egg whites to mix with sifted dry ingredients to form an almond paste, and used the rest for the Swiss meringue to make the bananas and monkeys as I wanted the macaron shells to have a smoother finishing.


I used royal icing and edible marker for the details. Have a look at the decorated macaron shells! I made them concurrently with the Charizard carousel bake!

I always make extras in case of accidental uglification or butter fingers


Mango flavour was requested. As this creation consist of some load-bearing parts and parts that do not need to bear load, I filled them differently. I used a firm and fairly low water content mango white chocolate buttercream as the base, but include homemade mango jam for pieces that can afford to be softer.


Mango jam
Ingredients:
250g mango flesh, cubed
25g sugar (or to taste)
pinches of salt
1-2 tsp lemon juice

Steps:
1. Place all ingredients in saucepan and cook until 50% of original weight. For a drier jam if you want to reduce water content further, which I did for jam in the ferris wheel base and wheel itself, I reduced it further to 30% of original weight but left the portion for monkeys and bananas at 50% of original weight. You may puree the mango but it's optional. Cool completely before using. You may prepare in advance and store in the fridge or freezer.

Mango white chocolate buttercream
Ingredients:
300g White chocolate, finely chopped or use chips
60g unsalted butter or vegetable shortening
1/8 tsp salt
45g Freeze dried mango powder (you may add more but I didn't want to soften the structure too much)
1/2 tsp vanilla extract

Steps:
1. Place everything in microwave-safe bowl and melt the chocolate. Mix well.  You may use double boiling method too if you wish.

2. Place bowl in a cold water bath and use electric mixer to beat until light and fluffy. Remove from cold water bath once the buttercream starts to firm up, continue beating until desired fluffiness. You may also choose to let the mixture firm up slowly at room temperature for half an hour before transferring into piping bag.


Here's the reel of the assembly and the ferris wheel in spinning action! 

https://www.instagram.com/reel/Cyam2-syoAz/?igshid=MzRlODBiNWFlZA==

If you would like to learn how to create macaron ferris wheels that is as sturdy as what I made and spins as smoothly, do join me for my Penguin family Christmas Carnival masterclass. I have both online and studio versions. Studio participants get to have access to online class material free of charge! Online class is ready for viewing anytime and there's no expiry date.


with love,

Phay Shing

Read More »

Sunday, 8 October 2023

Charizard Macaron Carousel

 This is the third consecutive year I am baking for a little man's birthday so you may find a common theme here 😉


The knight is slaying Charizard this year and it's a mini macaron carousel! The Pokeball on top of the carousel is an iced cookie with chocolate coated marzipan ball inside

I used my default Swiss meringue method recipe for the macaron shells and used royal icing and edible markers for the details. I used royal icing transfers for the Pokeball that the knights are holding to make it easier. 

Just to share some photos of the process...

Piped batter for knight with royal icing transfer Pokeballs

Charizard piped batter

Filling the knights with dark chocolate ganache and white chocolate buttercream with a dark chocolate chip added to turn it very slightly brown

Filling Charizards the same way

I added crunchy chocolate balls for the large carousel pieces

Assembled carousel frame. I think it looks breathtakingly beautiful in this earthy neutral colour😍

The fillings I used are adapted from my default recipes to make it either dairy-free or with minimal dairy. I made them firm enough to stay firm at 30C, which is a pretty common temperature for room temperature in Singapore.

Dark chocolate ganache
Ingredients:
90g bitter dark chocolate, finely chopped or chips
25g water
3g light corn syrup
9g unsalted butter, softened
Pinches of salt
1/2 tsp vanilla extract

Steps:
1. Place all ingredients except butter in microwave-safe bowl. Use medium power and 20 second bursts to melt the chocolate. Stir after each heating cycle. You may also use double boiling method to melt the chocolate.

2. Add butter and mix well. Let the ganache sit at room temperature to firm up for half an hour before transferring into piping bag.

White chocolate buttercream
Ingredients:
100g white chocolate, finely chopped or chips 
20g vegetable shortening (or butter if your ambient temperature is cooler)
1 dark chocolate chip (optional, I added for a slight brownish tinge)
1/2 tsp vanilla extract
Pinches of salt

Steps:
1. Place everything in microwave-safe bowl and melt the chocolate. Mix well.  You may use double boiling method too if you wish.

2. Place bowl in a cold water bath and use electric mixer to beat until light and fluffy. Remove from cold water bath once the buttercream starts to firm up, continue beating until desired fluffiness. You may also choose to let the mixture firm up slowly at room temperature for half an hour before transferring into piping bag.


Here's a reel for the assembly process. I took the liberty of using two-toned icing for Charizard's flame.

https://www.instagram.com/reel/CyLaa8-ynqE/?igshid=MWZjMTM2ODFkZg==

If you would like to learn how to create macaron carousels like this one, join me for my studio or online masterclass for the reindeer macaron carousel, one of my classic pieces. The online class version is available internationally, ready for viewing any time and there is no expiry date. You may ask me any technical questions that you have and learn from other participants who have joined the class over the years 


with love,

Phay Shing

Read More »

Thursday, 5 October 2023

Hello Kitty Pumpkin Chiffon Roll Cake


Hello Kitty on a pumpkin, the purr-fect autumn roll! 🍁🎃

Watch the video tutorial here

This bake was inspired by the @sanrio 's adorable Hello Kitty autumn baking sets! 
Too cute to eat? 🥰 


I will be embarking on an exciting new project on this type of cakes too! Working on many more. Can't wait to share more in future! =) 

With lots of love,

Susanne


Read More »

Saturday, 30 September 2023

Pokeball 3D Cookies with a Hidden Surprise

 Over the years many people have made edible Pokeballs out of chocolate and hid surprises inside. I have to confess I dislike working with chocolate for structures or construction because my home kitchen is on an average 29-30C, RH 65-80% all year round, with some days out of the range in either direction. This makes it almost impossible to temper chocolate and handle it for assembly. I only do dry work in the aircon room like drying piped macaron batter or packaging marshmallows.

I made the Pokeballs out of cookies instead!

The surprise inside is chocolate coated marzipan balls from Marks and Spencer


Putting marzipan balls in the cookie cavity

Because I didn't take the chocolate route, this was more time consuming to create as I needed to bake the cookies and coat them with royal icing. Thankfully, Julia Usher shared multiple detailed videos on how to create spherical/hemispherical iced cookie structures so I had a very good guide on how to make them. Do checkout her YouTube channel for the videos!

I used Julia's cookie recipe but omitted the spices and replaced it with a little cocoa powder. I only had the dark molasses on hand at home so the cookies appear darker. You can also use honey instead. As I only needed a small amount of dough, I reduced the portion by a few times. I used my default royal icing recipe with a little light corn syrup added to soften to texture a little.

Another thing I learnt in this project is making and using fondant from scratch. I thought long and hard about how to create the details of the Pokeball and came to the conclusion that fondant is still the best. Although I used homemade marzipan or modelling chocolate for details that are fondant-like in the past, I wanted something that is easier to handle (than modelling chocolate) in my hot and humid environment, and appear less grainy (than marzipan as almond flour grains may show a little in marzipan). I will still consider modelling chocolate and marzipan for future projects if they are appropriate because they taste good, just not for this project.

I chanced upon recipes by Veena Azmanov for homemade fondant which doesn't taste as bad as I thought! I have to stress that it has to be made from scratch and not from store bought marshmallows, for homemade fondant to taste good. I have avoided working with fondant because they don't taste good. Well I am proven wrong with homemade ones, especially when black cocoa powder is used for black😋! I used this recipe for white fondant and this recipe for black fondant. I made really small batches since I only needed a little fondant and won't be using it in the foreseeable future. 

Here's a reel for the process of making these cookies! Pardon the lack of coverage during most of the fondant parts as I didn't want to have to focus on the camera while working with the sticky mess that took me some time to get the hang of it 😆. It turned out I needed to knead in a lot more icing sugar/ cornstarch mix for it to be workable because of my hot and humid working conditions.

https://www.instagram.com/reel/Cx0K3Sty8gF/?igshid=MWZjMTM2ODFkZg==

I managed to make a dozen of them!


It was a good learning experience throughout the whole process and my chocoholic elder kid happily ate all the cut Pokeballs (I cut a few of them for taking videos and taste testing) . One of them is going on top of a macaron carousel. Stay tuned for it!


with love,

Phay Shing


Read More »

Wednesday, 20 September 2023

BT21 Cherry Blossom Scene (a marshmallow & cookie creation)

 My friend requested a creation from me to surprise his girlfriend who is a BT21 fan. A picture of the whole squad in a cherry blossom field was sent to me along with the request. He was kind enough to give me an open date and let my imagination go wild. Presenting my version of the scene made out of marshmallows and cookies!


This was before I scattered the cherry blossom "petals".


And this is the reference picture!


I refused to use a huge cakeboard or make the characters really tiny so it isn't an exact replica but I tried my best to capture the essence of the scene.

I made the tree trunks and base out of cookies using my favourite brown sugar cookie recipe but I replaced brown sugar with regular sugar. The characters and foliage are made out of marshmallows. The sakura petals are made out of wafer paper coloured pink with lustre dust. I used royal icing and store bought sugar flowers for the other details.

Here are some pictures of the trees and characters before assembly!


The characters have not been dusted yet in these pictures. I make duplicates of each character in case of accidental uglification 

I used templates for my marshmallows and it helps a lot because I can't do freehand piping of characters very well. I will show you the technique in detail in my upcoming Deco Marshmallows book.

Here's a reel for what went on behind the scenes:

https://www.instagram.com/reel/CxaersoykFw/?igshid=MWZjMTM2ODFkZg==


Thank God the surprise was very well received!


with love,

Phay Shing

Read More »

Tuesday, 19 September 2023

Bear Red Velvet Tiramisu Cups


Tiny cups of bear-y deliciousness: coffee-infused red velvet hearts, cuddled between layers of mascarpone cream and cocoa magic! 💕🥰 
Assembly video here
More detailed recipe can be found in my previous post

With lots of love, 
Susanne 

Read More »