Monday 29 January 2018

'Many Faces of Pusheen' Berry Jam with Dark Chocolate Macarons

This is a follow-up post after last week's post on foodie Pusheen macarons...Pusheen with all sorts of poses and expressions!

Sleepy, smiley, munching, winking, acting cool and holding onto food!

I made these a week after the foodie Pusheens because my friend loved them so much she wanted more! I had capacity to squeeze in a small quantity of macarons so I made these.

I used the reduced sugar recipe for the macaron shells here. Both regular and reduced sugar recipes can be found here. You may refer to my Creative Baking: Macarons book for a systematic presentation of the basics and complex shaped macarons. You may refer to my video tutorials for macaron basics and piping of complex shapes on the blog too.

The Pusheen shape is not too challenging to pipe and you may follow the basics in my Creative Baking: Macarons book for piping fancy shapes and pop-up features on macaron shells.


Piped shells

I made this batch of Pusheens together with the playground macaron pieces and some dinosaurs (posting in the future).


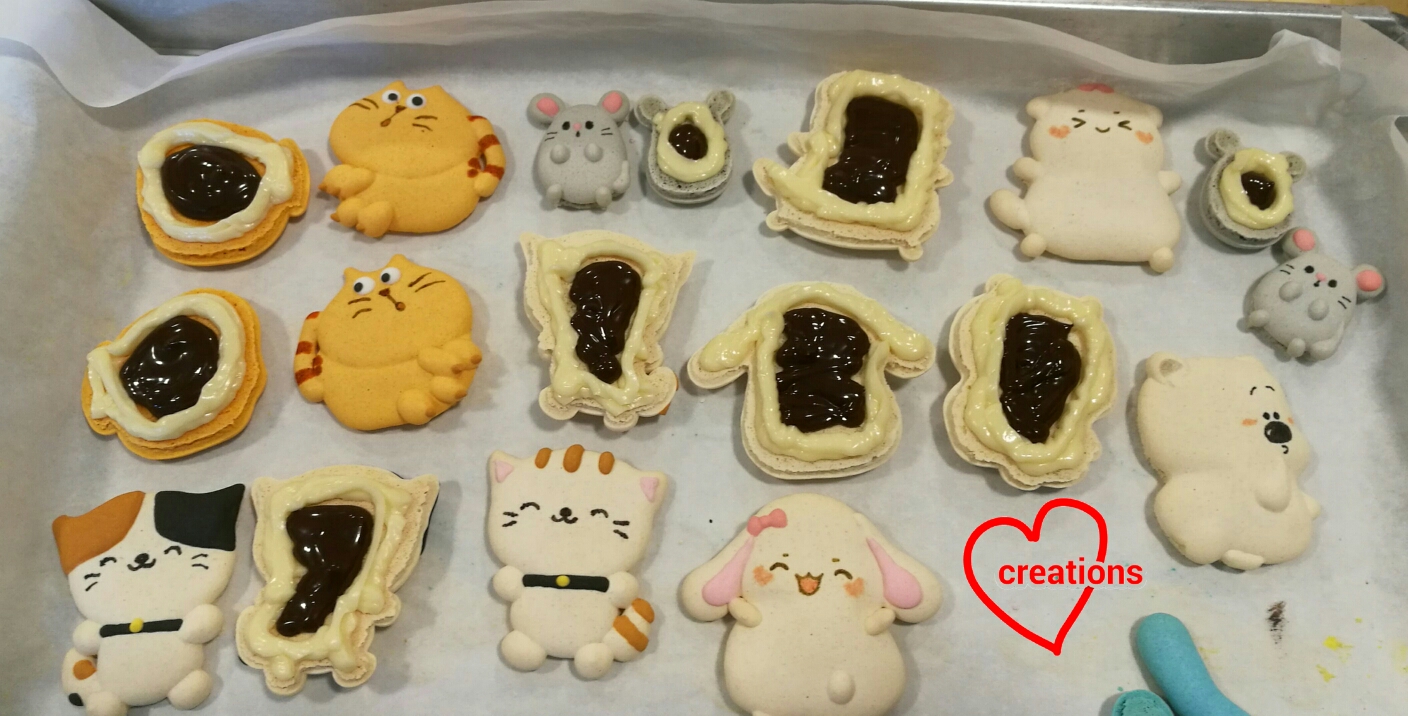
Checkout the awesome feet on these shells!


Filled with blueberry, raspberry or strawberry jam and dark chocolate ganache! You may find the recipe for the berry jams and the link for dark chocolate ganache in this post.


With love,
Phay Shing

Read More »

Sunday 28 January 2018

Doggy Chocolate Taiwanese Castella Cake and Cupcakes (Agogo 阿狗狗旺旺过好年)


Can you recognize who is this Doggy? =)

Yes this Doggy is inspired by the cute Agogo 阿狗狗旺旺过好年 that is designed by Mediacorp this year to usher in the Year of the Dog. This is inspired by the cute Agogo plush toy I saw at Popular. There's also a pink female version of it that is super cute!

I actually tried out this Chocolate Taiwanese Castella Cake as an item for my church's Culinary Arts Ministry (CAM). I have been teaching chiffon for the past 2 sessions so thought it's time I look for something new. My SIL from Taiwan also came back and mentioned that the Castella here is not as soft as those she tried from Taiwan. The Castella cake recipe and method is actually really similar to the cooked dough method for chiffon. But the great thing is that Castella cakes do not need to be fully cooled before eating! Instant gratification lol. Most Castella recipes use a lower liquid to flour ratio than chiffon, so it is not as moist. But similar to my optimized chiffon recipes, they use a much lower amount of flour, which gives a wobbly lightness to the texture (like my chiffon cakes hehe). The cooking of the flour in hot oil, a key feature, also prevents the formation of gluten and silky smooth batter, so crumbs are fine and smooth. I also find using Top flour gives even finer crumb. In this final version of the recipe after a few trials, I have increased the liquid for more moisture and reduced the sugar slightly, adapted from Josephine's recipes, to have both lightness and not too dry and just nice sweetness to the cake. Thanks to Josephine for sharing her wonderful experience and recipe.

These are the small cakes which I will be teaching. I use cupcake liners for them as they are more easily available and can be scaled up easily. I used cheese slices for the deco.


Doggy Chocolate Castella Cake and Cupcakes


3 egg yolks
35g warm oil or melted butter
36g whole milk
54g Top flour, or Cake flour (Prima)
A pinch of salt
2g vanilla extract
chocolate emulco/paste
3 slices cheddar cheese (optional)

3 egg whites
¼ tsp cream of tartar
60g castor sugar

1. Preheat oven to 160°C with a tray of water under the lowest rack (steam baking).

2. Heat the oil or butter in a microwave (30 sec for mine). Add a pinch of salt and milk, then whisk in sifted Top flour or cake flour. *I checked the temperature was less than 60°C as you don't want to end up cooking your egg yolks.

3. Add in the egg yolks and mix to silky smooth batter (do not overmix). Add in vanilla extract and stir well.

4. Divide the batter into 2/3 and 1/3. Leave the 1/3 plain, and to the rest of the batter, add a dip (around 1/4 tsp) of chocolate emulco.

5. In a separate bowl, using an electric mixer, whisk egg whites with cream of tartar till foamy. Add in the sugar gradually and whisk till firm peaks are formed.

6. Divide the meringue 2/3 and 1/3.

7. Fold in the meringue into respective egg yolk batter in 2-3 additions.

8. Spoon cake batter into 1 bowl (for head) and 1 bowl (for body). You can intersperse brown with white batter for dog patches. Spoon the rest of the batter into cupcake liners for small cakes, and sheet cake for cutting out deco later. 

*You can also spoon all into cupcake liners for making the small cakes only.

9. Lower the temperature to 140°C after the first 15 min. Bake the sheet cake for 15 min, cupcake liners for 20 min, and the bowl cakes for 35 min (or until skewer inserted into the centre of the cakes come out clean). *Note that individual oven vary, do check for doneness yourself using skewer.

10. Give the cakes a knock once out of the oven and unmould when they are cool.

*For another variation, I added in cheddar cheese slices into the doggie cupcakes.

*If you are doing a single tone chocolate flavour, you can substitute 54g Top/cake flour with 14g cocoa powder and 30g Top/cake flour.

*In terms of creative chiffon, I find it harder to control the batter as it is runny.

The different features eg ears, limbs were cut out from chiffon sheet cake and small cakes, and assembled onto using melted marshmallow cream. You can also use cheese slices like what I used for the small doggies cupcakes. I piped on their eyes using nutella.

May you have an Agogo 阿狗狗旺旺过好年!

With lots of love,
Susanne


Chinese edition of Deco Chiffon Cake Basics hitting bookstores (Kinokuniya, Naiise, in late Jan)! Also available at Goguru now! It's having a special promo at Goguru.


Read More »

Friday 26 January 2018

Foodie Pusheen Berry Jam and Dark Chocolate Macarons

My friend requested for some Pusheen macarons. Not just any Pusheen, but foodie Pusheen!

And a Pusheen that is trying to act cool

I decorated all the bottom shells as well since it was requested. These Pusheens were mande concurrently with the Chinese New Year doggie macarons and hedgehog macarons. And so I have to mention the fact about poor photography due to bad weather and lighting conditions 😅. The colours just seem to appear a bit off in the pictures for all of them but this is the best I can do.

I used the reduced sugar recipe for the macaron shells here. Both regular and reduced sugar recipes can be found here. You may refer to my Creative Baking: Macarons book for a systematic presentation of the basics and complex shaped macarons. You may refer to my video tutorials for macaron basics and piping of complex shapes on the blog too.

Just to share some photos of the process...

Piping the shells

Baked shells with details added in using edible marker

I made the food items using royal icing along with the berries for the hedgehog macarons 

I glued the food on with more royal icing and added the legs. It's a little tricky to get the icing to be the same shade as the macaron shell 

Checkout the awesome feet!


Filling the shells with various berry jams (blueberry, raspberry and strawberry) and dark chocolate ganache. You may refer to this post for the jam recipe and reference for dark chocolate ganache.

These were so well received that my friend wanted more! I made her another set of Pusheens the following week with different designs. You may take a look over here :)

With love,
Phay Shing

Read More »

Monday 22 January 2018

Orange Chocolate Macaron Playground

I had an idea for a playground with moveable macaron pieces some time last year but didn't get the chance to make until now. My friends have been very kind to be my guinea pigs for this creation and they did so gladly!

Front view of the playground with a slide, Merry-go-round and seesaw

Back view of the playground. I have to show this or the ladder of the slide won't be showcased at all.

Here's a short video of the Merry-go-round and seesaw in action!

As with all unique new creations, I won't be releasing the details of how to make the parts and put them together yet. The seesaw structure is a slight variation from my macaron ferris wheel so it was easy to adapt. The Merry-go-round mechanics needed more planning as it is my first time making something heavy that is able to rotate about its vertical axis.

I used the reduced sugar recipe for the macaron shells here. Both regular and reduced sugar recipes can be found here. You may refer to my Creative Baking: Macarons book for a systematic presentation of the basics and complex shaped macarons. You may refer to my video tutorials for macaron basics and piping of complex shapes on the blog too.

Just to share some pictures of the process...

Piping the cute characters

I filled the shells with a ring of orange white chocolate and orange dark chocolate in the middle.

Recipe for orange chocolate filling
Ingredients:
80-90g white or dark chocolate (buttons or finely chopped from a bar)
20g vegetable shortening
1/8 tsp fine sea salt
1/2-3/4 tsp orange oil (or 1 tbs orange zest)

Steps:
1. Put all ingredients in a microwave safe bowl and melt using medium power for 20sec. Stir and repeat as necessary until smooth and melted completely. Alternatively you may use a double boiler to melt all the ingredients together.

2. Let the mixture cool until it reaches toothpaste consistency. Transfer to piping bag and pipe onto the shells.

Filling the character shells.

Filling the side frames of the slide 

My friends and those at their gathering enjoyed playing with the playground before they made the painful decision to eat it 😅. Not only does the playground look good, it tasted good too! Here's my friend's feedback:

"the macarons taste really good too! couldn't stop eating and the kids had a very tough time to choose which one to eat 😏"

I had much fun creating this! If anyone of you would like to challenge me with new macaron structures, let me know. If it piques my interest, I will be more willing to make time to explore how to make it a reality 😉.  There are so many different designs and projects I have come up with that I have decided to create a separate "Macaron structures" label in the blog to accommodate them! I began with static structures like carousels and table with two chairs and bears sitting on them, to structures with moveable parts like Ferris Wheel, tricycle and now, Merry-go-round and seesaw! I have another exciting new macaron structure with moveable parts coming up in March so stay tuned! Gone are the days when "macaron structure" = macaron tower. Let your imagination run wild and there's so much more you can do!

With love,
Phay Shing


Read More »

Sunday 21 January 2018

We Bare Bears Chiffon Cake


Ahh don't they look comfy and happy stacked together? Hehe =).

This chiffon cake is based on the cute We Bare Bears, an American animated sitcom that follows three bear siblings, Grizzly, Panda and Ice Bear. One unique characteristic is that form a "bear stack” which serve as their support for each other (pun intended!) and unique way of transportation =). It was really challenging stacking the soft chiffon cakes, especially to balance the soft cakes and their body parts but also stagger the bears. Thank God the cake worked out and it was very well-received! Phew..

The chiffon cakes may look a little familiar as I have shared the recipes before.

The recipe for “Cloud” Chiffon Cake with step-by-step pictures can be found in my newest book Deco Chiffon Cake Basics. The Chinese edition (with this cake) will also be out in bookstores late January. You can also try another version of this cake, recipe shared here.


The Bears design is based on the “Mummy and Baby Panda” Chiffon Cake recipes in my 2nd book Deco Chiffon Cakes. I used an oval bowl to bake the cakes. The flavour is Cream cheese with Charcoal. In the book's version, it was much easier to stack the cakes as the baby panda was much smaller than the mummy panda =p.


Hope the We bare bears made you smile =).

Have a blessed week ahead!

With lots of love,
Susanne
IG: @susanne.decochiffon


Chinese edition of Deco Chiffon Cake Basics hitting bookstores (Kinokuniya, Naiise, Popular in late Jan)! Also available at Goguru now! It's having a special promo at Goguru.


Read More »

Wednesday 17 January 2018

2D and 3D Hedgehog Berry Jam and Dark Chocolate Macarons

I have a request for hedgehog macarons filled with dark chocolate ganache and various berry jams!

I had to use a filter from Instagram to create a photo that has colour closer to the actual macarons.

Both 2D and 3D versions! This was the original photo taken, which had a yellow hue

Pardon the poor photography as it has been really rainy and gloomy lately so I couldn't make use of natural sunlight to take pictures.

The 2D version of the hedgehog is modelled after a little boy's favourite stuffed toy. Mummy wanted some 3D hedgehogs as well so I included them as well. I first made 3D hedgehog macarons last year. Since I have bought another silicone mat with smaller hemispheres, I made little hedgehogs too! The inspiration to make each critter wear or hold a berry came about because I thought there should be a way to identify what type of jam filling is in each macaron since the jam is not visible from the outside.

This is the third time I am making 3D hedgehog macarons so I am ready to disclose a bit more detail on how it's done for those of you who are interested to try.

I used the reduced sugar recipe for the macaron shells here. Both regular and reduced sugar recipes can be found here. You may refer to my Creative Baking: Macarons book for a systematic presentation of the basics and complex shaped macarons. You may refer to my video tutorials for macaron basics and piping of complex shapes on the blog too.

Just to share some pictures...

Piping the 2D hedgehog

Piping the base shells for the 3D hedgehog

Piped 3D shells!

These are the smaller hedgehogs!

Baking time for hemispherical shells are much longer than regular macaron shells due to the shape and the fact that the hump of the silicone is not in direct contact with the metal baking tray. The shells must be totally dried out as well or it will be impossible to unmould without shattering the shells. Reduce temperature to around 110℃ after 15 min of baking and continue to bake for another 30 min to an hour or more as necessary. Thoroughly baked shells should be fairly easy to remove from the moulds. Don't worry about overbaking it. Simply let the shells mature for a longer time with filling, or brush the inner surface with milk or syrup before filling it.

Freshly baked shells!

I made some royal icing raspberries, blueberries and strawberries as identifiers for the type of jam filling in the macarons.

I made them concurrently with food items for some Pusheen macarons which I will post in the near future. I cheated a little for the strawberries by using red heart shaped sprinkles as the base. I just added the seeds and leaves. I put my thumb there to show just how tiny these things are!


The shells were decorated with black royal icing and edible marker. The berries were glued on with royal icing too.

I filled the macarons with an outer layer of dark chocolate ganache and berry jam filling in the middle. I made raspberry, strawberry and blueberry jams from scratch. You may refer to this post for the raspberry jam recipe. You may use the same recipe for strawberry and blueberry jams. Adjust the amount of sugar accordingly. If your fruit is sweeter, you may want to add less sugar. Raspberry is the most sour of the lot.

Cooking the strawberries and blueberries to make jams

Jams in piping bags

Turn the hemispherical shells over onto the silicone mould as support when you fill it.


Coat the insides with a layer of dark chocolate ganache. Fill the center with jam.


Cover the jam with more dark chocolate ganache.


Fill the bottom round shells with chocolate ganache.

Filling the 2D shells too!

Cover the hemispherical shells with the bottom round shell before flipping it over the right side up. Store the macarons in airtight container in the fridge for at least 24h before consuming.

With love,
Phay Shing

Read More »

Saturday 13 January 2018

12 Zodiac Animals 'Yusheng' Chiffon Cake


The 12 Zodiac animals gathering together for a “Lo Hei” reunion before the Dog takes over the Rooster for the year! =)

All the animals are made from small chiffon cake pops and the “yu sheng” was also cut from chiffon cake! It was a lot of work crafting the animals and “yu sheng” but it was a work of love and a joy for me =). Thankful it was well-received!

The animals going for a Merry-go-round here!

**Updated 15/2/18: 
Super honored to be featured on the official account on Instagram! Watch their instagram stories on how I made the cake!


The base cake is a 7-inch Lemon Vanilla Chiffon Cake.

I used this recipe:

Lemon Vanilla Chiffon Cake (7-inch chiffon tin)
4 egg yolks
26g sugar
53g corn/vegetable oil
52ml water boiled with lemon zest (1 lemon)
80g cake flour
7ml vanilla extract
Few drops of natural yellow food coloring (Magic colours) *optional

5 egg whites
60g sugar
1/4 tsp cream of tartar

1. Preheat oven at 160°C. *I used steam baking like ogura cakes but it is optional.

2. Beat egg yolks with sugar with whisk till pale yellow before stirring in oil, boiled water with lemon zest and vanilla extract.

3. Add in sieved flour and whisk till no trace of flour found.

4. Meringue: Beat the egg whites with ¼ tsp cream of tartar till firm peaks, mixing in caster sugar in 2 additions.

5. Fold in the meringue gently into the batter 1/3 at a time.

6. Scoop the chiffon tin and gently tap on table to remove air bubbles.

7. Bake for 160°C 15 min, then 140°C 30 min, or until skewer inserted into centre comes clean.

8. Invert once out of the oven and unmould by hand when cake is cool (see 'hand unmolding chiffon cakes for a smooth finishing' video).

The animals were baked in cake pop molds like these.


I used a 1 egg recipe (recipe above, divided by 4), and divided the egg yolk batter into 7 colours for the different animals (cream, pink, orange, yellow, green, light brown, dark brown). Similarly, divide the meringue into 7 equal portions and fold into egg yolk batter. Bake a different colour in each cake pop mold. For some animals eg horse and snake, I filled the mold with 2 colours. Bake for 12+ min at 160°C.

The rest of the details were cut from leftover batter poured and combined into baking trays lined with baking paper. You can pipe on the eyes using melted chocolate coloured with charcoal powder or cut from charcoal sheet cake using a yakult straw. Stick on the details using some melted marshmallow.


For the Yu Sheng, I baked another 1 egg recipe as sheet cake and divided into 5 colours (for each of the different “ingredient” (cream, pink, orange, green, red) as above. Then I sliced the sheet cakes finely to make the “yu sheng”, again using melted marshmallow to stick them on.

Don't they look happy? =) Wishing everyone ahead a happy and healthy happy lunar year!


**Updated (14/1/18): Merry-go-round Instagram Video here!

With lots of love,
Susanne

Updates

New Chinese Edition of my Best Selling Deco Chiffon Cake Basics coming in mid-Jan 2018!
- Popular, Kinokuniya and all major bookstores (similar to English version)
- Will be sold worldwide as well


             3rd book (Basics techniques)        2nd book (Deco)           1st book (Rainbow)


Read More »