Thursday 31 December 2015

Butterfly Giant Macaron on Lychee Rose Sponge & Pudding Cake

This is my last post for 2015 so I thought I better not "owe" any bakes that have been kept in the queue unposted for too long :p.
My friend requested for a cake to surprise her hubby some time in November :). Her family just had some butterflies as pets this year so she requested for a butterfly design!


This is another lychee rose chiffon sponge and pudding cake, made concurrently with my Baymax themed cake, and my second cake using giant macaron as the centerpiece. The first attempt was a giant bee macaron. Since this request came when I was busy with other macaron bakes, I took the chance to create the butterfly with the same batter as my mermaid macaron bake. You may refer to this recipe for macaron shell (omit the strawberry emulco) and this recipe for basic swiss meringue buttercream. I filled the butterfly with lychee flavoured swiss meringue buttercream. Just add some lychee flavouring to the basic buttercream. You should use lychee puree if you have the time but I was hard-pressed for time so I used artificial flavouring :p.

You may refer to this recipe for the sponge, pudding and stuffed lychees but multiply everything by 3/4 as this is a smaller cake (6.5").

Just to share some photos of the process

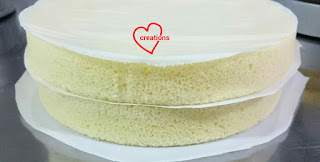
Freshly baked lychee rose chiffon sponge cakes

Assembled cake base. There's a toothpick holding each lychee in place. Pardon the out of shape letter "R". I blame it on the set of small sized alphabet cookie cutters that I have with the "R" shaped weirdly :p


Piping out the macaron batter

Completed piping of macaron batter

Freshly baked butterfly macaron!

The butterfly is about 10cm big. The feelers were extremely fragile and broke off when my butterfingers slipped and dropped the shell from a height of 2cm away from the tray. *sigh*. I sandwiched the feelers between the shells instead, using the buttercream to hold it in place.

Fully decorated face with googly eyes, big smile and mascara ;). All done with royal icing.

Filling up with lychee flavoured swiss meringue buttercream. Inserting the broken feelers and lollipop sticks.

Thank God that the cake and macaron were very well received! So well received that my friend's MIL wanted to order a lychee rose sponge and pudding cake for her birthday next year too! Feedback was it's not too sweet and really good :).

Happy New Year everyone! Thanks for your support! God willing, we may continue another year of churning out creative bakes but perhaps at a slower pace.

With love,
Phay Shing

Read More »

Tuesday 29 December 2015

Peppa Pig 2-Flavour/Colour Chiffon Cake (Blue pea flowers-Pandan)


This is another Peppa Pig chiffon cake creation! I have been staying away from making the Peppa pig using chiffon cake, but it’s for a dear friend so it was really difficult to refuse her. The Peppa pig face is cut from strawberry chiffon cake as previously. Here, I experimented with something new which is to make a 2-flavour/colour in 1 chiffon cake: Blue pea flowers (vanilla) chiffon on one side and Pandan chiffon on another side to make the blue sky and green grass respectively! It's actually similar to my Lego chiffon cake in idea but simpler =). I hid some marshmallows as hidden surprise in the tube hole and covered it up with the Peppa face =p. The sun and clouds etc. are also cut from layer chiffon cake. Thankful my friend said they loved the cake and the hidden surprise!

Merry Christmas and a Happy new year!

With love,
Susanne

Read More »

Sunday 27 December 2015

Guinea Pig Stuffed Toy Giant Macaron (baking tips for XXL macarons)

My family of four all have our birthdays within the last two months of the year so I have quite a few birthday bakes around this time of the year :). No, I don't bake for my birthday :p and we prefer to keep our celebrations simple. I made special macarons for my younger kid and hubby earlier on. These are the special macarons I made for my elder kid :).

Guinea pig macarons modelled after his favourite stuffed toy!

These guinea pig macs are huge. More than 10cm tall. I baked these along with the full bodied Hello Kitty macarons and Christmas macarons.

Macaron mania!

You may refer to this post for the basic macaron shell recipe, this post for macaron basics such as how to fold the batter and test the consistency, and this post for piping complex shaped macarons.

I made my own template by using the drawing tool of Microsoft Word to trace the outlines of the guinea pig and resized it to the size I wanted. The outlines don't show up very clearly if I use an edge detection function of an imaging software so I resort to this when that happens.

Divide the mass according to the ratio of 5:5:2 for black:orangey brown:white. Portion the Italian meringue according to this ratio by weight too.

As these macarons are big, they need to spend a longer time in the oven to dry out. Bake at 135°C for 10 minutes with the oven rack at lowest position, rotate the tray and bake for another 8 minutes. Reduce the temperature to 120°C and bake until the feet on the shells no longer appear wet. Reduce the temperature to 110°C if the shells appear to start browning. Check on the state of the shells every 5 minutes after about 20-22 minutes of baking. Total baking time may take up to 35-40 minutes. Carefully peel the baking paper away from the shells when they have cooled.

Just to share some photos...

Piping macaron shells. Wait for base shell to dry for 15-20 minutes before piping on the snout and arms.

Prepare some royal icing to add on features like the eyes, nose, mouth and paws.

Decorated macaron shells

Just to show the back view. Makes me want to smack its bum :p

Filling the shells with spiced apple swiss meringue buttercream and salted caramel. All made from scratch! You may refer to this post for details on the filling.

A closer look at the feet on the shells!


My elder kid loved the macarons very much :). He insisted that Guinea takes a look at the macaron before it's being eaten.


Here's a sight of the interior of the shells!
Gooey and messy :p but nicely baked with no hollows!


Blessed birthday Mun Yew! May you grow to love and know God more and more each day!

With lots of love,
Phay Shing

Read More »

Thursday 24 December 2015

‘Christmas Tree’ Pull apart Pandan Chiffon Cupcakes


This is my first ‘pull apart’ chiffon cupcakes forming a big Christmas tree! Chiffon cake is used to replace all fondant on top of cupcakes so that everything is light and soft! One thing to note about these cupcakes is to get the top of the cupcake to be level with the top of the cupcake liner after baking and cooling, so the estimation of the height of batter needs to be quite accurate. Instead of using fondant to cover on top, the circles are cut out from layer chiffon cake. These are Christmas chiffon cupcakes made last year. The balls are made from baking chiffon cake in cake pop molds.

Pandan Chiffon Cupcakes (makes around 22 cupcakes)
4 egg yolks
46g castor sugar
52g vegetable/corn oil
35 ml coconut milk
16 ml pandan juice
3 ml vanilla extract
7 ml pandan paste
80g cake flour
A pinch of salt

Meringue:
5 egg whites
60g sugar
1/4 tsp cream of tartar

Method:
1. Prepare fresh pandan juice by blending fresh pandan leaves (10-15 leaves cut into small pieces, omitting the tips) with 50 ml water. Strain with a sieve and press out all the liquid with a spoon.
2. Preheat oven at 160°C.
3. Beat egg yolks with sugar with whisk till pale yellow before stirring in oil, coconut milk and pandan juice.
4. Add in sieved flour and salt and whisk till no trace of flour found.
5. Meringue: Beat the egg whites with ¼ tsp cream of tartar till firm peaks form, or just to the point of reaching stiff peaks (but not beyond), mixing in caster sugar in 2 additions.
6. Fold in the meringue gently into the batter 1/3 at a time.
7. Scoop the batter into each cupcake liner leaving 1 cm from the top.
8. Gently tap the cupcakes on table top to remove air bubbles
9. Bake the cupcakes cake for 17-20 min at 150°C.
10. Allow to cool on a cooling rack.

Pandan Chiffon Layer Cakes
The same recipe is used for baking pandan chiffon layer cakes for cutting out the circles for covering the cupcakes. This recipe makes 2 big 10-inch pandan layer cakes. Pour the batter into 2 baking-paper lined 10-inch trays and bake at 160°C for 14 min. After cooling, flip over onto a cutting mat and cut out circles (slightly bigger than each cupcake) from the layer chiffon cakes. Lastly, attach the circles to each cupcake with a brush of melted marshmallows. 

Chocolate Chiffon Layer Cake
I baked an additional chocolate chiffon layer cake for the Christmas tree trunks. This is baked in an 8-inch tray.

1 egg yolk
7g castor sugar
13g vegetable/corn oil
15 ml water
2 ml vanilla extract
10g cake flour
5g cocoa powder
¼ tsp baking powder

1.5 egg whites
15g sugar
1/4 tsp cream of tartar

Follow the same steps as above and cut 2 brown circles from the cake.

Vanilla Chiffon Cake for Christmas Trees Décor
2 egg yolks
14g sugar
26g vegetable/corn oil
29 ml water
5 ml vanilla extract
30g cake flour

3 egg whites
30g sugar
1/4 tsp cream of tartar

Divide the egg yolk batter into 3 tsp pink, 3 tsp blue, 3 tsp orange, and the remaining yellow (only a touch of wilton colour is required). Bake the various colours for 12 min at 160°C in cake pop molds. Bake the leftover yellow batter in a 6-inch tray for cutting out the star.


Blessed Christmas to you and family!

With lots of love,
Susanne


Read More »

Wednesday 23 December 2015

'Polar Bears in Sweater' Brown Sugar Cookies

I have a request for a large batch of Christmasy bear brown sugar cookies!


I could only manage simple design with a large quantity of 30 large cookies. I couldn't find a large bear cookie cutter so I made my own template.

You may refer to this recipe for brown sugar cookies and royal icing.

Just to share some pictures of the process...


Cutting out the dough.

Bake for about 16-18 minutes or until browned at 160°C, rotating the baking tray halfway.

You may wonder how the patterns on the sweater are done. I made use of marbling technique to create the wavy lines. Begin by piping red and white stripes with a Wilton #5 tip. Before the icing dries, use a toothpick to drag the icing downwards at regular intervals (4th picture below). Use the toothpick to drag the icing upwards between each line made earlier (5th picture).


Remember to let the icing dry thoroughly before packing the cookies. You may oven dry with the fan on but heat off for an hour.

30 cookies all iced! I was seeing stars a little at the end of it.

Individually packed with a green ribbon!

Merry Christmas everyone!

With love,
Phay Shing


Read More »

Monday 21 December 2015

Pandan Kaya Gula Melaka Log Cake

I made lots of logcakes last year that were very well received but I felt so much like a log cake production factory that I decided not to make any this year except for special cases. I have two such cases, one for my extended family Christmas dinner gathering and one for Susanne's family :). Presenting a creation that I am absolutely excited about! Pandan Kaya Gula Melaka log cake!!

Not sure if you notice the dessicated coconut "snow" :p

I decided to decorate the cake with Christian themed edible decorations like I did last year, except that I used brown sugar cookies last year. This year I used  baby Jesus, star and sheep Christmas macarons filled with Pandan gula melaka flavoured swiss meringue buttercream :).


You may refer to this post for the recipe for gula melaka swiss meringue buttercream. I didn't have time to do from scratch so I just flavoured the smbc with gula melaka dissolved in a little Pandan juice and a pinch of salt added to offset the added sweetness.

Why this idea excites me so much is because Pandan kaya cake, which everyone is familiar with, can be transformed into something refreshingly different with just an addition of gula melaka and assembling in a way that you would with a log cake. The best part is, this cake is cream-free! You may do this with any flavour of my sponge and pudding cake creations too, such as Matcha Azuki, lychee rose and berry yoghurt! I have made a cake that has this flavour earlier on last year for my grandma's birthday. Check it out in this post.

Recipe for the cake is adapted from my Pandan kaya cake that a pastry chef gave a thumbs up for after he tasted it.

Recipe for Pandan gula melaka cake
Ingredients (makes one 10 x 12" layer cake)
2 egg yolks
20g gula melaka, finely chopped
23g canola/vegetable oil
13g Pandan juice
21g coconut milk
1/4 tsp vanilla extract
1/8 tsp Pandan paste (optional)
1/8 tsp coconut flavouring (optional)
38g cake flour
1/16 tsp salt

3 egg whites
1/5 tsp cream of tartar
28g caster sugar

Steps:
1. To make Pandan juice, blend about 15 leaves with 40ml of boiled water and strain through coffee filter. Let the juice collected sit in a container in the fridge for a couple of days to let it settle. Use only the dark green portion. If you don't have time you may use the freshly made juice but colour and flavour is less intense. Make sure that the chopped gula melaka has no big lumps as it will be harder to dissolve in the egg yolk.


2. Position oven rack to second lowest position, preheat to 160°C. Line 10 x 12" baking tray with baking sheet. You may choose to grease it very lightly but it's optional. Steam baking is also optional for such a thin layer cake that is going to be covered in pudding/fudge.

3. Whisk egg yolks and gula melaka for about 5 minutes until all the sugar is dissolved and mixture is thick and pale. Add oil and whisk until well combined. Add Pandan juice, coconut milk and flavourings until well combined. Gradually add sifted flour and salt and whisk until no trace of flour is seen.

4. Prepare meringue. In a clean metal bowl, beat egg whites with cream of tartar until firm peaks form, adding sugar gradually when the egg whites appear thick and foamy.

5. Fold the meringue into egg yolk batter in 3 additions quickly but gently. Pour the batter into prepared tray and use a spatula to level the batter. Gently tap the tray on the table to release trapped air bubbles.

I love the reusable silicone baking sheet! No more wrinkles on my layer cakes!

6. Bake for 13 minutes or until skewer comes out clean. Immediately remove from tray and gently peel of baking sheet. Cool in rolled up position.


Recipe for Pandan kaya gula melaka fudge
(A)
239g coconut milk (or evaporated milk. I used a combination of both)
125ml Pandan water (boil water with a few Pandan leaves)
62g gula melaka, finely chopped
1 tsp agar powder
1/8 tsp salt
1/4 tsp caramel essence (optional)
1/8 tsp vanilla extract (optional)
1/8 tsp coconut flavouring (optional)

(B)
23g custard powder
125ml Pandan water

Steps:
1. Combine ingredients in (B) in a jug. Set aside
2. Place all ingredients in (A) in a saucepan and bring to boil while stirring continuously.
3. Stir (B) again before pouring into (A). Stir continuously and bring to a boil.
4. Remove from heat and if you would like a smoother fudge, sieve it.


5. Divide the fudge into two portions. Cover one portion with cling wrap touching surface. This is to prevent the fudge from setting. Set aside.


6. Let the other portion cool at room temperature, stirring now and then until it thickens to a consistency that still flows but not too runny. Use a ladle to scoop some fudge onto the layer cake and smoothen it with the back of the ladle. Leave about 2cm uncovered with fudge at the edge that is furthest from you.


7. Carefully roll the cake away from you like a swiss roll. Squeeze the roll a little to push the fudge into any crevices, using the baking sheet to help you. Refrigerate for about 30 to 45 minutes.


8. Remove cake from baking sheet and cut off the ends to fit the cakeboard.


9. Remove cling wrap from from the other portion of fudge. Stir and use a spatula to apply the fudge on the swiss roll.


10. Place the cut-off ends on the log to form branches.


11. Apply fudge on the branches.


12. Refrigerate the cake for about 15-20 minutes to let the fudge set a little. Use a fork to lightly scratch the surface of the cake to form the characteristic logcake pattern.


13. Transfer some fudge into piping bag. This step is optional. Pipe the swirl on the cut surfaces of the cake.


14. Sprinkle some dessicated coconut to deposit some "snow" on the cake. This step is optional.


Refrigerate the cake overnight before serving. This is to allow the fudge/pudding time to set fully.

Enjoy!

Thank God the cakes were very well received by both my family and Susanne's so do give this recipe a try if you are a fan of Pandan kaya cake :).

With lots of love,
Phay Shing


Read More »

'Christmas Mistletoe Ring' Pandan Bundt Chiffon Cake


I had the inspiration to make a ‘Christmas mistletoe/holly ring’ (which adorn houses during Christmas to celebrate the birth of Christ) chiffon cake since 2 years back! Last year I finally made a Rainbow Mistletoe Ring Chiffon Cake! This year I thought of using the Bundt pan to get a prettier wreath shape! I tried baking chiffon cake in a Nordic bundt pan. However, the texture was slightly denser than normal fluffy chiffon cakes due to the non-stick surface. So I was really happy when a friend helped me get a silicone bundt pan from overseas! The silicone surface (and the tube support) allows chiffon cake to grip on so the chiffon cake is nice and fluffy, like the usual ones!


I decorated the chiffon cake with green chiffon cake ‘leaves’ of different colours, and red chiffon cake flowers, berries and bow. These were cut out from chiffon cake baked in layer trays.


The recipe with picture tutorial is now in 'Deco Chiffon Cakes' book.


Blessed Christmas to you and your family!

With lots of love,
Susanne


Read More »

Friday 18 December 2015

Koala Bear Neopolitan Chiffon Cake


It’s my first chiffon Koala Bear, here’s my cute Koala Bear sitting atop a Neopolitan Chiffon Cake (Strawberry, Vanilla, Chocolate), hiding a hidden surprise in the tube hole which also helps to support the weight! The Strawberry/Vanilla/Chocolate Neopolitan chiffon flavours were requested. I was pretty happy/thankful making this cake as the Koala bear was a delight and I loved the overall effect of the 3 flavours/colour. It's a reduced egg yolk recipe for whiter cake.

Neopolitan Chiffon Cake (7-inch chiffon tin)
1 egg
26 g castor sugar
52 g vegetable/corn oil
58 g fresh milk/water (I used 50:50)
80g cake flour
7ml vanilla extract
1 tsp cocoa powder + pinch of baking powder
1/2 tsp strawberry paste/emulco

5 egg whites
60g castor sugar
¼ tsp cream of tartar
1. Preheat oven to 160°C. Prepare a tray of water at the bottom of the oven (I used the lowest rack to bake the cake). *You may omit steam baking; I like to use it for moister cake.

2. Beat egg yolks with sugar with whisk till pale yellow before stirring in oil, milk/water and vanilla extract.

3. Add in sieved flour and whisk till no trace of flour found. Divide the batter into 3 parts. To the first portion, add 1 tsp cocoa powder (and a pinch of baking powder). To the second, add ½ strawberry paste. Leave the 3rd untouched.

4. Meringue: Beat the egg whites with ¼ tsp cream of tartar till firm peaks form or just to the point of reaching stiff peak, mixing in caster sugar in 2 additions.

5. Divide the meringue into 3 parts for each of the 3-coloured egg yolk batter above. Gently but quickly fold in the meringue into each batter 1/3 at a time.

6. Spoon the strawberry batter into the chiffon tin evenly, followed by the plain vanilla batter, and then lastly the chocolate batter, leaving around 2 cm from the tip.

7. Gently tap the tin on table 3x to remove air bubbles

8. Bake the chiffon cake for 15 min at 160°C and then at 140°C for 30 min.

9. Invert immediately once out of the oven to cool

10. Unmould by hand after the cake is cool. Gently pull the cake from the sides of the tin at each angle and push the removable base up to unmould the sides. To unmould the cake from the base, gently lift up the cake from the base using hands, repeating this at each angle before turning the base over (see 'Hand Unmoulding Chiffon Cakes for a Smooth Finishing' video tutorial).

*Tip if you are using natural cocoa powder (not Dutch-processed), you need to add ¼ baking soda to the chocolate egg yolk batter to prevent formation of bigger air pockets.

The Koala bear uses the same base recipe. I used 1/4 tsp of charcoal powder to colour the bear grey. The Koala bear was baked in glass bowls and cake pop molds. Picture tutorial and recipe of the Koala bear is now in Deco Chiffon Cakes cookbook.


The review was 'very nice!' =) Thank God.

With lots of love,
Susanne

Read More »