Hot on the heels of Chinese New Year is Valentine's Day so many macaron bakers are looking at making heart macarons for sale. I am part of a wonderful Facebook group called All Things Macarons and I know from there that there are some things that bakers would love to know about making heart shaped macarons. I happen to be teaching this for Culinary Arts Ministry in church so I have decided to do a detailed documentation of making heart shaped macarons. (Update: this event is cancelled due to the coronavirus spread. But I hope this post will be helpful to bakers. Stay safe everyone! Practice sensible hygiene and trust God to take care of us!) Although I have a rather comprehensive post done about 3 years ago over here, I have revised the French method recipe to one that dries faster and is so "failproof" that I use it for Junior chef classes. Many bakers also want to know how to get that beautiful deep shade of red so I am introducing a colouring which I use now that is better than the standard Americolor or Wilton ones. Presenting my humble raspberry dark chocolate heart macarons!

Here are the templates for hearts of different sizes. For Culinary Arts Ministry, I will be using the template with smaller hearts as we have limited time and oven spaces. Each template can be scaled to an A4 size paper.


I used to need to add many drops of gel food colouring in order to achieve a deep shade of red. But now that I discovered what "Ah Ma" (grandmother in the Chinese Hokkien dialect) used to colour things like red eggs or ang ku kueh works many times better than Wilton or Americolor, I am going to stick with it. All I needed to add was 1/4 tsp of the red powder per egg white worth of recipe for macaron batter to achieve a super deep and bright red!

I will share the French method recipe here although you can use your preferred method.
Recipe for red macaron batter (French method, makes about 20 small heart macarons (40 shells) or 12 regular hearts (24 shells) )
Ingredients:
Meringue
35g egg whites
1/8 tsp cream of tartar (optional, for stabilising egg whites)
32g icing sugar (with cornflour added)
1/2tsp cornflour
1/8tsp fine salt (optional)
Dry ingredients
48g icing sugar
40g superfine almond flour
1/8 tsp cornflour
1/2 tsp freeze-dried raspberry powder
1/8 tsp cocoa powder
1/4 tsp bright red powder colouring.
Notes:
I added cornflour to stabilize the meringue as well as help the shells dry faster and be sturdier. Do note that this will cause the shells to be chewier in texture as well so give the filling at least 3 to 4 days to mature with the shells in the fridge before consuming, or brush the bottoms of baked shells with unwhipped heavy cream before filling to speed up maturing process.
Raspberry powder and cocoa powder are added for dulling the bright red colour a little as well as to temper the sweetness level of the macaron shells.
I am introducing oven drying here but you may choose to rest the piped batter in the open or in aircon room.
Steps:
1. Preheat oven to 65°C, top and bottom heat only. Set rack to second lowest position. Line baking tray with template and parchment paper.
2. Sift together all the dry ingredients. You may want to weigh out about 3g extra almond as some grains may have difficulty passing through the sifter. Do not press the mix hard through the sieve as it will cause oils from the almond to come out and ruin your macarons (you get fragile, splotchy shells). Set aside.
3. In a small bowl, whisk together icing sugar and cornflour for the meringue
4. In a clean metal (or glass) mixing bowl, beat egg whites with cream of tartar until foamy. Add about a third of icing sugar/cornflour mix and whisk until sugar is absorbed then beat for a few seconds using elecreic mixer. Add another third of the sugar and repeat whisking and beating. Add the rest of the sugar and whisk until it is absorbed into the egg whites. Turn up mixer speed to medium high and beat until meringue reaches stiff peaks. Scrape down sides of the bowl with clean spatula. Beat the meringue again for about half a minute. Scrape down the sides and test if the meringue is ready. If the meringue balls up inside the whisk, it is stiff enough. But some whisks of mixers are unable to do this so another test I use is to create little peaks all over the meringue in the bowl. If all the peaks stand up straight without curling over, meringue is ready.
5. Scatter half of the dry ingredients over the meringue. Gently fold in using a spatula until no trace of dry ingredients is seen. Scatter the other half of dry ingredients and gently fold until just incorporated. The batter is underfolded at this point. Press the batter against the side of the mixing bowl to deflate some air from the batter. Test consistency again. Repeat this until batter is smooth, shiny and able to fall of spatula in an almost continuous manner. Alternatively, you can test consistency by creating little peaks of batter in your bowl and tap the bottom of the bowl. If the peaks sink back in, your batter is ready. You may find it helpful to watch this video tutorial I did for the basic french method to have a better idea of batter consistency and folding technique.
6. Transfer batter into piping bag fitted with a wilton #8 tip for small hearts and #10 for regular hearts. Pipe the hearts on the tray like this:
You may use a toothpick to nudge the batter into place as necessary, or to pop air bubbles. Bang the tray a few times to pop trapped air bubbles.

7. Place tray into oven for 10 min. Let it rest at room temperature free from draft while you preheat the oven to 170°C for 10 min. If you happen to have access to two ovens, you may preheat one to 65°C and the other to 170°C right from the start and just pop the tray of piped batter from the low temperature oven to the high temperature oven straight away after 15 min in low temperature oven. The purpose of oven drying is to speed up the process of forming a sturdy membrane on the surface of the shell before baking.
Once the tray is in the oven at 170 °C, reduce the temperature to 140°C. Bake for 18-20min for small hearts and 22-25min for regular hearts. Please note that the suggested temperature and time is a reference only as each oven works differently. Adjust your baking temperature and time accordingly, including the initial oven drying temperature and time.
Let the shells cool completely on baking tray before carefully removing the parchment away from the shells (not the other way round).


Raspberry dark chocolate ganache
Ingredients:
65g dark chocolate couverture
6g unsalted butter
18g heavy cream
1/8tsp sea salt
1/2 tsp vanilla bean paste
1/2 tsp coffee liqueur
8g freeze-dried raspberry powder
Steps :
1. Place all ingredients except raspberry powder in microwave-safe bowl. Heat on medium power for 20 sec and mix well. Repeat heating and mixing as necessary until smooth and melted.
2. Add freeze-dried raspberry powder and mix well.
3. Let the ganache firm up until toothpaste consistency before transferring into piping bag. You may choose to whip the ganache for a lighter texture if you wish.
You may fill the macarons with any filling of your choice but I love the raspberry dark chocolate combo as it compliments the sweetness of the macarons well so overall the confectionery is an explosion of flavours without being too sweet. Remember to be patient and only consume the macarons after a few days of maturing! Let the macarons sit at room temperature for 15 min before eating or the ganache might be too firm. The ganache recipe I share is suitable for hot climates like Singapore so feel free to increase the amount of cream if you want a softer ganache.
With the cancellation of the church event, I rushed out some hearts to give away instead! We need to spread more love during this trying time and not panic.

With love,
Phay Shing
Read More »

The colour of these hearts are not as deep because I made these concurrently with other macarons and so I didn't use the awesome red powder colouring here. I made these for the event ad much earlier.
Here are the templates for hearts of different sizes. For Culinary Arts Ministry, I will be using the template with smaller hearts as we have limited time and oven spaces. Each template can be scaled to an A4 size paper.
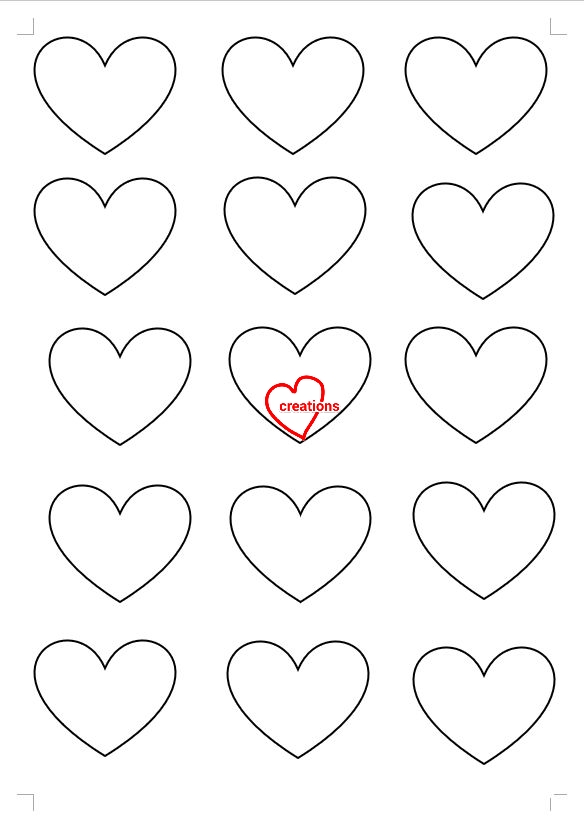
Regular sized hearts

Mini hearts
I used to need to add many drops of gel food colouring in order to achieve a deep shade of red. But now that I discovered what "Ah Ma" (grandmother in the Chinese Hokkien dialect) used to colour things like red eggs or ang ku kueh works many times better than Wilton or Americolor, I am going to stick with it. All I needed to add was 1/4 tsp of the red powder per egg white worth of recipe for macaron batter to achieve a super deep and bright red!

You can find this at supermarkets like Sheng Shiong in Singapore or perhaps Chinese or Asian grocery stores in other countries
I will share the French method recipe here although you can use your preferred method.
Recipe for red macaron batter (French method, makes about 20 small heart macarons (40 shells) or 12 regular hearts (24 shells) )
Ingredients:
Meringue
35g egg whites
1/8 tsp cream of tartar (optional, for stabilising egg whites)
32g icing sugar (with cornflour added)
1/2tsp cornflour
1/8tsp fine salt (optional)
Dry ingredients
48g icing sugar
40g superfine almond flour
1/8 tsp cornflour
1/2 tsp freeze-dried raspberry powder
1/8 tsp cocoa powder
1/4 tsp bright red powder colouring.
Notes:
I added cornflour to stabilize the meringue as well as help the shells dry faster and be sturdier. Do note that this will cause the shells to be chewier in texture as well so give the filling at least 3 to 4 days to mature with the shells in the fridge before consuming, or brush the bottoms of baked shells with unwhipped heavy cream before filling to speed up maturing process.
Raspberry powder and cocoa powder are added for dulling the bright red colour a little as well as to temper the sweetness level of the macaron shells.
I am introducing oven drying here but you may choose to rest the piped batter in the open or in aircon room.
Steps:
1. Preheat oven to 65°C, top and bottom heat only. Set rack to second lowest position. Line baking tray with template and parchment paper.
2. Sift together all the dry ingredients. You may want to weigh out about 3g extra almond as some grains may have difficulty passing through the sifter. Do not press the mix hard through the sieve as it will cause oils from the almond to come out and ruin your macarons (you get fragile, splotchy shells). Set aside.
3. In a small bowl, whisk together icing sugar and cornflour for the meringue
4. In a clean metal (or glass) mixing bowl, beat egg whites with cream of tartar until foamy. Add about a third of icing sugar/cornflour mix and whisk until sugar is absorbed then beat for a few seconds using elecreic mixer. Add another third of the sugar and repeat whisking and beating. Add the rest of the sugar and whisk until it is absorbed into the egg whites. Turn up mixer speed to medium high and beat until meringue reaches stiff peaks. Scrape down sides of the bowl with clean spatula. Beat the meringue again for about half a minute. Scrape down the sides and test if the meringue is ready. If the meringue balls up inside the whisk, it is stiff enough. But some whisks of mixers are unable to do this so another test I use is to create little peaks all over the meringue in the bowl. If all the peaks stand up straight without curling over, meringue is ready.
5. Scatter half of the dry ingredients over the meringue. Gently fold in using a spatula until no trace of dry ingredients is seen. Scatter the other half of dry ingredients and gently fold until just incorporated. The batter is underfolded at this point. Press the batter against the side of the mixing bowl to deflate some air from the batter. Test consistency again. Repeat this until batter is smooth, shiny and able to fall of spatula in an almost continuous manner. Alternatively, you can test consistency by creating little peaks of batter in your bowl and tap the bottom of the bowl. If the peaks sink back in, your batter is ready. You may find it helpful to watch this video tutorial I did for the basic french method to have a better idea of batter consistency and folding technique.
6. Transfer batter into piping bag fitted with a wilton #8 tip for small hearts and #10 for regular hearts. Pipe the hearts on the tray like this:
I made this video 3 years ago and didn't bother making another one because I think it is clear enough 🤣
You may use a toothpick to nudge the batter into place as necessary, or to pop air bubbles. Bang the tray a few times to pop trapped air bubbles.

Piped batter
7. Place tray into oven for 10 min. Let it rest at room temperature free from draft while you preheat the oven to 170°C for 10 min. If you happen to have access to two ovens, you may preheat one to 65°C and the other to 170°C right from the start and just pop the tray of piped batter from the low temperature oven to the high temperature oven straight away after 15 min in low temperature oven. The purpose of oven drying is to speed up the process of forming a sturdy membrane on the surface of the shell before baking.
Once the tray is in the oven at 170 °C, reduce the temperature to 140°C. Bake for 18-20min for small hearts and 22-25min for regular hearts. Please note that the suggested temperature and time is a reference only as each oven works differently. Adjust your baking temperature and time accordingly, including the initial oven drying temperature and time.
Let the shells cool completely on baking tray before carefully removing the parchment away from the shells (not the other way round).

Freshly baked hearts!

Another view! I love this view!
Raspberry dark chocolate ganache
Ingredients:
65g dark chocolate couverture
6g unsalted butter
18g heavy cream
1/8tsp sea salt
1/2 tsp vanilla bean paste
1/2 tsp coffee liqueur
8g freeze-dried raspberry powder
Steps :
1. Place all ingredients except raspberry powder in microwave-safe bowl. Heat on medium power for 20 sec and mix well. Repeat heating and mixing as necessary until smooth and melted.
2. Add freeze-dried raspberry powder and mix well.
3. Let the ganache firm up until toothpaste consistency before transferring into piping bag. You may choose to whip the ganache for a lighter texture if you wish.
You may fill the macarons with any filling of your choice but I love the raspberry dark chocolate combo as it compliments the sweetness of the macarons well so overall the confectionery is an explosion of flavours without being too sweet. Remember to be patient and only consume the macarons after a few days of maturing! Let the macarons sit at room temperature for 15 min before eating or the ganache might be too firm. The ganache recipe I share is suitable for hot climates like Singapore so feel free to increase the amount of cream if you want a softer ganache.
With the cancellation of the church event, I rushed out some hearts to give away instead! We need to spread more love during this trying time and not panic.

With love,
Phay Shing


