Monday 30 November 2020

Sanrio characters Christmas Pandan Chiffon (Official Sanrio Online Class)

We have come to the very last Sanrio online class and the special Christmas edition!

Celebrate the lovely Christmas and the magical finale of the year with the all-star cast, Hello Kitty, My Melody and Little Twin Stars, and our favourite pandan chiffon!💖💖

Sign up for the Christmas online class and baking kits here

As a gift for this Christmas season, the full baking kit with pan will be “dressed” in a pretty pink gift boxes! 🎀🎁


Though this year has been pretty different, hope that we are spending more time with our families, especially this holiday!

With lots of love,
Susanne


For other Sanrio classes, click here!

Read More »

Wednesday 25 November 2020

Tonkatsu Oatmeal Walnut Cinnamon Cookies (Refined sugar-free!)

For hubby's birthday bake this year, I decided to make something healthier and snackable so that it is a cute and special but also practical bake. I decided to make some yummy but healthy oatmeal cookies in the form of one of hubby's favourite characters - - Tonkatsu! 


Photo composition is inspired by wanwantea (Instagram account). I remembered being really tickled when I saw her Tonkatsu macarons in a frying pan some time back. 

How yummy can an oatmeal cookie be you may ask, especially one that is refined sugar-free? It is by making use of a variety of ingredients that add texture and flavour to the bake! Maple syrup is used as the sweetener for this cookie. You may replace with coconut sugar syrup. Both choices are much lower in GI than white sugar and impart a lovely flavour and aroma too! Apart from having a wonderful aroma, maple syrup is a good source of manganese and zinc. I added some walnuts in the cookie to give it an extra crunch as oatmeal cookies can tend to be on the chewy side. Cinnamon adds a lovely aroma. Both walnuts and cinnamon are great health foods as well. You can google for the health benefits of these. Not forgetting the main star of the cookies, rolled oats, is good for your health too! 

This recipe contains wheat flour so it isn't gluten-free. You may replace with alternative flours like coconut flour or almond flour but I like to stick with wheat flour as it gives the best texture in my opinion. 

I took pains to eliminate or reduce the use of refined sugar in this bake, including the decorative details. The nose and eyes of Tonkatsu are made out of cookie too! I will share the technique of doing so. No royal icing is used for these parts! I also took pains to use natural food colouring as far as possible. 

Recipe for oatmeal walnut cinnamon cookies
Ingredients (makes about 20 Tonkatsu cookies) :
85g unsalted butter, softened 
120g maple syrup (or coconut syrup) 
1 egg, lightly beaten
1/4 tsp salt
1/2 tsp vanilla extract 
90g plain flour, sifted (I replaced half with cake flour for a more delicate bite) 
1 tsp cinnamon powder
1/4 tsp cocoa powder (optional, for a bit of added flavour and tonkatsu colour) 
1/16 tsp turmeric powder (optional, for added tonkatsu colour) 
110g rolled oats
40g finely chopped walnuts 

Note: make sure all ingredients are at room temperature before beginning, with the exception of butter which should be softened but still cool (about 20C) 

Steps:
1. Preheat oven to 180C. Line baking tray with parchment paper. 

2. Beat butter until light and fluffy using electric mixer. 

3. Gradually add maple syrup and beat until combined after each addition. 

4. Gradually add egg and beat until smooth and combined. 

5. Add vanilla and salt and beat until combined. 

6. In another mixing bowl, whisk together flour, cinnamon, cocoa powder and turmeric powder. 

7. Sift the flour mix into the butter mixture. Fold in with spatula until no trace of flour is seen. 

8. Fold in chopped walnuts and rolled oats. 

9. Scoop a slightly heaped tablespoon (measuring spoon) of batter and drop it onto the lined baking tray. Use 2 metal teaspoons to carefully shape it into Tonkatsu shape, flattening the top until batter is about 1cm thick. Make sure there is a spacing of at least 2cm between drops of batter. 


Main body of Tonkatsu before baking. 

10. Chill the leftover batter in mixing bowl in fridge. Bake the tray of cookies for 12 minutes. Leave it to cool on tray. If you like soft chewy oatmeal cookies and gladly like to skip the decorative parts, you can stop here and store in airtight container. But I like my cookies crisp/crunchy too. If so, continue baking until really dry and firm at 140C for another 15 to 20 min after the first 12 minutes at 180C or proceed with step 11 if you are making Tonkatsu. Do not bake the extra 15 to 20 min at 140C if you are making Tonkatsu. 

11. Line a small tray with parchment paper. Quickly shape the leftover batter into small balls on the lined tray and freeze it. Return the leftover batter into fridge to chill if it turns too soft and sticky to handle. It is messy but don't worry, you don't have to be super neat because it is Tonkatsu afterall🤣. 

Balls of batter for arms and legs of Tonkatsu

Shortbread cookie parts
Ingredients:
10g icing sugar
20g unsalted butter, softened 
28g cake flour or plain flour
2g cornflour (may replace with plain flour) 
A pinch of salt 
2-3 drops of strawberry emulco
1/16-1/8 tsp charcoal powder
1/2-3/4 tsp cocoa powder
Some water

Note: you won't need all of it to decorate Tonkatsu. You may chill excess dough and bake another day, or just shape cookies out of leftover dough and bake until slightly browned at the bottom at 160-170C.

Steps :
1.  Preheat oven to 150C.

2. Mix unsalted butter, salt and icing sugar together. You don't have to cream it until light and fluffy. 

3. Add strawberry emulco a bit at a time until a desired shade of pink is reached. 

4. Add sifted flours and fold it in until a dough is formed. 

5. Portion out about 1/2 tbs of dough and add cocoa powder, charcoal powder into it. Add water 1/8 tsp at a time into this mixture until a pipeable consistency is reached. Transfer this black/ dark brown batter into piping bag with a small hole cut. 

6. Shape the pink dough into Tonkatsu's nose shape and gently but firmly place it on the main body. 

7. Pipe the eyes. 

Adding Tonkatsu's nose and eyes. 

8. Carefully place the frozen arms and feet made from the oatmeal batter onto the main body. 


9. Bake for 10 minutes. Reduce temperature to 140C and bake for another 10-15 minutes or until the cookie is nice and crisp. Cool completely before storing in airtight container. 

 Bon appetit! 


With lots of love, 

Phay Shing

Read More »

Monday 23 November 2020

Nativity Gingerbread Cookies (no-chill, no-spread cookie dough recipe!)

 For Culinary Arts Ministry event with the church this December, I shared how to make these simple gingerbread cookies!


The Zoom session along with a short talk about Christmas is just over so I will be sharing the detailed recipe and templates here. I will share how you can make these cookies without cookie cutters. Instead of using my default favourite brown sugar cookie recipe as the cookie base, I chose to use another recipe for ease of handling as my default recipe although absolutely yummy and fragrant, has a dough that requires chilling and can be tricky to handle in hot Singapore. 

The recipe I will share is so easy to handle kids can join in the fun. It doesn't spread in the oven so you can pack in as many cookies to bake as possible in one round of baking. The design I chose is deliberately simple as well so that you can decorate it by freehand without needing a template. 

Nativity gingerbread cookies


Logistics list

2-2.3cm round cookie cutter*

3cm round cookie cutter*

4cm round cookie cutter*

5cm round cookie cutter*

4cm star cookie cutter*

Small fruit carving knife**

Plastic file or parchment paper template**

Baking trays

Parchment paper/silicone baking mat

Rolling pin (preferably with 6mm guide)

Mixing bowls

Sifter

Silicone spatula

Digital weighing scale

Oven thermometer (optional)

Piping bags (use food bags or ziplock bags if you don’t have)

Scissors

Toothpicks

Electric mixer (for making royal icing)


*If you don’t have the cookie cutters, you may use the template provided by tracing the outlines of Joseph/Mary, baby Jesus and star onto clear plastic files. Cut the outlined traced on the file and wash thoroughly before use. This template is reusable. If you don’t mind having a single-use template, you may trace the templates onto parchment paper and cut the shapes out of parchment paper.


** Optional if you have all the necessary cookie cutters


Here is the template you can use. Resize it until this picture fits an A4 paper.


No-chill cookie dough recipe

Ingredients (makes a small portion of about 6 cookies of each of the 4 designs):

40g unsalted butter, slightly softened

30g dark brown sugar

30g Molasses (may replace with maple syrup, golden syrup, or honey in a pinch)

1 egg yolk

60g cornflour

70g plain flour

½-1 tsp ground ginger (depending on how spicy you prefer)

½ tsp ground cinnamon

1/16 tsp allspice powder (optional)

1/8 tsp salt

½ tsp vanilla extract


Here are some photos of some of the ingredients in case you don't know what to look out for.


Steps:

1. Preheat oven to 180C. Set oven rack to middle position.


2. Place unsalted butter, sugar, salt and vanilla in a mixing bowl. Cream butter and sugar by beating with spatula until smooth. Mixture does not have to be light and fluffy. As long as the ingredients are well incorporated, it is good enough.


3. Add molasses and mix well with spatula.


4. Add egg yolk and mix well.


5. In another bowl, sift together cornflour, plain flour, ginger, cinnamon and allspice. 


6. Add sifted ingredients into butter mixture and fold in until no trace of flour is seen. The dough should be soft but easy to handle. If the dough feels too sticky, add a little cornflour until it doesn’t feel sticky.


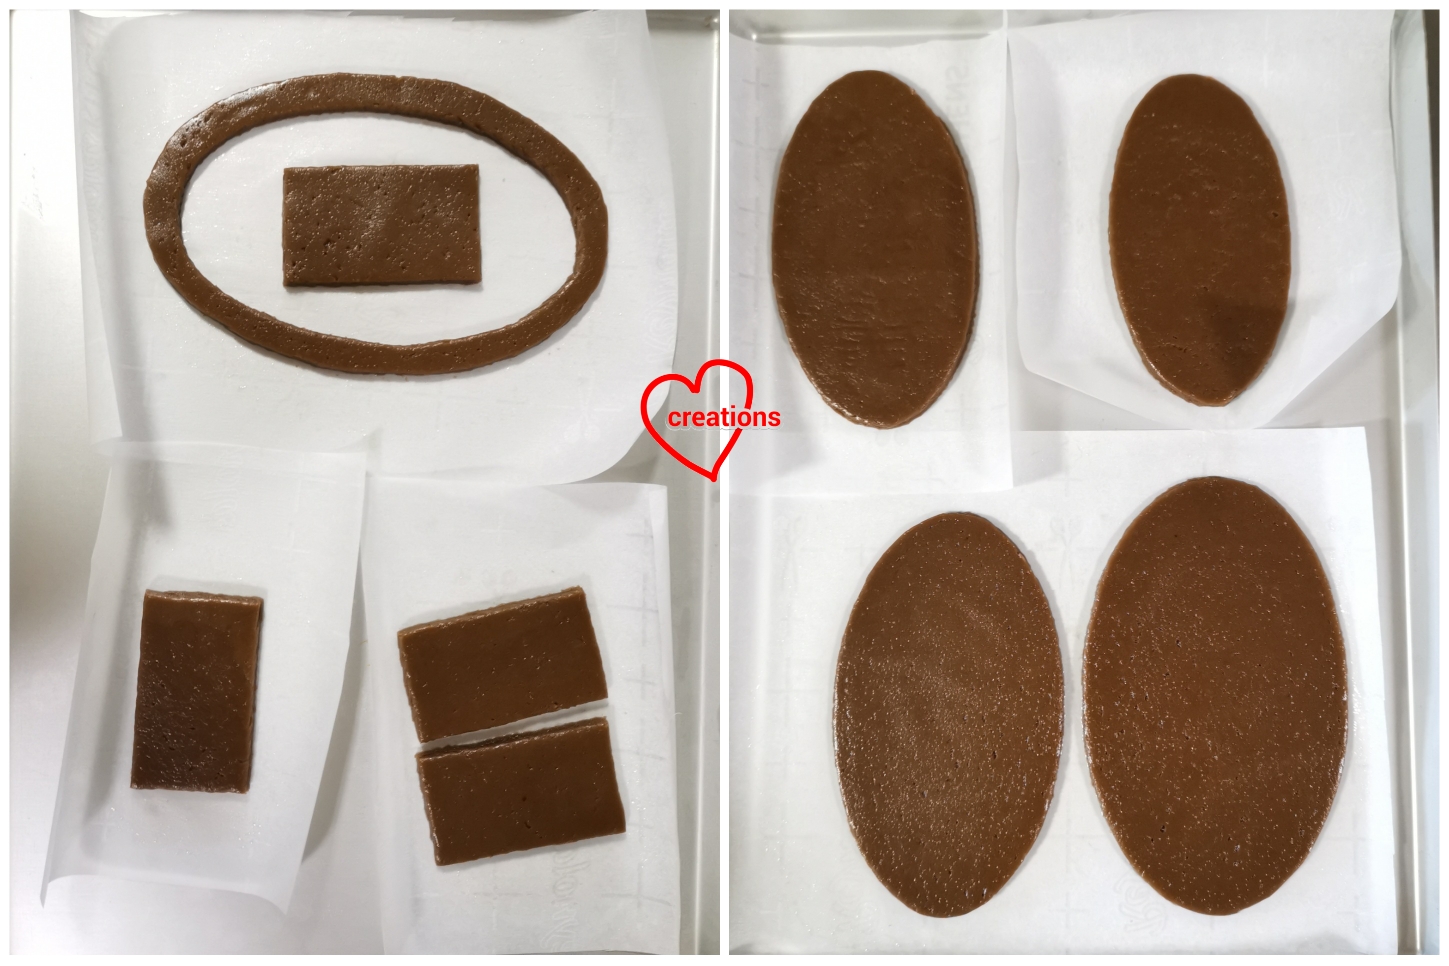
7. Place the dough between 2 sheets of parchment paper and roll to thickness of 6mm. Transfer the parchment paper with the dough onto the baking tray. Remove the top sheet of parchment. 


8. Use 4cm and 5cm cookie cutters or prepared template and a knife to cut out the shapes for Mary and Joseph. If using cookie cutters, gently press the dough where the 2 circles intersect such that the separated dough sticks together. You may position the cutouts about 1cm apart from each other as the cookie does not spread much. Peel away the portions of dough between the Mary and Joseph cutouts, roll into a ball and roll it between 2 sheets of parchment paper again.


9. Bake the Mary and Joseph cutouts at 180C for 10 min, and then at 170C for 2-4 min more or until the bottom of the cookies are lightly browned. Cool completely on the baking tray.


10. In the meantime, place the rolled dough between parchment on another baking tray. Remove top sheet of parchment. Cutout star and baby Jesus shapes (use 2cm and 3cm cookie cutters) and remove dough between cutouts. Roll out the excess dough again between parchment for more cookies of your choice.


11. Bake the baby Jesus and star cutouts at 170C for 8-10 min or until bottom of cookie is lightly browned. Cool completely on baking tray.


Important notes on decorating cookies

1. You may bake the cookies a day or a week in advance and store in airtight container once cooled completely. 


2.Decorate the cookies as you wish using either of the royal icing recipes. I highly recommend using meringue powder as it is really simple and fuss-free. But if you seldom bake and would unlikely be using meringue powder for anything else, you may use the raw egg white version. Since the cookie dough recipe uses only egg yolk, you would have excess egg whites to begin with so no wastage here! 


3. Use toothpick to nudge the icing into tight corners and for drawing the eyes. 


4. Remember to let the base layer of icing dry before layering on another layer if you would like 3D pop-up features. 


5. Let the iced cookies dry completely in the open under the fan or briefly in the oven at 60C with the fan mode on before storing the decorated cookies. 


Have fun while remembering what Christmas is about!


Royal Icing recipe (using meringue powder)

Ingredients:

125g icing sugar

9g (2 and ¼ tsp) meringue powder

1/8 tsp salt (optional)

25g water (more as necessary)

¼ tsp vanilla extract (optional)

1/8 tsp caramel flavouring (optional)

Yellow, blue, green, peach and brown gel food colouring 


Here is the meringue powder I use.


Steps:

1. Sift icing sugar, meringue powder and salt together in mixing bowl. 

2. Add water and flavourings (if using). Use electric mixer and beat on medium low speed for a few minutes, scraping down the sides of the bowl with a spatula now and then. You may also use a hand whisk and whisk continuously for 6-7 minutes. The consistency of the royal icing is such that it is able to form firm peaks. 

3. Divide icing into portions for various colours. Portion same amount for each colour except for white, which should be a double portion. 

4. Add colouring (except for white) and thin out the icing by adding 1/8 tsp of water at a time to thin it out until it reaches flooding consistency. Flooding consistency is where any peaks in the icing in the mixing bowl sinks back in within 20 seconds. Transfer royal icing into piping bag with a small hole cut at the end. Pipe as needed. You may store any unused icing in an airtight container with a clingwrap touching the surface of the icing. Store the container in the fridge, up to 1 month. Stir the stored icing well before use. 


Royal Icing recipe (using raw egg whites)

Ingredients:

113g icing sugar

1 egg white

¼ tsp lemon juice

Food colouring and flavouring as mentioned in above section

Some water for thinning the icing


Steps:

1. Sift icing sugar and set aside.


2. In a clean metal bowl, beat egg whites with lemon juice until frothy with an electric mixer. Gradually add icing sugar and beat until stiff and glossy.


3. Add flavouring if you wish and beat until incorporated.


4. Portion, colour and thin it out as mentioned in point 4 in previous section. Transfer into piping bag and pipe the designs onto the cookies.


IMPORTANT NOTE!! As this version of royal icing uses raw egg whites, the iced cookies need to be baked at low temperature of 70C for at least 20 min to ensure that the cookies are safe for eating.


Steps for decorating cookies

First layer


1. Ice the star with yellow icing
2. Ice baby Jesus' head with beige/peach icing
3. Ice baby Jesus' swaddle with white icing
4. Ice Mary's head scarf with white icing
5. Ice Mary's face with peach icing
6. Ice Mary's clothes with blue icing
7. Ice Mary's hair with brown icing
8. Ice Joseph's head scarf with green icing
9. Ice Joseph's face with peach icing
10. Ice Joseph's beard with brown icing
11. Ice Joseph's clothes with white and yellow icing (order doesn't matter) 

Let this layer dry in the oven at 60C with fan on for 10 min or in the open under a fan for at least an hour. 

Second layer


1. Pipe lines and dots on the star using yellow icing
2. Add in baby Jesus' ears and nose with peach icing
3. Add baby Jesus' hair and eyes with brown icing. You may find it easier to paint the eyes on using a toothpick. 
4. Add in 2 of the swaddle lines using white icing
5. Add in Mary's sleeves with blue icing
6. Add in Mary's nose and left hand with peach icing 
7. Add in Mary's eyes with brown icing
8. Add in Joseph's sleeves with white icing
9. Add in horizontal line on Joseph's head scarf with yellow icing
10. Add in Joseph's eyes with brown icing
11. Add in Joseph's left hand with peach icing

Let this oven dry again for 10 min or dry in the open for 30 min before continuing. 

Third layer


1. Add in final line on baby Jesus' swaddle using white icing
2. Add in Mary's right hand using peach icing
3. Add in Mary's head scarf outline using white icing
4.  Add in Mary's sleeve and collar outline using blue icing
5. Add in Joseph's right hand using peach icing 
6. Add in Joseph's head scarf outline using green icing
7. Add in Joseph's sleeve outline using white icing. 

Dry this thoroughly (overnight if air drying, 45min-1h if oven drying at 60C) before storing in airtight condition. 


With love,

Phay Shing 

Read More »

Tuesday 17 November 2020

'Let's Paint Fluttershy' Strawberry Rose Macarons

I made this for a girl who is a fan of Fluttershy, Chrissy and Francine. She also likes to draw so this was a macaron scene I came up with for her 😊. 


I think she can draw a nicer portrait of Fluttershy than these 2 artist wannabes 🤣

I used the swiss meringue method for making these macarons. Recipe for the macaron shell can be found in this post. Just to share some pictures of the process... 

Piping the characters 

Piping the canvas and stage

Piping the easel stand and paint brushes

Freshly baked shells! 


I used a combination of royal icing, edible paint made by dissolving gel colouring in vodka, and edible marker to add in the details. 

The macarons were filled with strawberry rose whipped white chocolate ganache. 


Recipe for Strawberry rose ganache
Ingredients:
80g white chocolate, finely chopped or chips
20g cocoa butter (may replace with white chocolate) 
20g unsalted butter
1/8 tsp salt
1 tsp rose water
55g strawberry compote*
1 tsp freeze-dried strawberry powder (optional) 
1/2 tsp strawberry emulco/ paste 

*Make the compote by combining pureed strawberries and adding 10% by weight of sugar, a pinch of salt and a dash of lemon juice. Cook over medium-low heat while stirring continuously until thickened to your preferred consistency. I usually reduce it until about half the original weight. 

Steps:
1. Place all ingredients except the last 3 in a microwave-safe bowl. Heat on low power using the microwave oven for 10 seconds and mix well. Repeat until melted and smooth. Alternatively, you may use the double-boiling method. 

2. Let the mixtire set at aircon room temeptature (20-24C) until firm. Alternatively, refrigerate for 10 minutes or until scoopable consistency. 

3. Use a spatula to whip umtil lightened in texture and ganache resembles buttercream. Gradually add strawberry compote and fold it in. 

4. Add strawberry powder and mix well. Add strawberry paste and mix well. Transfer into piping bag and fill the shells. Store filled macarons in fridge in aortoght container for at least 24h before consuming. Let the container rest st room temperature for 25 to 20 min before opening to prevent condensation from forming on the macarons. 

With love, 
Phay Shing
Read More »

Thursday 12 November 2020

BT21 Chiffon Cake (Tata, Cooky, Kola)


Do you think BT21 is cuter or BTS? 💖😍

Being a fan of kpop, I have made a few BT21 cakes! The latest is Tata, Cooky and Kola! Cooky and Kola are my favourites!

This time I shot it in the "sunshine" "bubble-pop" style of BTS.

Sending some cheerful vibes and looking forward to the weekend! 🌈🥰

With love,
Susanne


Read More »

Tuesday 10 November 2020

Masha and the Bear Salted caramel Dark Chocolate Macarons

My friend requested for a couple of macaron cake toppers for her daughter's birthday with the little girl's favourite characters --- Masha and the Bear! 


I had fun with the new backdrops I bought because it really brings the characters to life! 

I baked the macaron shells using the swiss meringue method along with the shells for Kirby and Mario on the beach scene. So it was one crazy bake. 

Piped batter

I decorated the macaron shells with edible marker and edible paint made by dissolving gel food colouring in some vodka. 


The macarons were filled with dark chocolate ganache amd homemade salted caramel


I always make an extra set of characters in case of damage. 


With love, 

Phay Shing

Read More »

Thursday 5 November 2020

Bento Chiffon Cake


Which is your favourite item in the bento? 
I've made many sushi chiffon cakes but this is my first bento version! 
The bento itself is also made from chiffon cake and I had fun piping the polka dots! Do you spot the tako and tamago as well? Both my favourite food!
I miss the cute food in Japan, but thank God we are all safe.. Do hang in there, and take care!

With lots of love,
Susanne

Read More »

Wednesday 4 November 2020

Noah's Ark Cookies on Mixed Fruits n Cream Cake

A pair of grandparents wanted to bless their grand daughter with a birthday bake that provides and opportunity for them to share about God. So they requested for Noah's ark themed cake. Here is my cookie version of Noah's ark, on top of a fruits n cream cake!


I made the ark out of a no-spread cookie recipe, naturally coloured with dark brown sugar and coconut sugar. The animals are made out of shortbread cookies with minimal royal icing used. Even the little horns, spots on the giraffe and the tiny doves are made out of shortbread! 

I experimented with creating little rainbows out of green kiwi, mango and strawberry to insert into the cream layers. But that proved to be very challenging 😅. I think if I ever want to attempt something similar again, I will do it with just 2 types of fruits. I wanted to try making the rainbows because it is part of the Noah's ark story, signifying God's promise never to destroy the earth by flood again. 

I used my default vanilla chiffon recipe for the fruits n cream cake. Inside the cake is filled with fresh thai mango pieces and homemade mango compote cooked with a dash of yuzu juice concentrate. 

Be prepared for a long post as this bake consists of quite a few components. 

No-spread cookie recipe
Ingredients:
Brown dough
114g unsalted butter 
50g dark brown sugar
50g coconut palm sugar
50g egg, lightly beaten
250g plain flour 
48g cornflour 
3/8 tsp salt
1 tsp vanilla extract

Pink dough
18g unsalted butter 
16g caster sugar
8g egg, lightly beatened 
40g plain flour 
8g cornflour
Pinch of salt 
1/8 tsp vanilla
Pink gel colouring 

Steps : 
1. Preheat oven to 170C for baking small parts like letters of name and 180C for larger pieces. 

2. Cream butter and sugar but not till fluffy. You want to minimize bubbles in dough. 

3. Add egg a bit at a time and mix well. Add vanilla and mix well. Add gel colouring if using and mix well. 

4. Sift together cornflour, plain flour and salt in another bowl. Add sifted flours into butter mixture. Fold the flour in until just combined. 

5. Roll the dough between parchment paper until about 6mm thick.  Use cookie cutters or a small knife and template to carve out the shapes required. I remove the excess dough instead of the cutouts so that it retains its shape. You may place the cookies quite close together as they don't spread in the oven. 


6. Bake smaller parts for around 10 to 12 min. Lower baking temperature for larger parts after the first 12 min to 160C and bake until done, about 20min. 

I assembled the ark using royal icing coloured in a similar shade to the cookie. You may refer to this post for the royal icing recipe. Use a zester to file the sides of the cookie so that the various parts join seamlessly. 


Animal Shortbread cookie recipe
Ingredients :
50g icing sugar
100g unsalted butter 
130g plain flour
20g cornflour 
1/8 tsp salt
1 tsp vanilla extract
Gel food colouring and natural food colours like cocoa powder and charcoal powder

Steps :
1.  Preheat oven to 150C for larger parts, 140C for smaller parts. 

2. Cream butter, salt and sugar until combined but not till fluffy. 

3. Add vanilla and mix until well combined. 

4. Sift together cornflour and plain flour. Add into creamed butter and sugar. Fold in the flour until ball of dough forms. 

5. Divide dough into portions and colour them with gel or natural colouring. 

6. Shape using fingers and fondant tools and place on parchment. Freeze the tray(s) of shaped cooke dough for at least 10 min before baking. 


7. For larger parts, bake at 150C for first 10 min, lower to 130C and bake for another 10-15min . For the tiny doves, elephant ears, bake at 140C for 10 min then at 130C for another 2 min. Cool conpletely before storing or assembling. 

Tenporarily storing overnight before assembling 

8. Assemble by joining the parts with royal icing. You may gently scrape the cookie with a butter knife to get the crumbs to cover the seams a little. Use royal icing to add in the mane, eyes and mouth. 


Let the icing dry completely before storing in airtight container. 

I glued the animals to the ark using the same brown coloured royal icing. 

I added in the flood waters using stiff royal icing and glued on the name in the waves. 


The recipe for the vanilla chiffon can be found in this post. I baked a 17cm (7 inch) chiffon and a 7x7 inch sheet cake. I love how tall and fluffy the chiffon cake is! 


Slice horizontally into 3 layers with a serrated knife. Store in airtight container until ready to assemble. 

Prepare mango compote by cooking mango puree with a little sugar, a pinch of salt and a small dash of yuzu juice until reduced and thick. Refrigerate until ready to assemble. 

Slice all the fruit and place on paper towel to absorb excess water. Refrigerate overnight. 

I used a combination of dairy and non-dairy cream to get a more stable filling that still tastes good. 

Stabilized whipping cream with non-dairy cream
Ingredients:
150g whipping cream (dairy cream) 
2 gelatin sheets, bloomed in ice water
180g whip topping (non-dairy whipping cream) 
1 tsp vanilla extract 

Steps:
1. Heat whipping cream until steaming (not boiling). Add bloomed gelatin and whisk until melted. 

2. Press cling wrap on surface of cream and refrigerate overnight. 

3. Beat chilled whip topping with vanilla extract using electric mixer until stiff peaks form. Set aside. 

4. Beat dairy cream set by gelatin with electric mixer until firm peaks form. Fold into whipped non-dairy cream until well combined. 

Assembly

1. Add a little whipped cream onto cakeboars and place first layer of chiffon cake on it. I cover the hole with a separate cake cutout. Wrap the cake with acetate sheet to facilitate assembly. Coat the sponge with some mango compote 

2. Add a thin layer of whipped cream and arrange the fruits around circumference and in the middle. Drizzle some compote on top of the mango slices in the middle. 

3. Cover fruits with more cream and smooth it out with a teaspoon. 

4. Drizzle some compote on top of the smoothened cream. Carefully place the next layer of cake on top and gently press it down. Repeat layering with cream, fruits and another sponge on top. Refrigerate for at least 2 hours before carefully removing the acetate sheet. 


Insert some dowels and glue a cakeboard on top using royal icing as a platform to put the cookie cake topper on. Keep cake refrigerated until ready to serve. 

Thank God it was very well received! 


With love, 
Phay Shing


Read More »

Sunday 1 November 2020

My Melody and Little Twin Stars Anniversary Chiffon


My Melody and Little Twin Stars Anniversary Chiffon Online Class is here!💖💖

Celebrating My Melody and Little Twin Stars 45th anniversary this year together, with this special mix characters chiffon class with a delicious cream cheese filling and hearts surprise within the same bake!

Sign up for the class here!🙂💕

These are official licensed Sanrio baking classes in collaboration with Sanrio =).

**A special FREE gift! In addition to the main My Melody and Little Twin Stars Anniversary Chiffon template, a free repeated characters template is included as a bonus!!

Baking kits with cream cheese filling, patterning batter, all food colouring and equipment for this cake are also available (for delivery within SG)!

With lots of love,
Susanne
Read More »