Monday 27 March 2023

Sanrio Hanami Dango Vegan Macarons

I am finally done with the first draft of Deco Marshmallows! While waiting for the editor to get back to me with it, I have decided to work one something I have been procrastinating for years---vegan macarons! 

As Sakura season is here, I am inspired by the Hanami dango, which is a traditional Japanese confectionery that announces the arrival of spring. Of course I couldn't resist the chance to make it kawaii with Hello Kitty, My Melody and Keroppi! 

Matcha, strawberry and vanilla white chocolate ganache as filling to match the traditional colours 

Besides vegan macarons with vegan fillings, I took the chance to try out vegan royal icing for some of the fine details.

All credit goes to Meiyee (Instagram account: nm_meiyee) for sharing her vegan recipes. Her work is beautiful, naturally coloured and flavoured! I adapted from her recipes that are shared so I didn't follow exactly what she did but do check out her account for the recipes and to marvel at her work! 

I used bakeable matcha powder with no additional artificial green colouring for the matcha shells and ganache. I added freeze-dried strawberry powder and a tiny bit of bottled strawberry emulsion for strawberry. I used matcha Pocky sticks for the "skewer" (I know it's not vegan but I prefer having everything edible but I didn't want to make the biscuit sticks from scratch too 🙈)

Here are some photos of the process:

Freshly baked shells. I was working on a separate set for future vegan macaron class material at the same time.

I actually rushed through the decoration and didn't manage to finish as I had to go out of the house. This is the works-in-progress decoration with vegan royal icing. Could have been better if I didn't rush

Strawberry, matcha and vanilla vegan white chocolate ganache before whipping it up to lighten the texture.

Filling up the macarons and inserting a matcha Pocky stick


Experienced macaron bakers will be able to tell that I had issues with one of the colours of batter and they would be right! I knew what went wrong and but am confident I can rectify it for the class. After all, this is my first attempt and it was rather ambitious of me to try three colours/flavours of macaron shells in a single batch. The flavour that I left to the last to work on had issues because the meringue needed to be whipped stiffer again and I should have trusted my instincts to do so. Can you tell which one it is? 

I am excited to be able to include vegan macarons as part of my class content after this experiment. Stay tuned for class announcements July onwards for vegan macarons! But note that I won't be teaching the Sanrio characters. 


Check out my Instagram reel for some video snippets of the aquafaba meringue and macaron batter!


with love,
Phay Shing


Read More »

Sunday 26 March 2023

Strawberry Cartoon Chiffon Cake Class


Love cartoons and desserts? Combine your passions in my new Strawberry Cartoon Chiffon Cheesecake Class! 🍓🍰 

I'll teach you Step-by-Step how to make the cutest yummiest cartoon cake ever! 😍  Here's a video to see what you will learn! 
Sign up link is here

With lots of love,
Susanne


Read More »

Tuesday 21 March 2023

Eeyore Sugar-Free Ube Coconut Chiffon Dome Cakes

 I am almost done with draft 1 of Deco Marshmallows! But before I complete writing the last two recipes and create the respective templates for them, I decided to take a short break to satisfy my curiosity as well as test out the ube paste that I am going to use in one of the marshmallow entries. Having had success with the sugar-free chocolate Rilakkuma swiss roll, I am curious to know if it works for decorative chiffon cake characters as well. Here's the result of my experiment!


This is actually my second attempt. The first attempt was considered a fail for me although taste and texture wise was great. Why so?

I use Allulose and Alchemy fibre as my sugar replacements for sugar-free chiffon cakes. I explained my choice of sugar-replacements in my previous post and you can read about it. 

While this combination of sugar replacements produce chiffon cakes that have texture like the real deal, Allulose browns at a much lower temperature than sugar. If you are baking strong colours, earthy, brown or black colours, the browning of Allulose would not be as obvious. But browning will show up more obviously for pastels and tricky colours like blue and purple. This makes baking "naked chiffons" or character chiffons trickier if you don't want the cakes to appear brown at all.

Using coconut milk like I did for this bake doesn't help either as the cake tends to brown more easily than if water is used but I prefer not to compromise the taste for looks. I used steam baking and lower temperature to help to mitigate the browning.

Video of the process is on my Instagram:

https://www.instagram.com/reel/CqEyn-EgGdl/?igshid=YmMyMTA2M2Y=

Sugar free ube coconut Eeyore dome cakes (makes one 7x7" sheet cake + 4 domes baked in glass bowls*)

Egg yolk batter
2 egg yolks
5g Allulose
30g oil of choice 
30g coconut milk
1.5 tsp ube paste/extract**
45g cake flour
Pinches of salt
white gel coloring (as needed or optional)**
1 drop of purple gel coloring (optional)**
2-3 drops strawberry paste**
1 small toothpick dip of peach gel colouring**

Meringue
3 egg whites
22g Alchemy fibre
53g Allulose
1/4 tsp Cream of tartar/lemon juice

* I used glass bowls that are about 9cm in diameter at the top and 6.5cm in height. You may use any metal or silicone molds about the same size as well but do note that any markings using edible marker should match the colour of the batter or pipe by freehand.

** Use 2 tsp ube paste and omit all extra colouring and flavouring if you are making plain ube coconut cake without Eeyore design. Bake in 6" chiffon tin or in 10x12" tray for Swiss roll.

Steps:
1. Preheat oven to 150C with tray of water at base of oven. Line 7x7" tray with Teflon sheet or parchment paper. Trace out the snout on outer side of glass bowls with edible marker.

2. Make the egg yolk batter. Whisk egg yolks, salt and Allulose until pale and thick. Add oil and whisk until combined. Add coconut milk and whisk until combined. Gradually sift in cake flour and whisk until no trace of flour is seen. Add a little white gel colouring if you wish to make the batter base less yellow. 

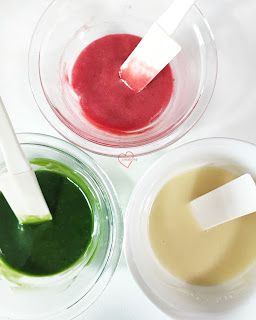
3. Portion out 2 tsp of batter and add strawberry paste to colour it pink. Portion 2 tsp of batter and colour it peach coloured. Add ube paste to the remaining batter. Add purple gel colouring if desired.

4. Make the meringue. Whisk together Allulose and Alchemy fibre in a small bowl. In a clean metal bowl, beat egg whites with cream of tartar until firm (almost stiff) peaks, adding sugar-replacement mix gradually once egg whites are foamy.

5. Fold in 4 tbs of meringue into the each of the pink and peach batters. Fold in the rest of the meringue into purple ube batter. Fold in the meringue in two or three additions. Transfer purple and peach batter into piping bags with hole cut.

6. Pipe purple batter into glass bowls until it reaches the line marked by edible marker for the snout. Pipe the snout with peach batter. Fill up the whole glass bowl with more purple batter, leaving about 1cm unfilled. 

7. Pour the pink batter into the 7x7" tray and spread it to fill half (one side) of it. Fill the other half with purple batter.

8. Place all cakes into the oven. Reduce temperature to 140C. Bake for 10 minutes or until the sheet cake is baked through. Remove from oven and immediately flip it out onto a fresh sheet of parchment paper. Continue baking the dome cakes at 130C for another 15 minutes. Reduce temperature to 110C and bake for another 10 minutes or until skewer comes out clean. Please adjust baking temperature and time according to your oven. All temperatures mentioned in this post is as read by the oven thermometer.

9. Let the dome cakes cool completely before carefully unmolding by hand. Be gentle as chiffons are delicate! 

Extra details like the hair and eyes
10g butter
10g egg whites
10g cake flour
10g powdered erythritol (replace with icing sugar if you don't have. Although it won't be 100% sugar-free, this is negligible)
1g charcoal powder
1g cocoa powder (may replace with charcoal)

Steps:
1. Preheat oven to 150C and line a small tray with teflon sheet or parchment paper.

2. Whisk everything together until smooth. Transfer into a small piping bag with a small hole cut.

3. Pipe a blob with spikes for Eeyore's hair. I did this by freehand. Pipe a patch of batter about 6x6cm in area for the eyes. Batter doesn't have to be too thick. About 2mm thick will do.

4. Bake for 7-8 min or until it appears dry. 

5. Cool completely before carefully removing the hair and use a Wilton #12 tip to cut out the eyes.

Assembly
1. Use a knife to press a line down the front of Eeyore's face.

2. Use a tear drop shape cookie cutter to cut out the ears from the sheet cake. I made one out of metal can. Press the pink and purple cutouts together for each ear.

3. Melt some sugar-free chocolate (I used 100% cocoa with no sugar added from Pascha) and colour it black with charcoal powder or oil based black colouring, or use black chocolate chips. Paint on the nostrils, stitches and eyebrows with melted chocolate.

4. Glue on the hair and eyes with melted chocolate. 


I had to stop work here as it was night time and had other household things to deal with but took the chance to take a photo of the works-in-progress look.

5. Glue on the ears with melted marshmallows or cake glue. Use short pieces of wooden skewer to help to secure it in place if necessary but warn your recipients! 

As with all sugar-free bakes made with sugar replacements, eat in moderation as some people have digestive systems that are sensitive to them.


with love,

Phay Shing


Read More »

Wednesday 15 March 2023

Black Pink Oreo Chiffon Cake


Black pink oreo chiffon cake recipe!

Video tutorial here.  
I was surprised that many of you were interested in this recipe, so here’s the tutorial. This is a very yummy cake! 

Black pink oreo chiffon cake (6” heart pan) 
2 egg yolks 
30g vegetable oil 
24g milk 
4g vanilla extract 
42g cake flour, sifted 
5 black pink oreos 

2 egg whites 
45g castor sugar 
Pinch of cream of tartar 

Crush 2 pink oreos (without filling) into fine crumbs. Mix egg yolks with oil, milk and vanilla extract.  Add in cake flour, pink oreo crumbs and a drop of pink food coloring (optional). 
Whisk egg whites with cream of tartar and castor sugar (added gradually) till firm peaks. Fold the egg yolk batter above into the whipped egg whites. 
Arrange the pink oreos (6 halves) at the base of the cake pan. Pour the cake batter over. Bake at 140C for 45+ min, till the centre of the cake is dry. Enjoy! 

With love, 

Susanne 


Read More »

Monday 13 March 2023

Sugar-free Rilakkuma Chocolate Swiss Roll

 In the midst of writing Deco Marshmallows, I couldn't resist taking a little time out to make this simple bake because we stumbled across an awesome source of chocolate that is 100% cacao with no sugar added BUT is so smooth! Once we tasted the chocolate chips which were suitable for use in baking and making hot chocolate, I knew I had to try it for my bakes. Most other 100% cacao chocolate we have tasted tend to be a little dry and gritty. Here's my rich chocolate swiss roll made without white sugar!


Even the decoration for Rilakkuma is made without white sugar!

The Swiss roll is made of sugar-free chocolate chiffon sponge and sugar-free dark chocolate cremeux. Those of you who aren't familiar with cremeux, it is a cross between ganache and custard.

Where is this awesome chocolate from you may ask? It is from Pascha. I used their unsweetened dark chocolate chips. The sugar replacements I used for the cremeux are a mix of Allulose and Maltitol, and for the chiffon sponge I used a mix of Alchemy fibre (which is a blend of Inulin and edible gum) and Allulose. Why these choices of sugar replacements? They are all soluble in water so you don't get any grittiness from them like you would from Erythritol. While Alchemy fibre is not sugar, it adds bulk to the bake, is a good meringue stabilizer and good for diabetes management and digestive system. I thought of using it when I saw Swee Heng, a bakery chain in Singapore, use it for their sugar-free chiffon cakes. While Maltitol is a sugar replacement, it contains carbohydrates and will raise the blood sugar levels a little (but much less than sucrose), unlike Allulose and Alchemy fibre. I used a little Maltitol instead of using all Allulose because I have it lying around at home and it needs to be used up 🙈. All the sugar replacements used here taste less sweet than white sugar (sucrose) so I used more than if white sugar were used. The chocolate doesn't contain sugar at all so that needs to be compensated as well. You may adjust the amount of sugar according to taste. We don't have a sweet tooth so if you prefer sweeter tasting cakes, please add more sugar replacement.

Sugar-free dark chocolate cremeux (with yuzu option)
Ingredients:
150g heavy cream (may replace with 40g butter and 110g full fat milk)
150g full fat milk
60g egg yolks (about 3-4)
55g Allulose (45g if not adding yuzu concentrate)
20g Maltitol (15g if not using yuzu concentrate, may replace with Allulose)
Pinches of salt
140-145g sugar-free 100% cacao dark chocolate (unsweetened)
3g gelatin bloomed in 20g 100% yuzu juice concentrate (optional)

1. If adding yuzu, bloom gelatin in chilled yuzu juice concentrate. Set aside. Omit gelatin if not adding juice concentrate.

2. Whisk together egg yolks, salt and sugar replacements in a heatproof bowl. 

3. In the meantime, heat milk and cream in a saucepan until steaming hot but not boiling. Pour into egg yolk mixture in a thin stream while whisking the egg yolk mixture to temper the egg yolks. Pour everything back into the saucepan.

4. Whisk the custard and cook until 82-84C. 

5. Place chocolate and bloomed gelatin in large mixing bowl. Pour hot custard over and let it sit for 2 minutes. Use an immersion blender to blend until smooth.

6. Press cling wrap onto the cremeux and cool to room temperature before refrigerating overnight or at least 4 hours.


7. When ready to assemble with sponge, remove from fridge and let it sit at room temperature for 30 minutes. Loosen the cremeux gently with a spatula before using.


I added a little yuzu to offset the richness of the chocolate. You may use orange juice concentrate and orange zest to add some citrusy notes too.

Sugar-free chocolate chiffon sponge
Ingredients (makes one 10x12" and one 7x7" sheet cakes):
Egg yolk batter
4 egg yolks
10g Allulose
20g sugar-free 100% cacao dark chocolate (unsweetened)
45g vegetable oil
45g boiling hot water 
10g cocoa powder (I used Valrhona)
65g cake flour
½ tsp baking powder
Pinch of salt
1.5 tsp vanilla extract 

Meringue
4 egg whites
30g Alchemy fibre
70g Allulose
¼ tsp cream of tartar 

1. Line the trays with Teflon sheets or parchment paper. Preheat oven to 170C. 

2. In a heatproof or microwave safe bowl, bloom cocoa powder by whisking in boiling hot water. Let it sit for 1 minute. Add unsweetened chocolate and stir until melted and smooth. Microwave or double boil if necessary if the chocolate is not fully melted. Set aside.

3. Prepare egg yolk batter. Whisk together egg yolks, salt and Allulose until thick and pale. Add oil and whisk until combined. Add chocolate paste in 2. and whisk until well combined. Add vanilla and whisk until combined. Gradually sift in flour and baking powder and whisk until no trace of flour is seen.

4. Prepare meringue. In a small bowl, whisk together Alchemy fibre and Allulose. In a clean metal bowl, beat egg whites with cream of tartar until firm peaks, gradually add sugar-replacement mix once the egg whites are foamy. 
You should also be able to flip the bowl upside down without the meringue sliding out or flopping around.

Meringue with firm peak


5. Quickly but gently fold meringue into egg yolk batter in three additions. Divide the batter among the two trays in a ratio of approximately 5:2 by weight for larger: smaller tray.

6. Bake for 12 min or until skewer comes out clean. Immediately flip the cakes out onto fresh sheet of parchment paper and roll up the larger cake to cool. Note that each oven is different so adjust temperature and time accordingly.

Freshly baked 10x12" sheet cake

When you are ready to assemble, unroll the large sheet cake and pipe a generous amount of cremeux in the middle of the sponge. Use a small spatula to smooth out the cremeux as necessary. Roll it into a tight roll, cutting off the excess strip of sponge if necessary if you are making Rilakkuma's face for each slice of cake. Refrigerate for 2 hours.

In the meantime, you may cut out Rilakkuma's ears from the smaller sheet cake using 2-2.5cm round cookie cutters. Cut off a little cake along the circumference with the same cutter so the ears can sit nicely on the head. Keep the small cake cutouts in a container or covered until ready to assemble.

I used white strawberries for Rilakkuma's snout as it is in season now. You may use other fruits like banana if you wish but dip it in lemon juice to prevent oxidation. I used mango for Rilakkuma's inner ears. I used a smaller round cutter or you may use jumbo straw to cut it out. Leave the cut pieces of fruit on paper towel in the fridge to remove excess water.

When it is time to assemble, you may melt a little chocolate with charcoal powder (or use black chocolate) and added on the eyes, nose and mouth of a cut slice of swiss roll. Cut slices of swiss roll with a serrated knife and arrange the ears and facial features on the serving plate. 

Serve with extra fruits (highly recommended) as this is a very rich cake that serious chocoholics can appreciate. And by serious chocoholics I mean those who appreciate cacao without too much added sugar to offset the natural bitterness. My hubby is one such person and he's the type that likes his eating chocolate, chocolate drink and chocolate bakes with a touch of bitterness from the cacao. Needless to say, hubby gave a thumbs up for the cake! Best eaten chilled when the cremeux is firmer.


with love,

Phay Shing

Read More »

Thursday 9 March 2023

Sumikko Gurashi Chiffon Cake


Sumikko Gurashi Birthday chiffon cake for my daughter's birthday party. Thank God it was well-received!

With lots of love,
Susanne


Read More »

Monday 6 March 2023

Sugar-Free Cinnamoroll Marshmallows

 This was my first attempt at sugar- free character marshmallows in December last year. I decided to give Cinnamoroll a try since my friend requested for some Cinnamoroll cookies and macarons at the same time. 


Ever since this first attempt, I have refined the recipe until I can safely say I am satisfied with the ingredient ratios for sugar-free character marshmallow making! Working with sugar replacements isn't as straightforward as they don't behave like sugar does when working with sugar syrups. So glad to find the formula to work with where hubby my taste tester can tell me "This is more like proper marshmallow!" 

I will share this formula in my upcoming Deco Marshmallows book but for now, you can take a sneak peek at how I piped these using the templating method in the video over here:

https://www.instagram.com/p/CoVyFGKSY2s/?igshid=NTdlMDg3MTY=

The templating method is much easier for those of us who are artistically challenged and uses so much less cornstarch! Here is a peek at the piped marshmallows before dusting!


with love,

Phay Shing

Read More »