Saturday 30 April 2022

Dragonfruit Rose Mantou (Mother's Day Special)

It is my pleasure to share a full length video tutorial for a Culinary Arts Ministry Mother's Day special with my church Adam Road Presbyterian Church! 

Here is a screenshot of the simple ingredients you need for making the rose mantous.


Please click on this link to view it.

Have fun making these healthy edible roses for or with your mum!


Note that the colour of the roses may differ depending on steaming time and whether you choose to use a mix of milk/water and dragonfruit as well! 


with lots of love,

Phay Shing

Read More »

Wednesday 27 April 2022

Angry Bird Hatchlings Marshmallows

While making a batch of brown sugar teddy bear plushiemallows for my friend, I made some marshmallows in the semblance of my kids' favourite plushies! 

Blue and green hatchling plushiemallows!

These were made with the same recipe and batch as this post so you may head over there for recipe. I would have preferred using all white sugar so I didn't have to compensate so much for the light tanned colour caused by the brown sugar but I didn't want to end up having too much marshmallow by making separate batches!

As usual I mark out the size and rough shape of the character so that they turn out approximately the same size and shape. I used a measuring spoon here.

Marking out the shapes on bed of cornstarch. You may use a mix of icing sugar and cornstarch if you wish.

Freshly piped marshmallows!

And of course I have to reveal the plushies I based my creation on!


Here's a video of the plushiemallow in action!


As mentioned previously, I prefer toasting marshmallows instead of floating them in beverages because toasting marshmallows bring out a wonderful caramel aroma and taste that cannot be found in untoasted ones. I didn't bake any Graham crackers at the time of making these plushiemallows so I used the plain crackers we have at home instead.

My kids had a good laugh seeing their edible versions of the plushies sunburnt😆


with love,

Phay Shing


Read More »

'Rose Tart' Tea Castella Cake


Rost tart made from tea castella cake! Created this early mother's day cake! 💗

Tea Castella Cake 
3 egg yolks 
33g warm oil (60C) 
40g peony jade tea 
54g cake flour 
Pinch of salt 

3 egg whites 
¼ tsp cream of tartar 
70g castor sugar 

Tea-infused jam 
240g peony jade tea 
70g sugar 
5g lemon juice 
2g pectin  

Recipe video here.  

Make peony jade tea by steeping 4 tsp tea leaves in 2 cups of hot water. Heat the oil to 60C. Add 40g tea, then whisk in sifted cake flour and salt. Add in the egg yolks and mix well. Divide the batter 1/3 (plain) and 2/3 (red).  

Whisk egg whites in a separate bowl with cream of tartar and sugar till firm peaks. Divide the meringue 2/3 and 1/3 as above and fold in. 

Fill two 4” pans with plain batter till 2/3” thick. Bake at 160C for 20min. Pour the remaining plain and red batter into a half sheet pan (18”x11”). Bake for 16min. 

Make the tea jam: Mix sugar with pectin, then add to 240g tea and lemon juice. Bring to a boil over low heat and allow to thicken. Cool and transfer to piping bag. 

To assemble, cut a thin strip of plain sheet cake and wrap around the 4” cake. Pipe a layer of tea jam over the cake. Cut semicircles (1.5” round cutters) from red cake and line the cake in circles to make the giant rose. Enjoy! 

With lots of love,
Susanne


Read More »

Monday 25 April 2022

Bento Box Chiffon Cakes


Another version of Bento chiffon cake, this time peeking out of the box cover! 

Check out my other bento chiffon cakes here and here

With lots of love, 

Susanne 


Read More »

Friday 22 April 2022

Chocolate Filled Strawberry Marshmallow Bouquet

 This is rather last minute but I have decided to share how to make this edible bouquet made out of marshmallows!


The marshmallow flowers are all filled with chocolate!


The marshmallow recipe and technique is different from all the plushiemallows I have been making. These are actually traditional Russian marshmallows called Zephyr or Zefir which are agar and fruit-based. No gelatin is used for the version I follow so there is no pork, beef or fish source in there. I use lots of strawberries in this bouquet. The pink roses are coloured with the strawberries and a little strawberry paste so no additional food colouring is added!

The challenge of making Zephyrs is the precision required of each step and you have to work relatively fast. But I will try and show you how to make it manageable. 

Class details will include technique of making Zephyr, how to pipe hydrangeas and roses, and fill them with chocolate. And of course how to form a simple bouquet with materials that you either have at home or are easily available from supermarkets.


Here's a short video of how bouncy they are! Less bouncy than plushiemallows due to the use of different ingredients and technique, and also due to the chocolate filling inside, but nonetheless still unmistakably marshmallowy bouncy!


Both online and hands-on classes are available. Hands-on participants will have access to online class material at no extra charge. There is no expiry and you can watch the pre-recorded class unlimited number of times and you may ask me questions if you encounter difficulty.


Click here for hands-on class registration.

Click here for online class registration.


with love,

Phay Shing

Read More »

Monday 18 April 2022

Mermaid Pusheen Vanilla Choux Pastries (New technique!)

 I made these Mermaid Pusheen choux pastries in early January this year but only got around to posting it now. Better late than never!


These creampuffs with crunchy cookie dough (or craquelin) are filled with vanilla diplomat cream.

Choux pastries need not come in round choux buns, long Eclairs or donut shaped like Paris Brest. They can come in any shape you want! Besides demonstrating how to make non-regular shaped choux pastries, I am going to show you that it is possible to add on details using choux pastry batter on a baked choux pastry case instead of using chocolate, fondant or royal icing in a double-baking technique.

You may refer to this post for my default craquelin and choux pastry batter recipe. Note that baking temperature and time may vary according to your oven.

Begin by preparing the craquelin. You may refer to this post to see how I create customized shaped cookie dough cutouts without a customized cookie cutter.

Freeze this tray of craquelin cutouts until frozen hard, at least an hour or overnight.

Prepare choux pastry batter as per normal and pipe the mermaid Pusheen shape on perforated mat with a template underneath.

Place the craquelin on top of the piped batter. Note that the craquelin is about 5-10mm larger than the piper batter.

Bake as you normally would. Let the baked pastries cool for about 20-30min before piping on the pink frills on the pastries with choux batter. Pipe the pink tail and grey front paws separately on the perforated mat as well. Pipe only a thin layer of pink batter for the frills and dab down any peaks with a damp finger. Thick batter piped will not stick well to the contours of the pastry after baking.


Bake in preheated oven at 130-150C for 30min or until thoroughly dry. This baking temperature should be high enough to thoroughly bake the batter but not so high that it browns the pastries further. 

I have mentioned before that long baking times for choux isn't a concern for me as the filling has such high water content that it softens the cases within half an hour of filling it. If you prefer it really crisp, double-baking is perfect for you!


Add on the facial features, stripes and scales on the tail with royal icing . I used a gold star sprinkle for decoration as well. The pink tail and front paws were glued on using royal icing.

Recipe for vanilla diplomat cream can be found in this post .

Here's a short video of cutting a choux pastry, revealing the cross section!


Pardon the poor lighting as it was rainy, and the slightly messy cut as the crumbs trailed down the cream😅. I took this video and cover photo on a different day from the day I finished assembling the pastries (which had better lighting).

I made some mermaid Pusheen and unicorn Pusheen macarons along with these choux pastries as well! Stay tuned for another Pusheen themed post!

Get a copy of my Deco Choux Pastries book if you would like to have a comprehensive guide to making decorative choux pastries! I am also most active on Instagram so do check out my account at phay_shing if you would like to have a look at what I am up to in a more timely manner😊.


with love,

Phay Shing


Read More »

Tuesday 12 April 2022

Totoro and Mei Earl Grey Salted Caramel Macaron Scene


I had a request for a macaron scene with birthday girl's favourite characters in there so I created this!

Totoro and Mei with elephant, giraffe and koala!

I used my default swiss meringue method recipe to make the macaron shells for the characters and the large round base. 

The trees are made of black tea brown sugar meringues. I got the basic recipe from a baker friend but tweaked it for the added flavours so I am not able to share it. 


Yes the entire tree is made of meringue! No royal icing or wires used to glue or support the structure. I had to build it up in stages like a 3D cardboard tree except all parts and glue are made of meringue. These were made in advance, thoroughly dried and stored in airtight container.

Here's a better view of all the characters. I usually make duplicates of each character in case of accidents while handling.


I filled the macarons with Earl grey Italian meringue buttercream (IMBC), homemade salted caramel and some crushed biscoff.

I folded in some salted caramel, crushed biscoff and some earl grey tea leaves into half of the Earl grey IMBC, and drizzled more salted caramel and sprinkled more crushed biscoff for the large macaron base.

 I have always used Swiss meringue buttercream as my default buttercream base but thought why not try Italian meringue based buttercream instead so that I can incorporate more brewed tea in the buttercream.

Earl grey Italian meringue buttercream (IMBC)
Ingredients:
76g egg whites (about 2 eggs)
100g caster or granulated sugar (portion about 1 tsp out for egg whites)
30g concentrated Earl Grey tea*
114g unsalted butter (cut into small pieces, cool but softened)
A pinch of salt
1/2 tsp vanilla extract

* Steep 4 Earl grey teabags in 60g boiling water for 10 minutes. Squeeze out the liquid from the bags as much as possible. Measure out 30g for making IMBC

Steps:

1. Place sugar (100g minus 1 tsp) , concentrated tea and a pinch of salt in a small saucepan and heat at medium-low heat. Stir intially to help the sugar dissolve but once the water starts boiling, stop stirring. 

2. In the meantime, beat egg whites with 1tsp sugar until foamy. Reduce mixer speed if necessary to prevent overwhipping.

3. Once syrup temperature reaches 110C, turn up mixer speed and whip until soft peaks as you wait until syrup reaches 115C. Again, reduce mixer speed as necessary once soft peak is reached. Once temperature is reached, remove from heat. Turn mixer speed up to medium-high and pour the syrup down the side of mixing bowl in a slow and steady stream. Keep beating on medium-high speed for 10-15 minutes or until Italian meringue is cooled to room temperature.. It is important to make sure butter is not warm when you add the softened butter.

4. Add butter a little at a time while beating on medium-low speed. You may switch to paddle attachment if you wish but I prefer having less things to wash. Don't panic if it appears to split a little. just keep going and adding butter a little at a time.

5. After all the butter is added, add vanilla. Continue whipping but increase mixer speed to medium high and beat for another 2 minutes.

You may use the Earl Grey IMBC as it is. But I portioned out about half of the IMBC and added homemade salted caramel with the ratio of 
1:2 for salted caramel : Earl grey IMBC,
folded in some Earl grey tea leaves (about one teabag's worth) and crushed biscoff (about 30g). Do note that the ratios can be adjusted according to taste.


Sharing a picture of the assembled large base with a meringue tree before the tree gets hidden by the characters.

I hope this creation brought a smile to your face as it did for me and the recipient! 

Do check out my Instagram account at phay_shing for a more up-to-date view of my baking journey!

with love,
Phay Shing
Read More »

Comic Chiffon Cake


Comic Chiffon Cake!
Thought it was too cute not to try the trending webtoon cake! This is my watermelon comic chiffon cake version =p Does it look like from the page of a webtoon? 

Here's a video of the comic cake with me instead? =p 


Just opened a new Comic watermelon chiffon cake at Redman next month too! Check it out here if you are keen =) 


With lots of love,

Susanne


Read More »

Wednesday 6 April 2022

Gudetama Chiffon Egg Cakes


Cute Lemon Egg Cakes singing & dancing 🥰💃

Which is your favorite?❤️😛

Lemon Chiffon Egg Cakes🍋
1 egg yolk
10g vegetable oil
5g lemon juice
5g milk
1/4 tsp vanilla extract
15g all-purpose flour
¼ tsp lemon zest
¼ tsp lemon emulco (optional)

1 egg white
25g castor sugar
Few drops lemon juice

@suncorefoods yellow safflower for the color

Whisk egg yolks with oil, lemon juice, milk, vanilla, lemon zest. Add in sifted flour and whisk till well combined. Add in yellow safflower powder and mix till desired shade.

Whisk egg whites with sugar and lemon juice in a new bowl till firm peaks. Fold in the meringue till well incorporated.

Pour the batter into 6 drained egg shells till 2/3 full. Bake at 140C for 30 mins. Unmold when the cakes are fully cool. Decorate with melted chocolate, sheet cake and sprinkles.

Hope they made you smile!!❤️❤️🥰
 

Read More »

Tuesday 5 April 2022

Bear Plushie Brown Sugar Marshmallow

My friend requested for me to make marshmallows modelled after her favourite bear soft toy, Momo, that has been with her since childhood so this is a special bake 😊.


Have a look at Momomallow in action and Momomallow with the real Momo!


I thought more practice with character marshmallows is always good so I took time out to make these bears along with some of my kids' favorite plushies (stay tuned for future post!). I decided to use some brown sugar to replace white sugar for a naturally tanned colour.

Brown sugar marshmallow
Ingredients:
75g brown sugar
125g caster or granulated sugar
82g light corn syrup
A pinch of salt
1/8 tsp cream of tartar (optional)
60g water
75g egg whites
9g (1 tbs) gelatin powder
30g ice water
1/2 tsp vanilla extract

Steps:
I followed almost the same steps as my original reference recipe but melted the gelatin separately instead of in the sugar syrup. I poured the gelatin into the Italian meringue after a while after adding in the syrup to egg whites.

Remember to use a taller saucepan when using brown sugar in Italian meringue as the bubbling syrup rises a lot higher than white sugar.

Before making the marshmallow batter, prepare your baking tray by lining with parchment paper and then covering with generous amount of cornstarch or a mix of cornstarch and icing sugar. You may want to mark out the borders or rough shapes of the character in the bed of cornstarch so that they end up almost the same size and shape when you pipe.


I coloured a little batter with charcoal powder for black marshmallow batter for the eyes and nose. Don't use piping tips so that you can microwave the bag of marshmallow batter any time it thickens up too much.


Leave to dry in the open overnight before dusting with cornstarch or a mix of cornstarch and icing sugar. Store in airtight condition at cool room temperature up to two weeks.

Follow me on Instagram at phay_shing to see more of my work as I don't necessarily post all my bakes in the blog in a timely manner.


with love,

Phay Shing

Read More »

Friday 1 April 2022

Bunny Pandan Coconut Gula Melaka Swiss Roll

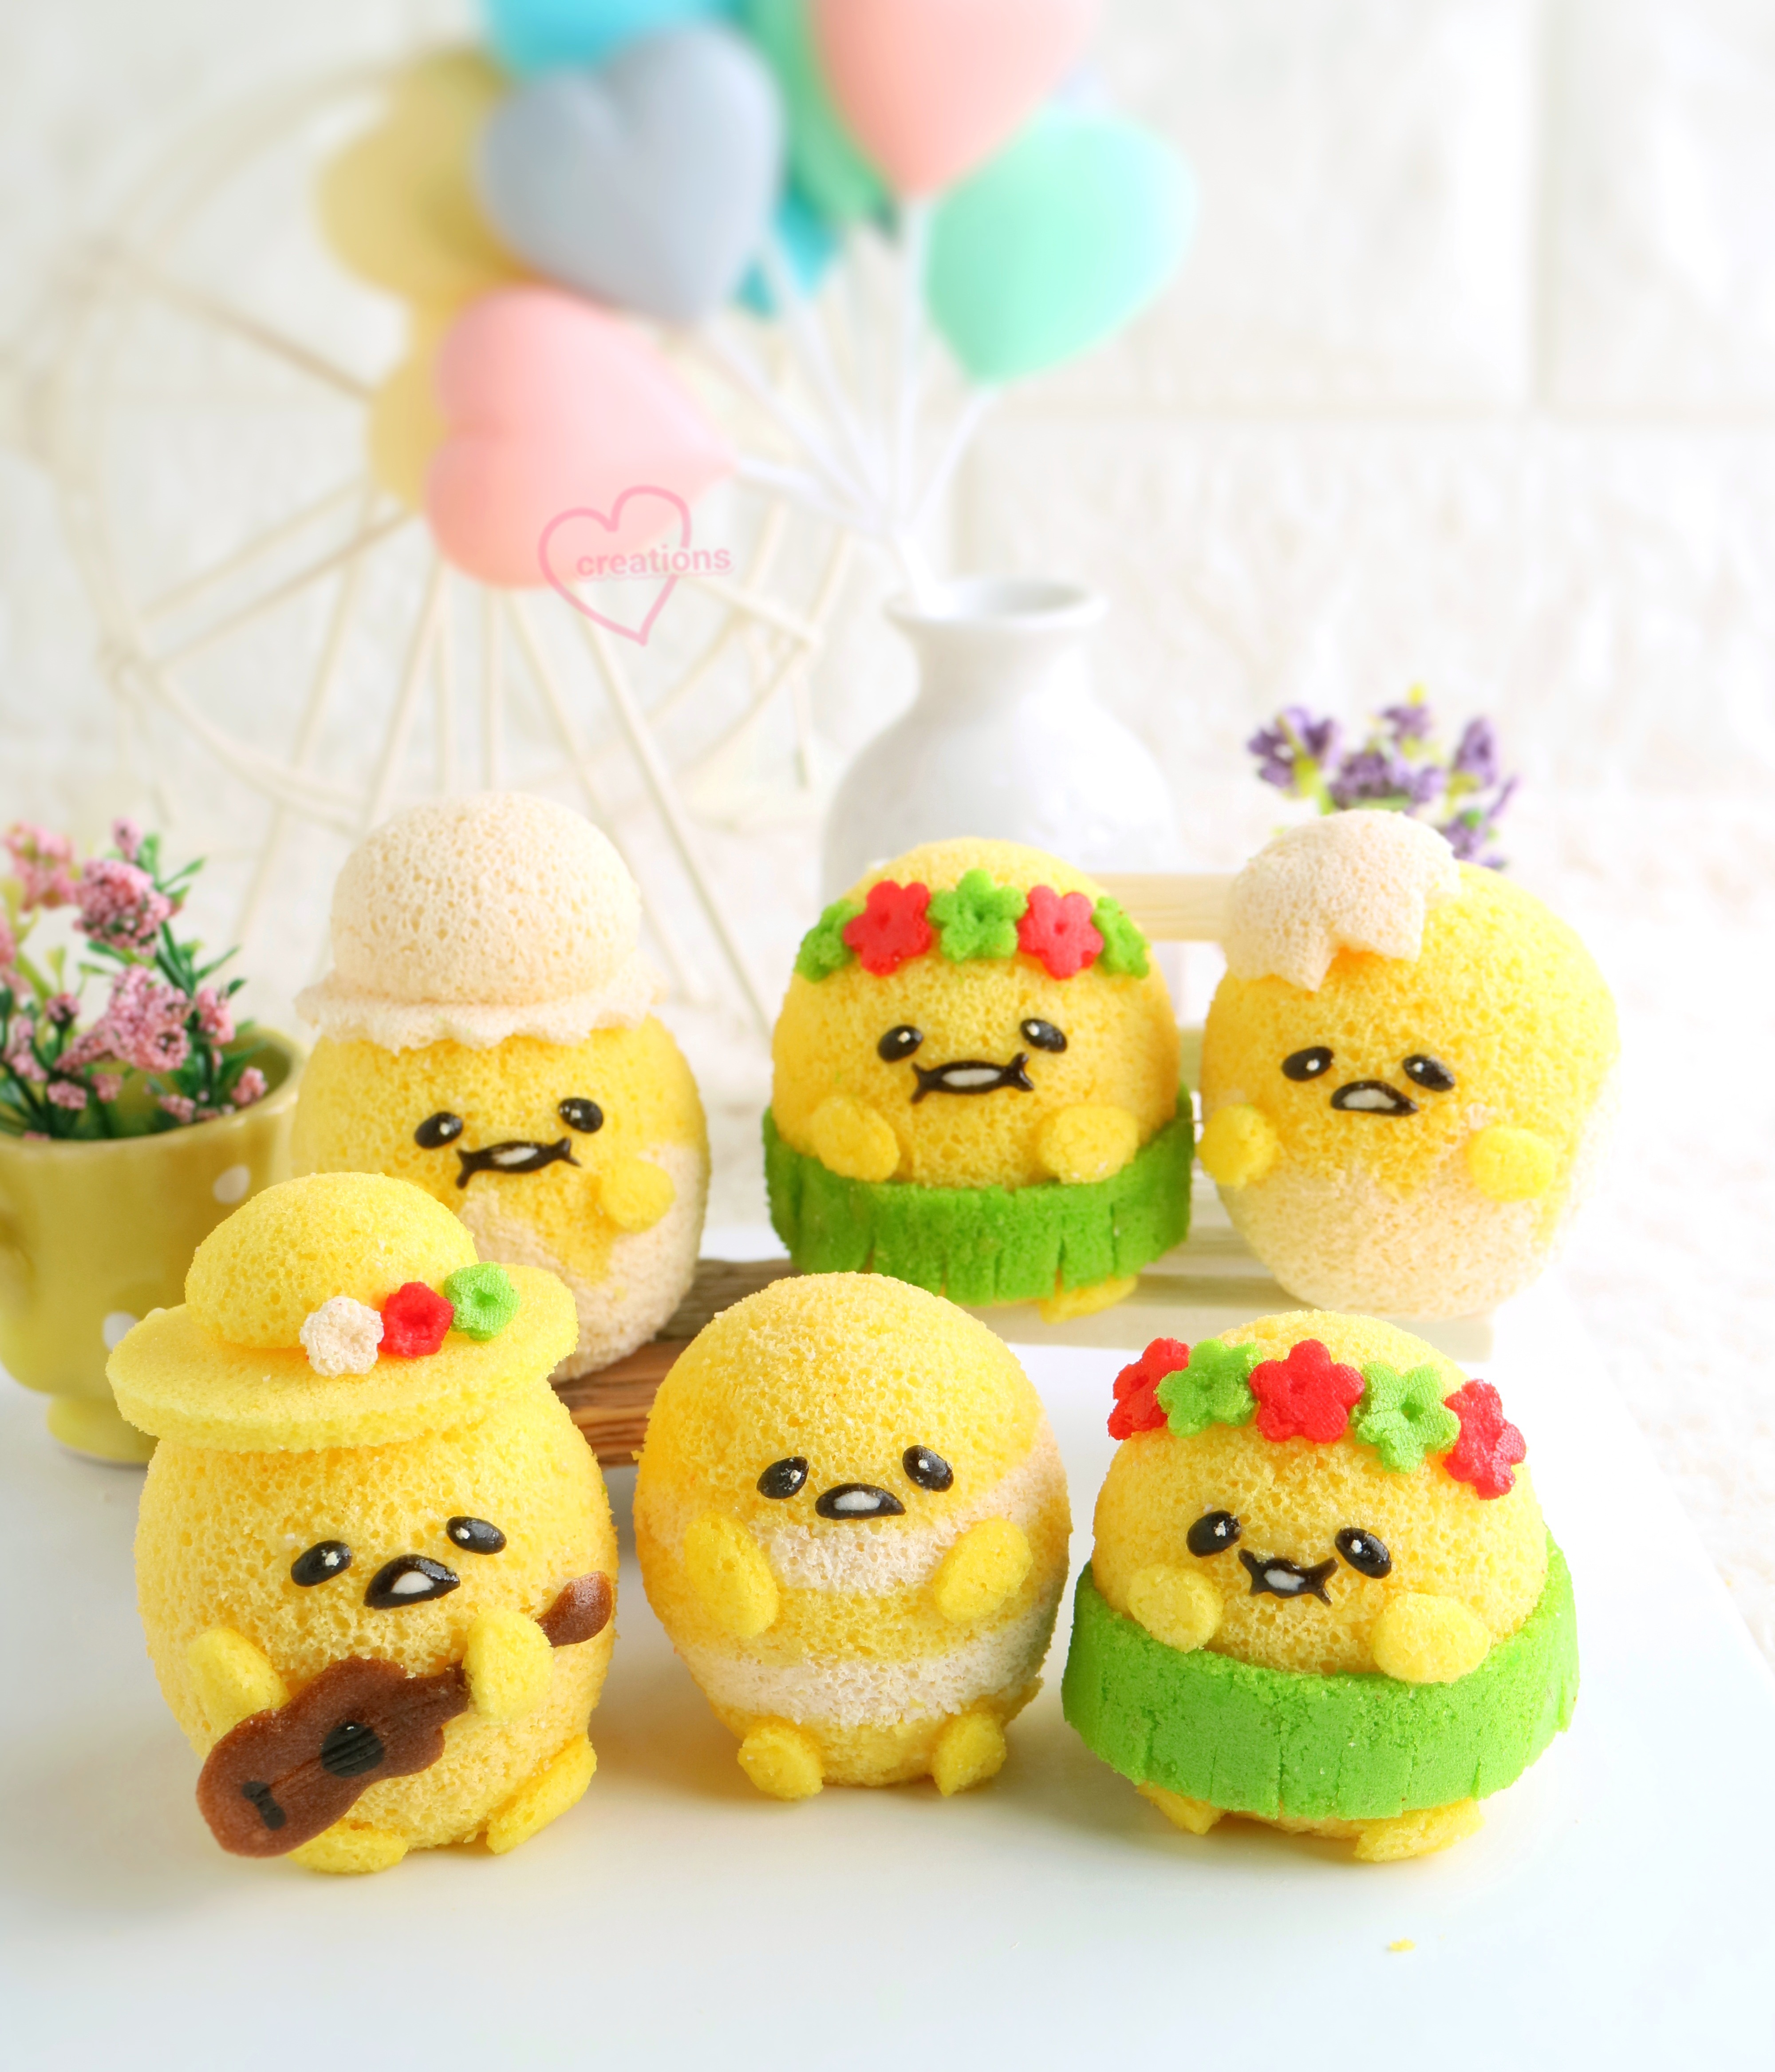
This project has been on my waiting list for a while after I made the corgi swiss roll based on my 3D corgi design. Presenting my bunny swiss roll based on my 3D teacup bunny macarons and 3D bunny macaron designs!


Pandan coconut gula melaka chiffon sponge with the same flavour of diplomat cream and coconut agar jelly in the middle. 

To be honest, I had trouble taking photos of the roll cake together with the macarons because which ever angle you choose, something will aways look odd😅. I did a poll on Instagram and chose the one that was more popular as the cover photo.

I begin the project by making the templates for cookie cutter and patterned roll. I made my own cookie cutter based on the template design.
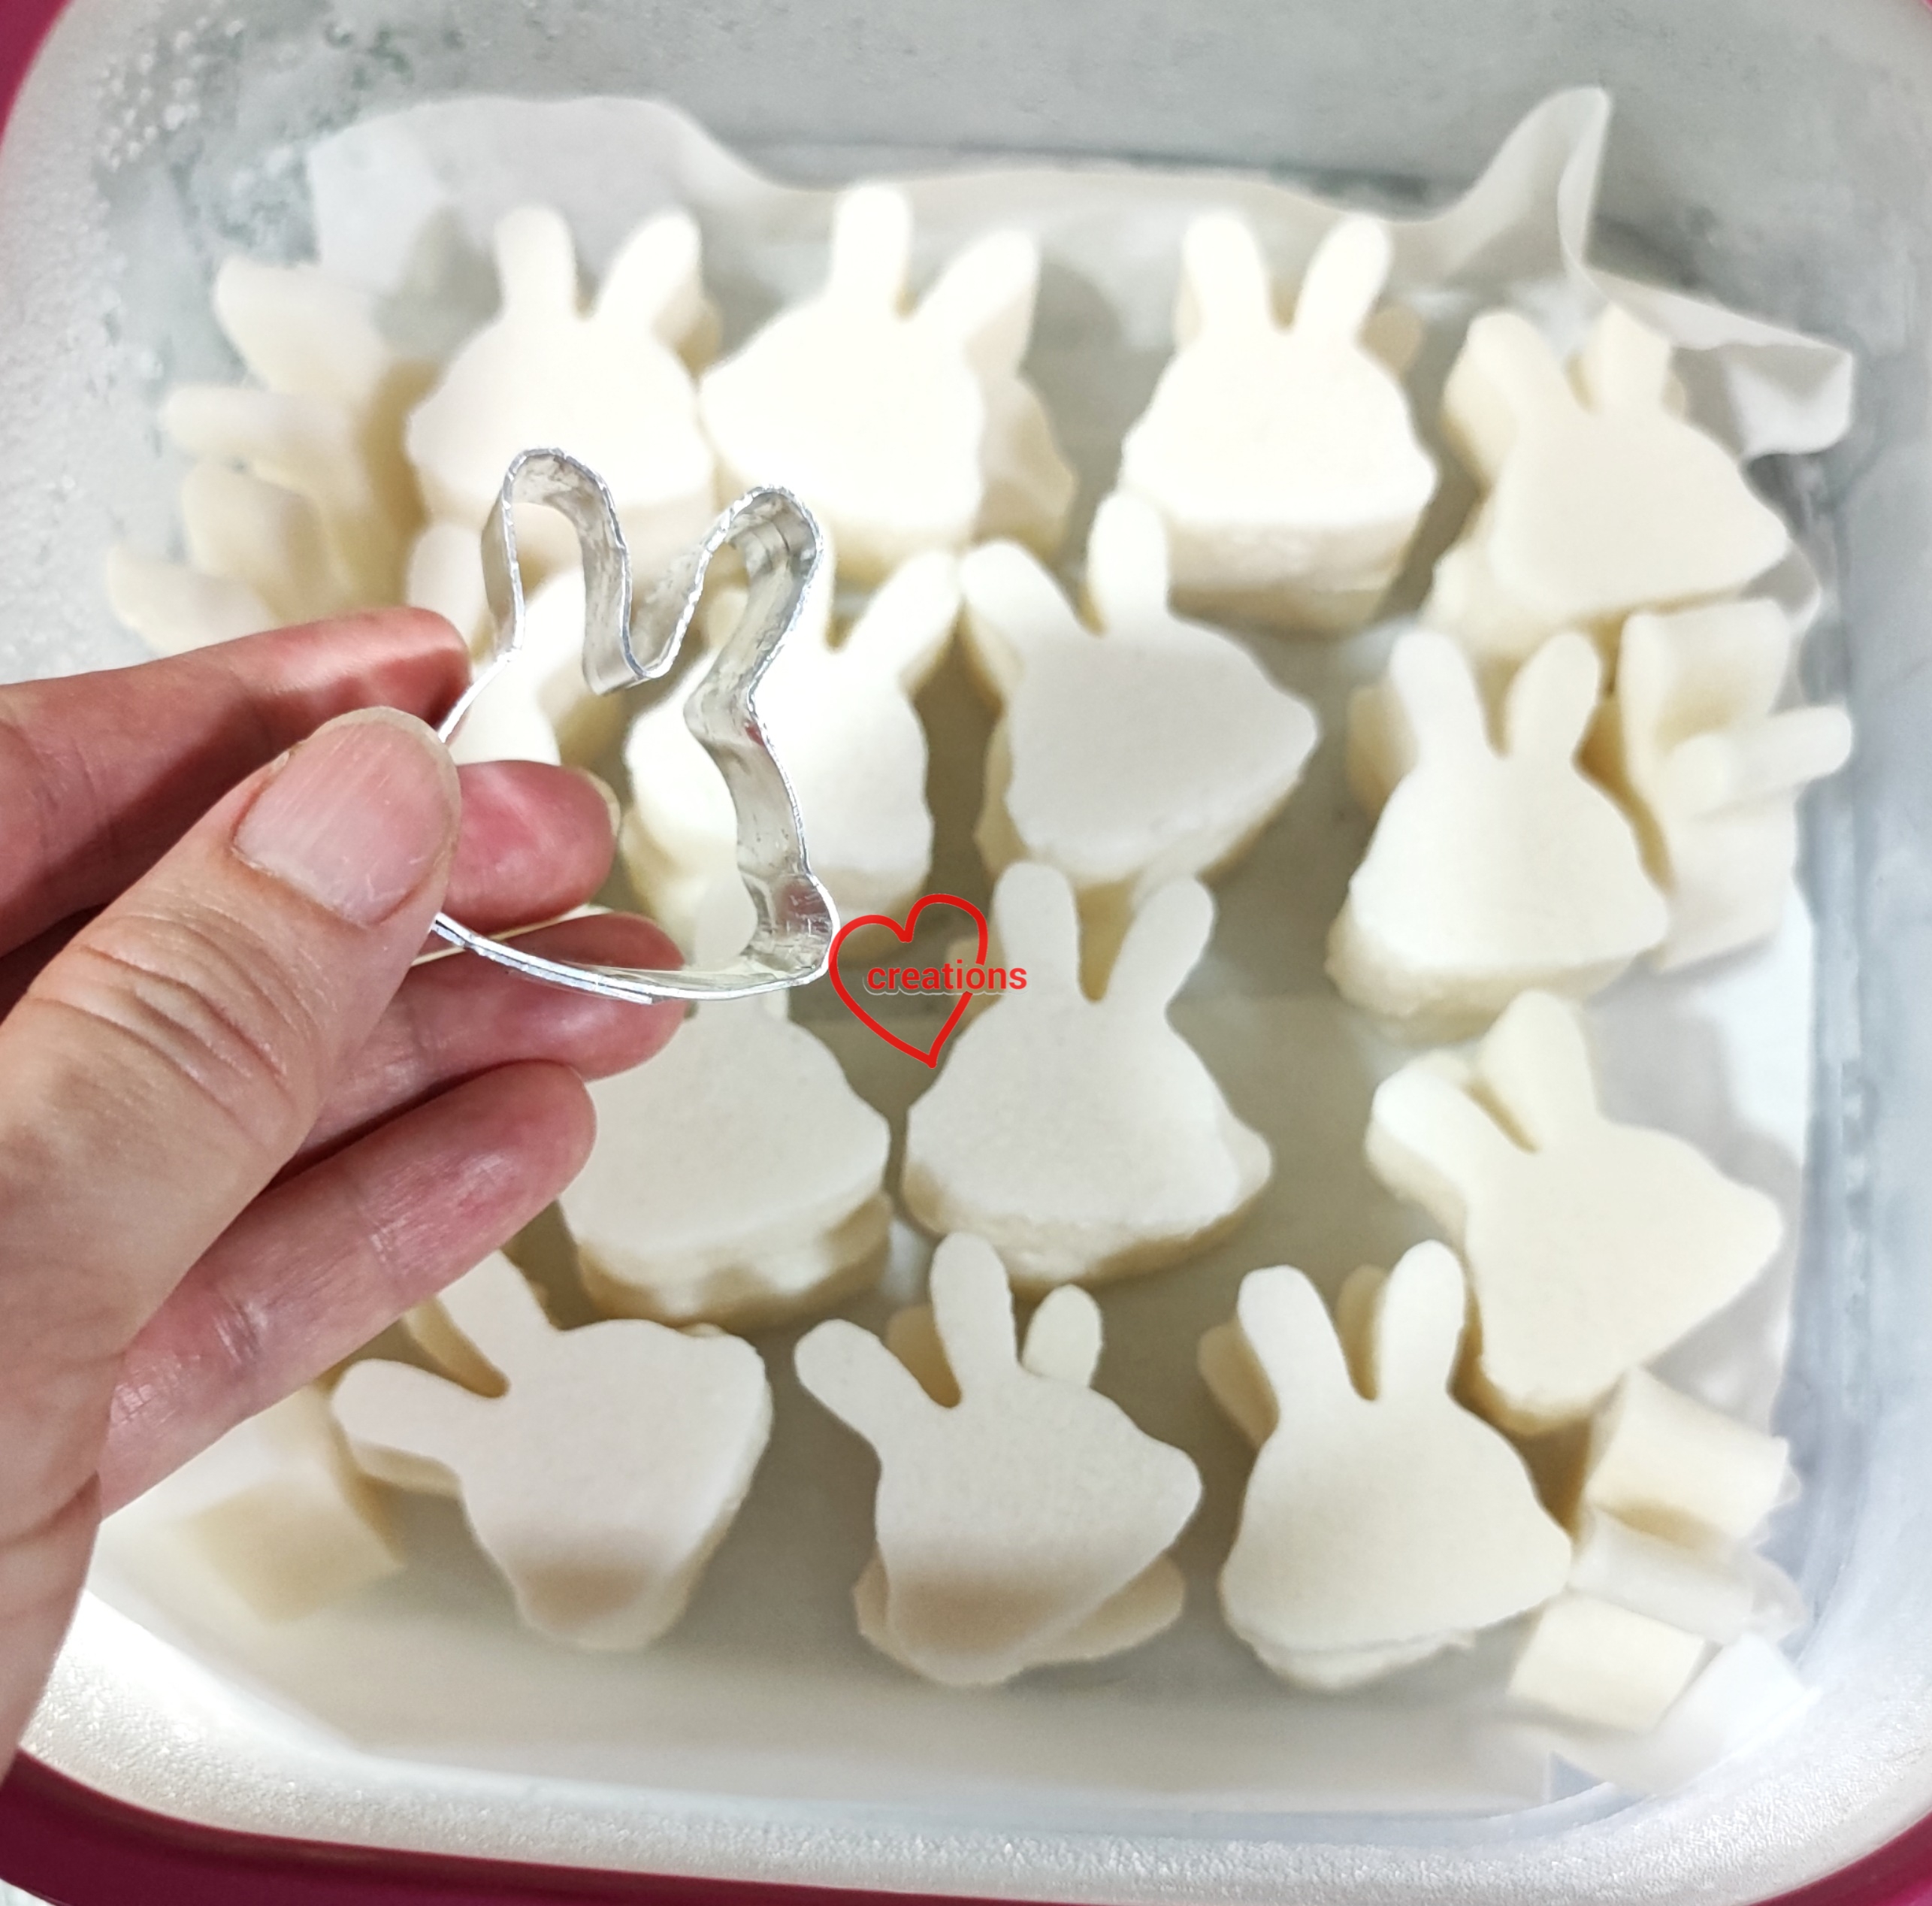
Coconut agar jelly

Ingredients (fills two 7x7" trays to about 2cm height):
500g coconut milk
500g coconut water (may replace with coconut milk if prefer richer jelly)
12g agar powder
pinch of salt
3 pandan leaves, knotted or cut into short strips
30g sugar (or to taste. Mine is considered very low sugar)

Steps:
1. Put coconut milk, coconut water, salt and sugar in saucepan. Scatter agar powder over and let it bloom for about 5 minutes. Try not to let the agar powder clump together.

2. Add pandan leaves and bring to a boil while stirring.

3. Once the coconut milk boils, keep boiling for another two minutes while stirring to ensure all agar powder is dissolved. 

4. Pour into trays and cool before refrigerating for at least 2hours or overnight. I lined my trays with teflon sheets but it isnt necessary.

5. Unmould and use cookie cutter to cut out bunny head shape. Store cutouts in airtight container until ready to assemble.

Note that this portion or agar is more than what you need so feel free to halve the recipe. 


Pandan coconut diplomat cream

Ingredients:
200g coconut milk
10g pandan juice concentrate*
40g gula melaka, finely chopped
1/8 tsp salt
20g cornflour
2 egg yolks
15g unsalted butter
3/4 tsp pandan paste
70g whipping cream (you may use dairy, non-dairy or a combination of both. You may need to stabilize dairy cream with gelatin in hot weather. You may use more cream if you prefer lighter taste and texture.)

* This needs to be prepared in advance. Omit and use 1-1.5 tsp pandan paste instead if you do not want to use pandan juice concentrate. Blend pandan leaves with a little water. Squeeze out the pulp and sieve the extracted juice. Let it settle in fridge in a container/bowl for three days before using the dark green layer that settled to the bottom of the container/bowl.

Steps: 
1. Heat coconut milk, pandan juice concentrate, gula melaka, salt and pandan paste in a saucepan
until steaming hot (not boiling). In the mean time, whisk together egg yolks and cornflour in a heavy bowl or measuring jug.

2. Once coconut milk is hot, remove from heat and pour in a thin stream into egg yolk mixture while whisking the egg yolk mixture continuously. Pour everything back into saucepan. 

3. Cook the custard over medium-low heat while whisking continuously. Once it thickens, remove from heat and keep whisking until smooth. Place back on heat and cook until it thickens further, about another few minutes. Be careful not to use too high heat or it will become scrambled eggs. 

4. Remove from heat and add butter. Whisk until well combined. Transfer into mixing bowl. Press cling wrap on surface of pastry cream. Refrigerate for at least an hour or overnight.

5. When ready to assemble with sponge, lighten the pastry cream by whisking it briefly. Whip the whipping cream until stiff and fold into pastry cream to make diplomat cream. Transfer into piping bag.


I can't disclose the recipe for the chiffon sponge as I bought it from Keem Ooi. You may purchase it from her by dropping her a DM on Instagram (account name is keempossible_2). I tweaked her original recipe to include gula melaka, coconut milk and pandan juice concentrate.

Here's a peek at my pattern piping and the pattern reveal after baking!


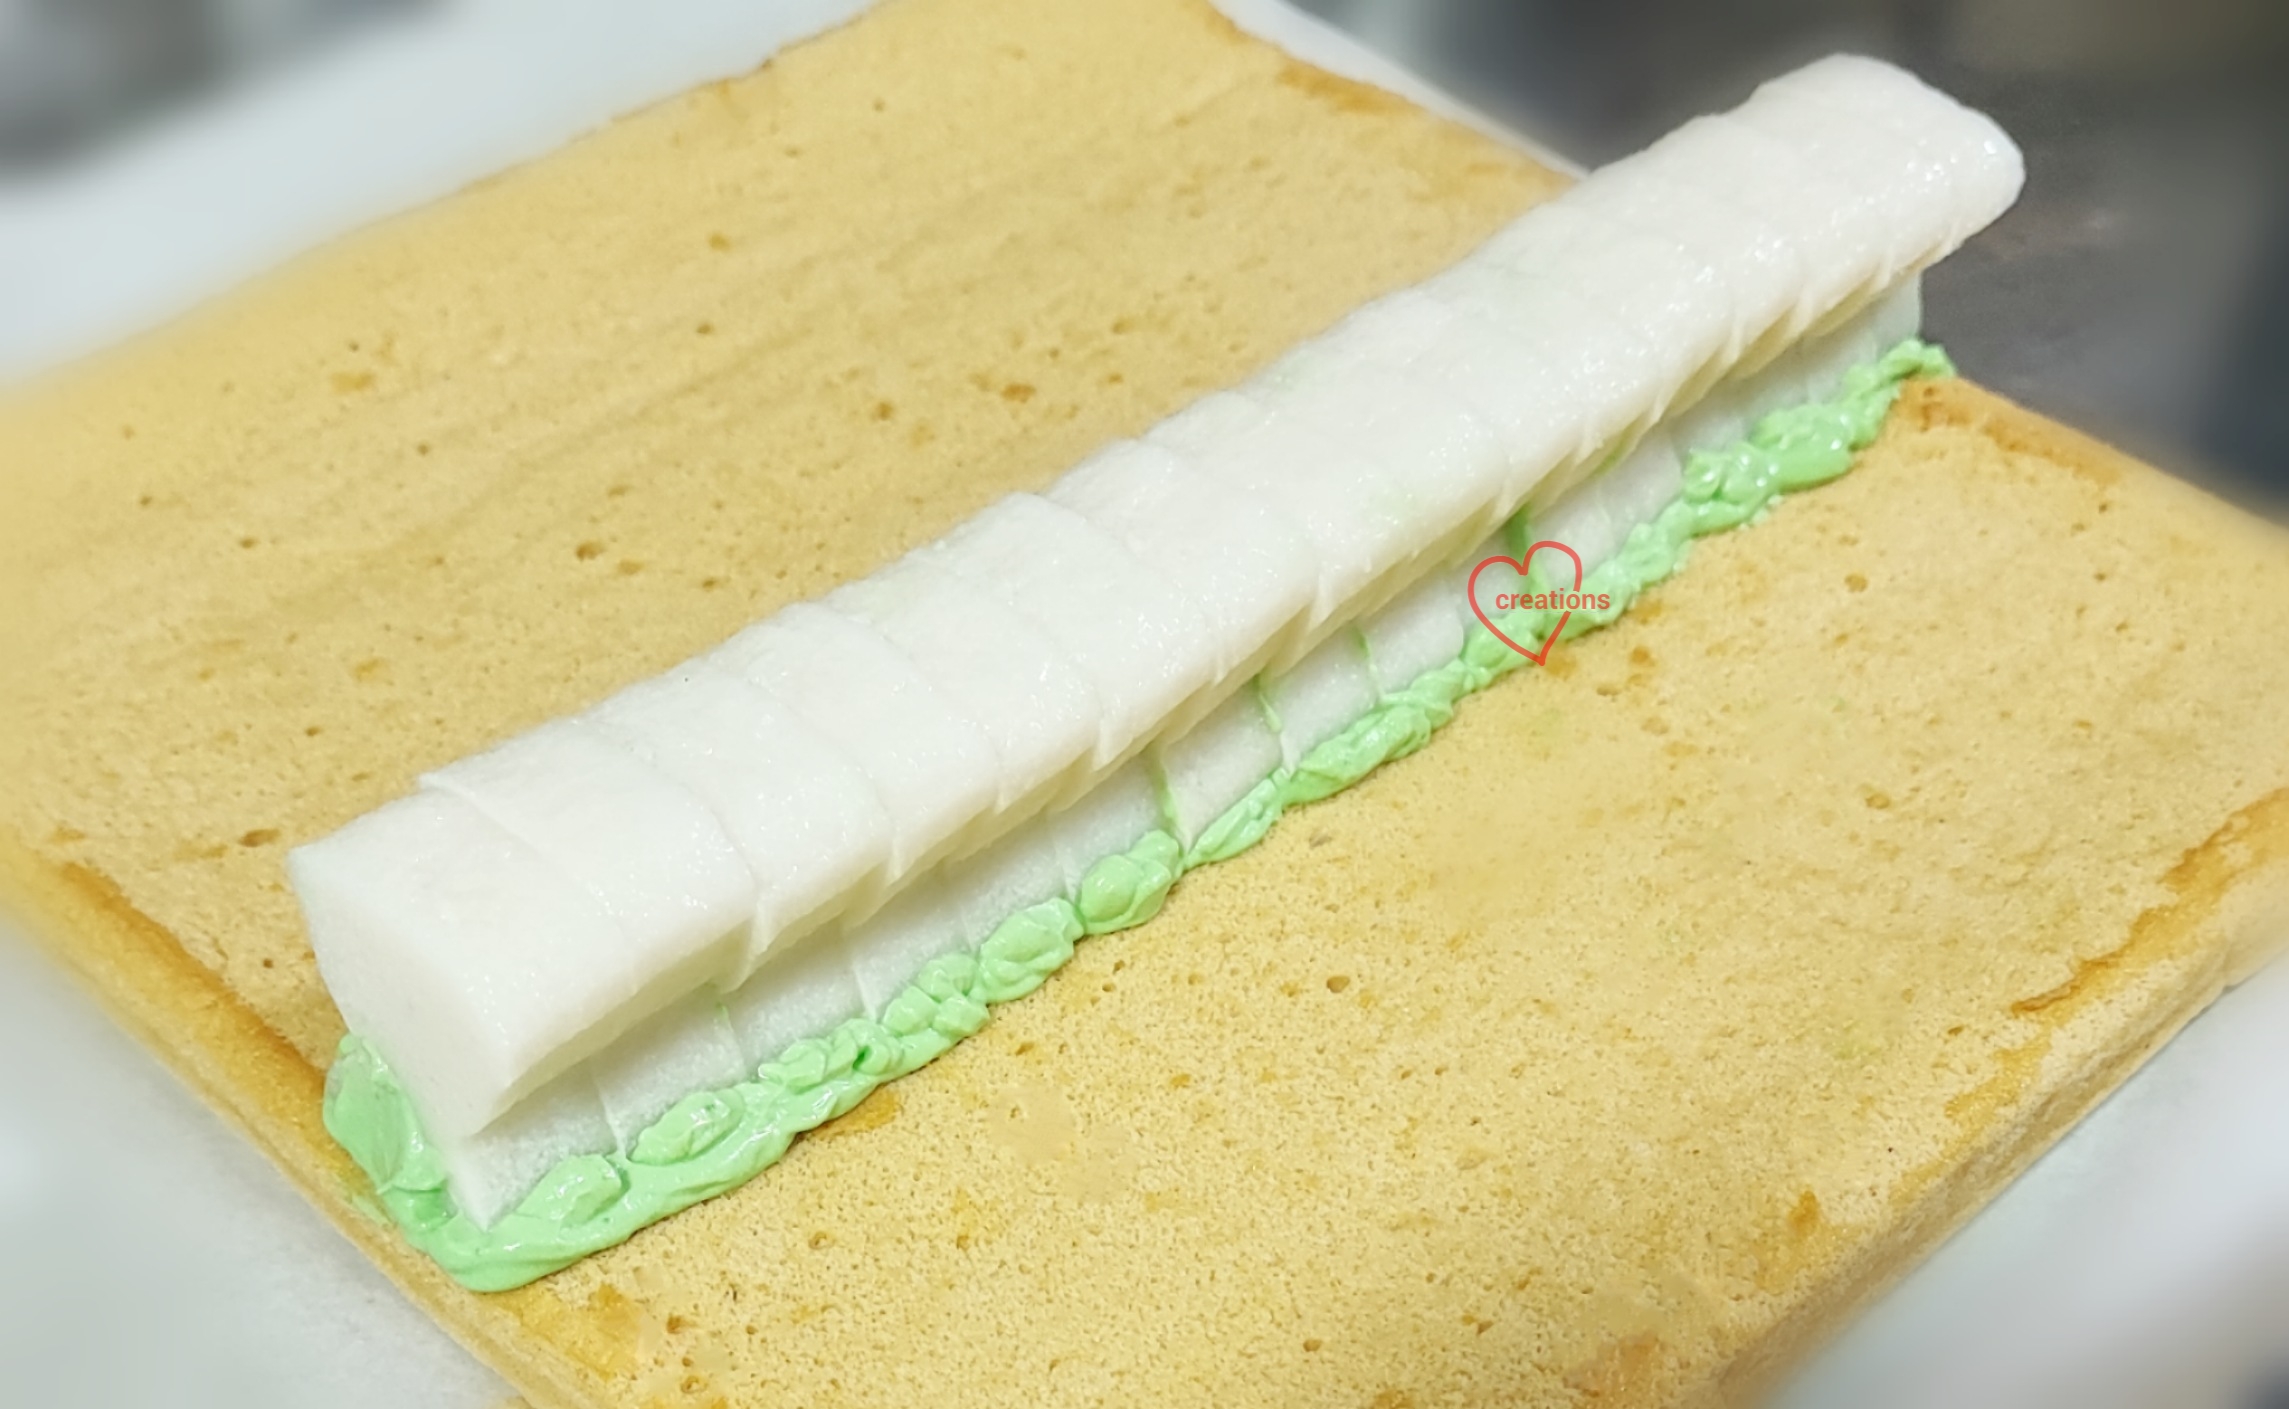
Roll up the baked sponge while warm to cool completely before filling.


Apply the cream and line the bunny agar cutouts about 12cm from the start of the roll. 


Cover the agar cutouts with more cream and coat the sponge with a thin layer of cream before rolling. Refrigerate for at least an hour or overnight before adding in the details with edible paint. You can make the paint by using gel food colouring diluted with a little water.


Works in progress! I cover the portions I am not working on with cling wrap to minimize drying out of the sponge. This picture shows it all covered because I took a short break. 

I made this bunny swiss roll in time for Easter and a cute spring collaboration on Instagram too! Follow me on Instagram at phay_shing as I am most active there and not all my bakes will be featured in the blog in a timely manner.

with love,
Phay Shing
Read More »