
I have also had queries about whether I conduct macaron classes. At this season of life, it's a bit tough. Perhaps when kids are older :). What I sought to do for this post is to provide more explanations and photos for the preparation of macaron batter. Hopefully it is helpful to some of you :). Pardon the poor photography as some of them are taken using one-handed operation on my phone camera.
Recipe for macaron shells
Ingredients (makes about 100 crown shaped shells, 50 macarons):
200g superfine almond meal/ ground almond
200g icing sugar
200g caster sugar
75ml water
160g egg whites, divided into 2 equal portions, preferably aged for a few days to a week
5g Queen's natural sourced food colouring (optional)
Pink gel food colouring
Steps:
1. Make the mass. Sift together almond, icing sugar and pink powder. Add 80g of egg whites and mix well to form a mass (second photo). As you can see, I have to add more pink powder or some gel colouring to get it to a deeper shade of pink. I added one chopstick dip of gel (third picture). The mass can be left on the counter top sitting for an hour or more. Just cover with cling wrap if you are not adding in the Italian meringue soon. This happens for me when I have assorted shells to make.

2. Prepare the Italian meringue. Place the rest of the egg whites in a clean metal bowl and beat at medium-low speed until soft peaks form. Do not beat past soft peak stage or the meringue will be too stiff to incorporate into the mass. Slow down the mixer speed if necessary to keep egg whites moving. In the mean time, heat caster sugar and water in a small saucepan until 115°C. Use a candy thermometer to keep track of the temperature. Do not stir once all sugar has dissolved to prevent crystals from forming. Remove from heat immediately once temperature is reached. Turn the mixer speed to high and slowly and carefully pour the syrup into the egg whites, taking care to avoid the beaters. Some blogs mention keeping the speed at medium to medium low when pouring in the syrup but I always get lumps of sugar at the bottom of the mixing bowl when I do this. Keep beating on high speed for 10 minutes until the meringue is cool. I usually blast a standing fan at the mixer when the mixer does the work to cool the meringue faster but not absolutely necessary.

You should get stiff glossy peak when you lift the beater.
3. Macaronage. Fold the Italian meringue into the mass. This is the trickiest part of macaron making. It would be good to watch a video demo of this process and the right consistency. My photos can only tell so much :p. Here's how you should fold. Don't be as gentle as folding in the meringue for chiffon cakes. You need to deflate the egg whites a bit for macarons. Leave about 1/4 cup of meringue unused as I find the batter a little too runny if all of the meringue is used.
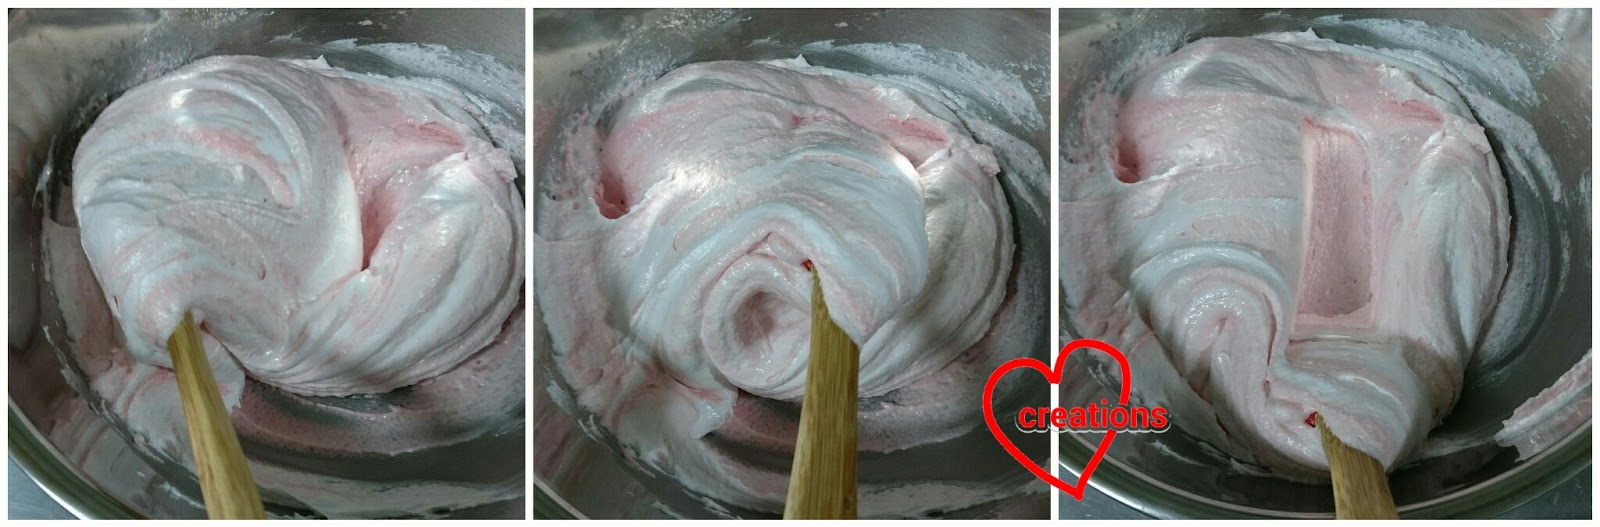
First picture: use the spatula to bring up batter from the bottom of the bowl to the side and upwards.
Second picture: flip the batter over, doing the "folding" motion.
Third picture: press the spatula downwards and towards the side of the bowl nearest yourself.
Repeat the steps, turning the mixing bowl slowly. When the batter looks about evenly mixed (no traces of meringue), start testing to see if consistency is right.
Some blogs tell you to count the number of folds. This is the most unreliable method since portion of batter and individual strength and the way you fold is different. So don't even try counting. I tried. Doesn't work :p. Some tell you to test by counting the time it takes for a peaks or ribbon of batter to settle. Some find this very useful but I find it a bit ambiguous. I keep having to guess if the batter is ready and take a long time deciding :p.
The last method is the one I always use and has been pretty reliable so far. Scoop a generous dollop of batter with your spatula and watch the way it falls off into the mixing bowl. When the batter is undermixed, the batter will fall in a discontinuous manner, with the ribbon breaking off at points before the entire dollop of batter falls back into the bowl. When the batter is able to fall of the spatula in a slow, magma-like way with ribbons forming as it falls off but in a slightly discontinuous way, the batter is ready for piping fancy shaped macarons, like the crown in this post. If you are piping circles, continue folding the batter until all the batter is just able to batter fall off the spatula in a continuous ribbon. Do not overfold!! Your batter will be too runny and the macarons won't turn out well. Do watch a video tutorial that I made to show the right batter consistency!

Slightly discontinuous flow of batter off the spatula. The photos don't really show the process well... Sorry about that. So do watch a video demo!
4. Transfer the batter into piping bag fitted with a Wilton #12 round tip and #8 round tip. You may find it helpful to place the bag over a big mug. You may pour or scoop the batter in. Although the macaron batter is stable, transfer to piping bag as soon as you prepare or keep it covered as exposure to air will cause the surface to form a crust.

For the crowns, I used a combination of Wilton #8 and #12 tips.
5. Pipe the crown with printed template under baking sheet. If the baking sheet can't lie flat, use some Italian meringue to apply to stick the baking sheet down. Try to pipe with the tip perpendicular to the surface of the tray about 6-7 mm away from the tray surface.
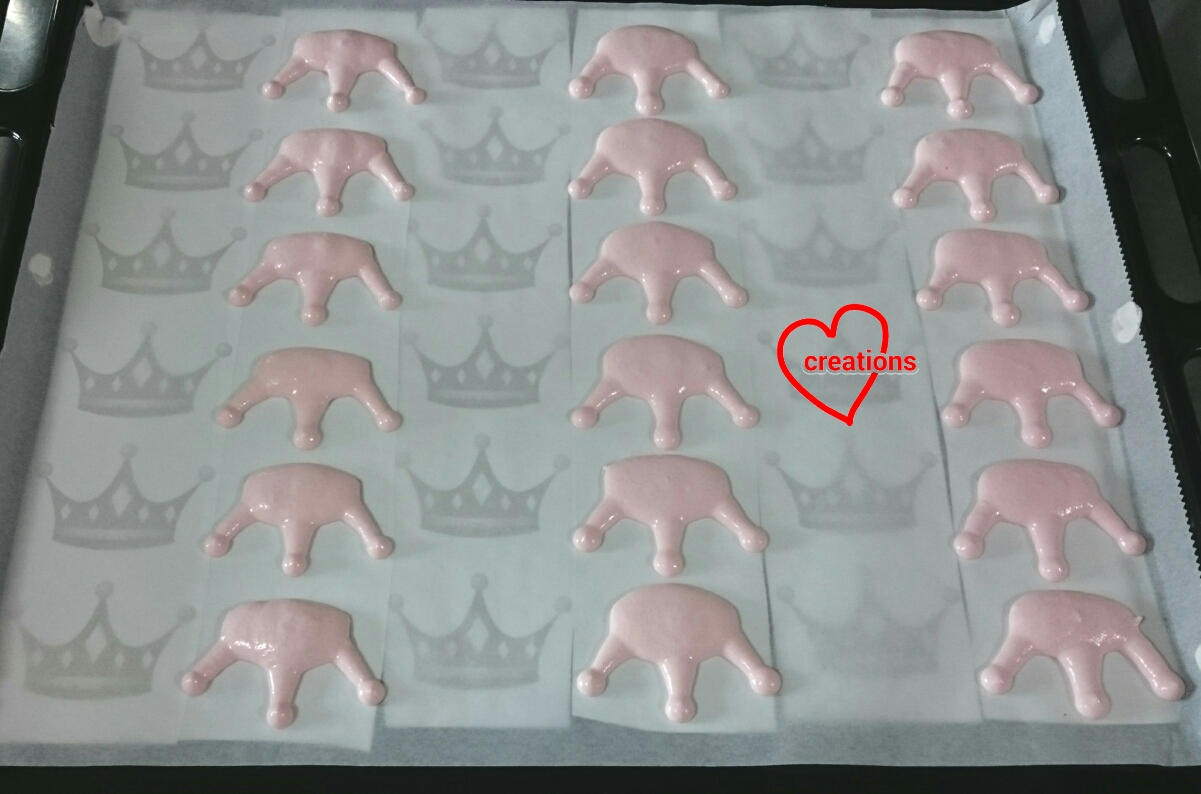
These crowns are the most challenging things to pipe so far!
6. Tap the tray hard on the table top a few times to release trapped air bubbles. Don't be shy to bang hard. Hold the baking sheet down as you tap the tray. You can see from the photo below that the peaks flatten after tapping. The crowns on the right column below were piped before the tray was tapped and the crowns on the left were piped after.

7. Let the shells dry in air con room for about 2 hours or until the shells are dry to touch when you run a finger across the surface of the shell. Do not bake shells that are still sticky to touch. The shells will crack. I have made this mistake many times. You may try oven drying at 50-60°C. So far I have been using air con drying as I usually have many shells to pipe. Oven drying is much faster but not suitable for me when I work with big batches that require my full attention when piping. If you use oven to dry the shells, bake them once they are dry. I have left shells out drying for too long before and the feet formation is not as nice and the shells are hollow.
8. Bake the shells in preheated oven at 130°C with the rack at lowest position. Position the rack at lowest position for light coloured shells as any browning will show up more obviously. Position at second lowest for dark coloured shells and bake at 140°C. Bake for about 17-18 minutes, rotating the tray halfway through baking. Use an oven thermometer as the actual oven temperature is usually not the same as the one you set. Let the shells cool off in the tray before removing them. If the feet appear a little wet (you can see light reflecting off wet parts on the feet), bake the shells for 3-4 minutes more before checking again. Don't attempt to remove shells from baking sheet that are stuck as they are underbaked. If they appear to be browning a little, reduce oven temperature to 120°C and bake for a few minutes more before checking again.

Pairing up the shells!
9. I decorated the shells with pink royal icing and some gold dust (given by a friend) dissolved in (ahem) Chinese rose wine. I didn't have vodka.

Let the shells dry, preferably overnight before filling them.
10. Prepare the filling. Please refer to this recipe for salted caramel filling (salted caramel swiss meringue buttercream with salted caramel center). Omit the earl grey tea bags. Refer to this recipe for strawberry smbc. I doubled the amount of strawberry paste used. These can be made earlier and frozen. Thaw and rewhip the cream before use.

11. Fill the shells by piping the filling on.

Salted caramel, strawberry and Nutella fillings!

I hope this post has been helpful to you. I have been hesitant to write a technical post for macaron batter as there are so many resources out there to help you troubleshoot. I can only share from my personal experience.
I didn't just make crowns for this batch. I made some smiley pandas and Piglets (from Winnie the Pooh) too so keep a lookout for them :).
With love,
Phay Shing
Awesome!! Thanks for sharing <3 Can i ask? how u usually baked ur macaron? i'v been trying making some macaron character last week n i used top bottom heating in my oven and it's browning my macaron.. do u usually use only bottom heating or both? with convection or not? Thank u very much, i really need ur help ><
ReplyDeleteHi Marcella,
DeleteI use top and bottom heating and place the rack at the second lowest position for darker coloured macarons. I place the rack at lowest position for pastel or white shells to prevent browning but at the same time ensure that the shells are not under baked. I turn on the fan in the oven (convection) only when the oven temperature falls below 120°C but I only turn it on for a few minutes just to get the temperature up again. I use an oven thermometer for all my bakes to ensure consistent baking results. I find that browning is minimized (not eliminated) if the temperature does not go above 130°C.
It is easy to brown fancy shapes with thin sections like the crowns in this post so I had to be extra careful. If the shells show signs of starting to brown but are still stuck to the baking sheet, bake them at 110-120°C for 5 minutes and then check again. They go back into the oven if still under baked. My macarons go in and out of the oven quite a bit towards the end of baking time for light coloured shells because it is better to under bake than overbake them.
I hope this helps :). I still brown my light coloured shells sometimes when I don't eyeball the oven temperature and colour of shells carefully. So don't give up! You will get better with practice :)
Thank u sooo much for the tips!! U'r sooo kind :D i will try it soon heheheh.. Hope i can make a perfect n pretty macaron like yours <3
DeleteYou are welcome :). All the best!
DeleteHi there, loving your blog. Please may I ask, is it possible to freeze the macarons after they've been decorated with the royal icing and have been filled?
ReplyDeleteThanks and keep up the amazing work.
Hi :). I have not tried freezing iced and filled shells, only tried unfilled and undecorated shells. If you have filled the shells with fillings that freeze well (e.g. swiss meringue butter cream, lemon curd, ganache, salted caramel), the macarons should do fine. I am not sure about the icing though. Some cookie makers have reported patchy icing when frozen iced cookies were thawed. I would advise decorating and filling frozen thawed shells if possible, or try to work the decorations in using macaron batter and do away with royal icing if you are freezing filled macarons.
DeleteThanks for your encouragement :)
Thank you so much for the prompt reply and advise. Will maybe try one and freeze it to see how it works out.
DeleteDo let me know if it works. I am curious too :). In need of time savers if possible too since my baking schedule is pretty full. In need of more freezer space too :p
DeleteHi, thanks for sharing this great recipe! Your works are awesome. May I ask the difference between French and Italian methods? I have failed whereby my macaron were once cracked at top and once hollow inside :( May I seek for your expertise on why did this happen? Many thanks
ReplyDeleteHi JJ,
DeleteThank you for your kind words :). French method involves incorporating dry ingredients (icing sugar and ground almond) into a simple meringue (beating egg whites with caster sugar to stiff peak stage). The Italian method which I use involves combining a mass (a thick paste formed by egg whites, ground almond and icing sugar) and an Italian meringue. The Italian meringue involves adding boiling syrup at soft ball stage (115°C) to the egg whites while the egg whites are being beaten at high speed.
Cracked macarons are usually caused by insufficient drying time, oven too hot/the fan mode was used in the oven. Hollow shells are usually caused by oven temperature too low or under-folded batter. Make sure you use an oven thermometer at all times in the oven, use the lowest or second lowest rack for baking and don't use the fan mode. It takes quite a few tries to get the hang of it so don't give up!
Dr Onokun helped me healed from hpv with his natural herbs i can give more info of how this good man cured my hpv completely, the herbs he offered me really helped me out that’s why am dropping this testimony with joy in my heart kindly massage this doctor to help you out no matter the disease you are suffering from. His email address:
ReplyDeleteDronokunherbalcure@gmail.com
Website: Onokunherbs.com