Sunday, 29 September 2019

Burger and Ice Cream Chiffon Cake Pops


Burger and Ice Cream Chiffon Cake Pops, which is your favorite? <3

Just sharing a cute and simple treat I made for a children's party, since Children's day is coming!

The burgers are more fluffy versions of the Cheeseburger chiffon cake pops I made previously, and the ice cream pops are mini 'cornetto' versions of the Ice cream pops I shared in Creative baking: Chiffon Cakes. Hope you like them!

Burger cake pops
Burger buns – chocolate chiffon cake
Beef patty – dark chocolate chiffon cake
Cheese – vanilla chiffon cake
Lettuce – pandan chiffon cake

Ice cream cake pops
Ice cream - vanilla chiffon cake
Cone - chocolate chiffon cake

The buns are baked in round silicone cake pop moulds. The beef patty, cheese and lettuce are cut from layer chiffon cake using round, square and leaf cutters respectively.

Cheeseburger chiffon pops (makes approximately 9)
3 egg yolks
20g castor sugar
39g corn/vegetable oil
40g milk
5g vanilla extract
60g cake flour
Cocoa powder (dark)
Pandan paste
Yellow food coloring (PME natural coloring)

Meringue:
4 egg whites
45g castor sugar
1/4 tsp cream of tartar

1. Preheat oven to 140°C.

2. Beat egg yolks with sugar with whisk till pale yellow before stirring in oil, water and vanilla extract.

3. Add in sieved flour and whisk till no trace of flour found.

4. Scoop out 6 tsp batter into 3 bowls each. To the first bowl, add 1 tsp dark cocoa powder (for beef patty). To the second bowl, add 1/4 tsp pandan paste (for lettuce). To the third bowl, add a drop of yellow food colouring (PME natural yellow coloring) (for the cheese). To the rest, add 1 tsp cocoa powder (for the bun). Mix well.

5. Meringue: Beat the egg whites with ¼ tsp cream of tartar till stiff peak, mixing in caster sugar in 2 additions.

6. Scoop over 12 tbsp meringue into each of the 3 bowls and gently fold in respectively. Fold in the rest of the meringue into the light cocoa batter in 3 additions.

7. Scoop the light cocoa batter into a cake pop mould (fill 18 round molds for 9 cake pop burgers). Bake at 140°C for 20-25 min, or until skewer inserted into centre comes out clean.

8. Pour the dark brown batter into a baking-paper lined 6-inch tray and bake at 140°C for 20 min. Do likewise for the pandan and yellow batter.

9. Leave the cake pop mold to cool on a wire rack once out of the oven and unmould by popping the pops out when cool.

10. Flip over the layer cakes onto a new baking paper and leave to cool covered by another sheet.

11. To assemble, cut out circles from the dark brown cake for the beef patty corresponding to the size of the ‘buns’ (cake pops). Cut out squares from the yellow cake for the cheese. Cut out ‘leaves’ from the pandan cake for the lettuce using a leaf cutter. Assemble just like how you would make a burger, using melted marshmallows to glue the parts together.


Ice cream chiffon cake pops (makes approximately 15)
Same recipe is used as above, however, batter is only divided into 2. Leave the first batter plain, for the ice cream. To the other half, add 1 tsp charcoal powder.

Bake the plain batter in cake pops molds as above at 140°C for 20-25 min and cocoa batter in paper cones (from SKP) and 140°C for 20-25 min. 

Assemble by sticking the parts together with melted marshmallows or inserting a cake pop stick through.


Hope they make you smile too! They were a big hit with the kids! =)


With lots of love! Happy Children's Day in advance!
Susanne


More loving chiffon cake creations here:


Read More »

Thursday, 26 September 2019

Matcha Azuki Bean Mini Cakes

If you are a fan of Matcha and Azuki beans in dessert, you will love this cake --- alternating layers of light matcha chiffon sponge and refreshing Matcha pudding with whole azuki beans!


I will be teaching how to make these mini cakes at Redman. I decided to use Sakura flowers and whole azuki beans for a simple and elegant decoration.

Please click on this link for more details and to register.

With love,
Phay Shing
Read More »

Wednesday, 25 September 2019

Duggee Chiffon Cake


Hey Duggee!!

Who will like a big Duggee Hug from me!! 🥰

Posting another of my backlogs.. I actually didn't know about the lovable dog Duggee, till my friend shared.

For this Duggee, I used dark pearl chocolate chiffon cake recipe, instead of the usual chocolate chiffon cake recipe. I liked it so much, I will share it below. It can be used in a normal 15-cm tube pan or ball pan. Hope you will like it!


Dark Pearl Chocolate Chiffon Cake (15-cm ball or tube pan)
2 egg yolks
8g castor sugar
26g vegetable/corn oil
29g milk
4g vanilla extract
40g cake flour
Pinch of chocolate emulco
15g dark chocolate
Pinch of baking powder

3 egg whites
35g castor sugar
¼ tsp cream of tartar

1. Preheat oven to 140°C. Prepare one 15-cm tube pan or ball pan.

2. Prepare egg yolk batter: Whisk egg yolk with sugar using hand whisk. Add in oil, water and vanilla extract and mix well at each step. Whisk in sifted cake flour and mix till no lumps.

3. Melt the dark chocolate (using microwave or double boiler). To the chocolate batter, add chocolate emulco and melted chocolate. Mix well.

4. Prepare meringue: In a grease-free, dry metal bowl, using electric mixer, whisk egg whites with cream of tartar till frothy. Add in castor sugar for meringue gradually and whisk at high speed till firm peaks form.

5. Spoon or pour the chocolate batter into the tube pan, leaving at least 2-cm from the brim.

6. Bake the tube pans at 140°C for 1 hr, or until a skewer inserted into the centre of cake comes out clean.

7. Leave the tube or ball pans (must invert) to cool completely on a wire rack, before unmoulding by hand.


Have a blessed week ahead! 💕

With lots of love,
Susanne

Read More »

Monday, 23 September 2019

Alpaca Cookies n Cream and Matcha Macarons

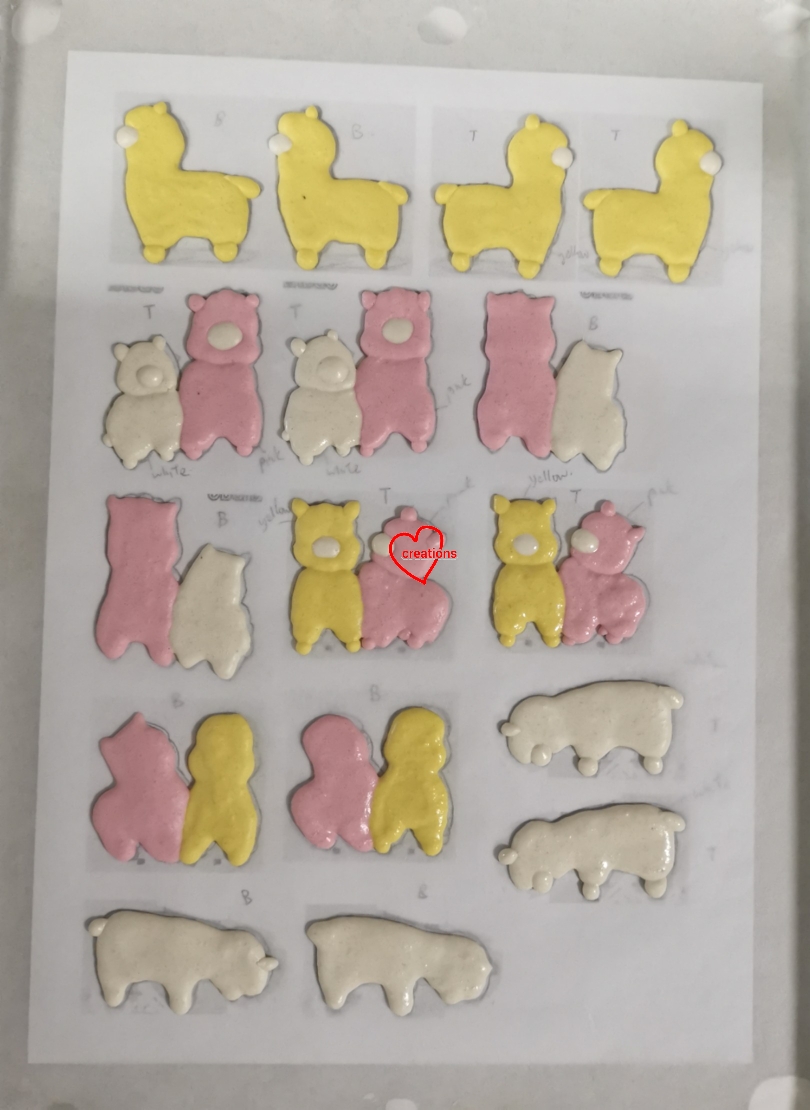
When given freedom to design a centerpiece with the theme "alpacas", this was what I came up with, along with a bunch of loose pieces of alpaca macarons 😊.

Whimsical land! 

I used the Swiss meringue method to make these but reduced sugar in the meringue since Audrey (my friend who shared the recipe) mentioned it works just as well. You may refer to this post for the detailed recipe. I reduced the castor sugar from 85g to 75g. Remember not to overbeat the meringue but beat it firm enough until it is able to form a firm peak (peak with a curled hook) when beater is slowly raised.

I love the mesmerising look of a well beaten meringue! 

Just to share some photos of piped batter...

Loose pieces of alpacas

Pieces of alpacas that go on the structure. I made an extra set just in case. 

I decorated the macaron shells with edible black marker and pink royal icing.

I have been including cocoa butter in my white chocolate based ganache nowadays since it works just as well and it makes the ganache less sweet too! I will share the recipe for the fillings here. Feel free to scale it up if you wish to make a bigger portion.

Matcha whipped white chocolate ganache
Ingredients:
45g white chocolate chips or finely chopped
10g cocoa butter shavings
10g unsalted butter
15g heavy cream
2 tsp Matcha powder, sifted
1/4 tsp vanilla bean paste
1/8 tsp salt

Steps:
1. Place white chocolate, cocoa butter, butter and cream in microwave safe bowl. Heat on medium-low power for 10 sec and mix well with spatula. Repeat heating and mixing until mixture is smooth. If there are stubborn pieces of chocolate or cocoa butter that refuse to melt, sieve them out. Be careful not to overheat. Press the chocolate/cocoa butter against sides of bowl during mixing to help them melt more evenly.

2. Add salt and vanilla and mix well. Add matcha powder in a few additions and mix well after each addition.

3. Chill in freezer for 1-2 min and mix well with spatula. Repeat chilling and beating until texture is light, smooth and creamy.


Cookies n cream Swiss meringue buttercream
Ingredients:
35g egg whites (about 1 egg)
22g castor sugar
1/8 tsp salt
60g unsalted butter, slightly softened but cool
1/2 tsp vanilla bean paste
32g oreo cookies without cream, crushed

Steps :
1. Place egg whites, castor sugar and salt in a clean metal mixing bowl. Set the bowl over a simmering pot of water without the water touching the base of bowl. Whisk continuously while monitoring the temperature of the egg whites wihh a candy thermometer. Keep whisking until temperature reaches 71.1°C.

2. Remove mixing bowl from heat and beat on medium high speed with electric mixer until cool to room temperature. The meringue should be able to form stiff peaks.

3. Gradually add butter and beat well with electric mixer fter each addition until fully incorporated.

4. Add vanilla and mix well. Fold in crushed oreo cookies.


I filled the "hill" pieces with the matcha filling on outer ring and Oreo filling in the middle.

Filling the "hill" 

I filled the alpacas with Oreo filling.

Filling the alpacas 

Store assembled macarons in fridge in airtight condition for at least 24h before eating. Let the macarons sit at room temperature for 15 min before opening the airtight container to prevent condensation from forming on the shells.

I glued the alpacas on the hill and created the grass using Royal icing. The flowers on the hill are store bought sugar flowers.

I hope this whimsical bake puts a smile on your face as it did mine 😊.

With love,
Phay Shing
Read More »

Monday, 16 September 2019

MSW Durian Chiffon Cake


Sorry for the delay in posting! I was away in Malaysia last week due to school holidays. Anyway, here to share a MSW Durian creation I made sometime back, inspired by a Mao Shan Wang Durian we had hehe =p. You can check out my previous post Durian Cottony Chiffon Cake I made for my dad 3 years back! =) I am still fine-tuning the recipe for this new version.

Hope you like it!

With lots of love,
Susanne


Read More »

Matcha Azuki Bean T-Rex Choux Pastry (class + giveaway!)

When I first made dinosaur themed choux pastries, I was thinking to myself I should conduct a class on how to make them, particularly the chubby T Rex!


I decided to make a more naturally coloured version this time, show casing Matcha and Azuki bean flavours. If you are interested in learning how to make these cute dinos, please click on this link for more details and to register for the class.

This is also the first time we are doing a giveaway of a very useful baking item together with the class! I requested for this as I find that it makes a huge difference to use perforated baking mats when baking choux pastries. It helps to retain the shape of the piped batter much better than if you piped and baked on parchment paper or silicone mat as the little holes in the mesh helps to anchor the pastry as it rises in the oven during baking. For small pastry parts or plain round choux it doesn't really matter which surface you pipe on but for the "main body" of non-standard shapes or eclairs, it does. You will get to experience the use of the perforated baking mat in class and bring home a brand new one after the class! Perforated mats are also great for baking tarts, cookies and breads so it's not just for choux pastries!

With love,
Phay Shing
Read More »

Tuesday, 10 September 2019

Reading Room Raspberry & Dark Chocolate Macarons

As far as whimsical bakes are concerned, I think this is one of my most whimsical ones. Presenting a reading room scene made out of macarons! Even the armchairs, lampshade and floor rug are made out of macarons!


Darth Vader is finding someone else's reading material interesting 🤣. 

You can guess what are some of the birthday man's favourite characters and what's his favourite hobby. I had fun coming up with this creation!

I used the Swiss meringue method to make the macarons as there are many colours involved and I needed a more stable meringue. You may refer to this post for the detailed recipe. Just to share some photos of the process...

Piping the characters

I made the armchairs using raspberry flavoured macaron shells and filling by adding freeze dried raspberry powder. 

You may refer to this post for the raspberry filling recipe. I replaced some white chocolate with cocoa butter to make the filling even less sweet. I made Royal icing that is close to the colour of the macaron shells to join the individual macaron pieces together.

Filling the characters with raspberry white chocolate ganache. I decorated the characters using edible markers and paint made by dissolving gel food colouring in vodka. 

Filling the base macaron with dark chocolate ganache and raspberry ganache. This is the largest circle base I have made so far, which is about 15cm. My macaron carousels have 13cm circles as the base. 

You my refer to this post for the recipe for dark chocolate ganache.


I hope this creation brought a smile to your face as it did mine 😊.

With love,
Phay Shing

Read More »

Tuesday, 3 September 2019

Mooncarons (Swiss Method)

I began my quest of making macarons that look and taste like mooncakes two years ago so this is the third year I am giving it a go again and this time round, I can say that I am presenting mooncarons!

I have to thank my friend for exclaiming that these are "mooncarons" when she saw them. These are proper mooncarons, not just some mooncakes stuffed with a macaron in the middle 

Just some background to my experiment making these. Two years ago I made a few attempts, trying out different ways of making the mooncake pattern. The experiment included imprinting the surface of partially dried piped batter using mooncake moulds and indenting the surface of partially dried shells with toothpick. Both do not work so don't try 😂. Unless you happen to have liquid nitrogen and a custom made metal mould for imprinting piped batter. You can read all about my first attempt over here. Last year I focused on getting the taste of the filling right and you can read about it here. This year, I thought of experimenting yet again to add some height to the "mooncake" and change the process of making the shells by tweaking the recipe and process, such that the shells don't end up being too fragile and soft due to the use of gula melaka (coconut palm sugar) for meringue but still tastes great.

As always, begin by making your template. I used the mooncake mould imprinted part to trace out the outlines. This can only be done if you use the plunger type of mooncake mould because you can't do that with traditional wooden moulds.


This is the first time I am trying out using granulated gula melaka and icing sugar to make the Swiss meringue and am rather pleased with it. The resulting macaron shells aren't as fragile and still has that wonderful aroma and taste that is similar to traditional baked mooncake "skin". The macaron shells have the added advantage of having a lower GI because of the replacement of white caster sugar with coconut palm sugar. I usually split the egg whites into two batches for Swiss method now but in this case, I use all of it for the meringue to ensure that all the sugar is dissolved in it. This is also the first time I am trying out using the stand mixer to do most of the macaronage process.

Ingredients (makes about sixteen to eighteen 5cm mooncarons):
Dry ingredients
85g superfine almond flour
85g icing sugar
1/2 tsp cocoa powder (use 1/4 tsp if you prefer lighter brown)
1/4 tsp cornflour (optional)

Swiss Meringue
75g egg whites
60g granulated gula melaka (coconut palm sugar)
20g icing sugar (with cornflour/cornstarch already added)
A pinch of salt (optional)
1/8 tsp cream of tartar (optional)

Steps:
1. Prepare template and line baking tray with parchment paper. Set oven rack to lowest or second lowest position. Sift dry ingredients together and set aside.

2. Prepare the Swiss meringue. Place all the ingredients in mixing bowl of stand mixer if using a stand mixer for meringue. If not any regular clean metal or glass bowl will do if using handheld mixer.  Place mixing bowl over a saucepan filled with a bit of water. Make sure the water in saucepan doesn't touch the base of mixing bowl. Turn the heat on to medium low heat while whisking the contents in the bowl continuously. Monitor the temperature of egg whites using a candy thermometer. Heat until temperature reaches 48-50°C. This process may take up to several minutes so prepare for a workout 🤣. The reason why you should heat slowly is because all the sugar had to be dissolved before you whip it up using electric mixer. If the temperature rise is too fast, some sugar may be undissolved and the meringue won't turn out well. Remove bowl from saucepan once temperature is reached. Use electric mixer or stand mixer to continue beating the meringue at medium speed until stiff peak. Note that the meringue shouldn't be beaten until it is so stiff and dry that it balls up inside the whisk (applicable for French method only).

Swiss meringue using gula melaka and icing sugar 

3. Scatter dry sifted ingredients into meringue in 3 batches. After each addition, turn mixer on to medium high speed for a couple of seconds just to incorporate the dry ingredients. After all the dry ingredients are added, use a spatula to gently fold the batter to ensure that everything is incorporated well. Test the consistency of the batter. If it falls off the spatula in a continuous or almost continuous ribbon, it is ready. If not, continue folding and check again. You may refer to the video tutorial here for the right consistency.

4. Transfer batter into piping bag fitted with a wilton #5 or 6 tip. Pipe the base of the shells. I use three shells for each macaron, with the middle shell as a ring. Let the top shell dry until a sticky membrane is formed before switching to wilton 1s tip to pipe the patterns. Unclog the tip if necessary as you pipe. Remember to bang the tray after piping to flatten any peaks and pop any bubbles trapped.

Top shell

Middle shell

Bottom shell

Dry in aircon room until dry to touch before baking.

5. When about to bake, preheat the oven to 170°C. Place baking tray in oven. Immediately turn temperature down to 140°C. Bake for 20-25 min or until feet doesn't appear wet for top and bottom shells. The ring should take about 15 min to bake. Let the shells cool on the tray completely before carefully peeling the parchment paper away from the macaron shells. If the shells are stuck, bake for another few minutes before checking again. You want to bake the shells until biscuit-like as the filling will soften the shells. Do note that baking temperature and time is just a guidine as each oven is different. Because coconut sugar is used, I bake them longer than if I use regular white sugar as it is more hygroscopic (tends to retain moisture).

Freshly baked shells! 

As with my previous attempts, I use gel food colouring dissolved in vodka to create a paint to give the shells an egg washed look that traditional mooncakes have. Use a mix of electric yellow and teeny bit of chocolate brown. You may want to oven dry the shells at 70°C before filling if the paint has turned your shells soft.

Please refer to this post for detailed recipe for the mung bean filling and salted egg yolk filling. You may Google for a lotus paste recipe if you prefer lotus paste instead of mung bean paste. Just thin it out with whipping cream as I mentioned in the post for the filling. The assembly sequence is shown below from left column to right.

1. Coat bottom shell with mung bean filling. 2. Place ring on top of bottom shell. 3. Fill cavity with a ring of mung bean filling and salted egg yolk filling in middle. 4. Coat top shell with a layer of mung bean filling. 5. Sandwich top shell on middle shell. 

Refrigerate for a day in airtight container before serving. Let the macarons sit in airtight container at room temperature for 15 min before opening and serving to prevent condensation from atmosphere onto the shells.

I love the view of the cross section! 

As you can see a lot of time and effort has been taken to come up with this so please acknowledge my hard work of you ever replicate this. Thank you and hope this will help you bless your loved ones at Mid-Autumn Festival this year!


With love,
Phay Shing


Read More »

Friday, 30 August 2019

Dairy-Free Blackforest Chiffon Cake

My friend sent me a picture of her daughter lying on a field and reading, and asked if I could make something like that for her daughter's birthday. I thought long and hard about the various genres of bakes I could use to make this and finally settled on chiffon cake since I think it is the best medium for this theme. It is the first time I made a full-bodied human figurine so I am glad it came out quite decently! Presenting my chiffon creation on top of a dairy-free naked blackforest cake!


Instead of cooked dough method for making chocolate chiffon, I tried doing it the regular chiffon way but bloomed the cocoa powder in boiling water instead of sifting together with cake flour. Blooming cocoa powder for bakes helps to intensify the chocolate flavour. I baked three 9" round layers. My friend's kids are allergic to dairy at some degree so the whole bake had to be dairy free.

Recipe for dairy-free chocolate chiffon cake
Ingredients (makes three 9" layers):
Egg yolk batter 
9 egg yolks
95g cake flour
50g Dutch processed (alkalized) cocoa powder
1/2 tsp baking soda
1/4 tsp salt
102g canola/vegetable oil
108g boiling water
2.5 tsp vanilla extract
1 tsp Kahlua coffee liqueur

Meringue
9 egg whites
1/2 tsp cream of tartar
150g caster sugar

Note: divide the meringue ingredients into three to bake the layers individually unless you are able to bake all three at once.

Steps :
1. Dissolve cocoa powder in boiling water in a small mixing bowl. Cover with cling wrap and leave to cool. Preheat oven to 150°C, set oven rack to second lowest position. Line bottom of baking tray with parchment paper.

2. Prepare egg yolk batter. In a large mixing bowl, whisk egg yolks until thicker in consistency and paler in appearance. Add oil and whisk until we'll combined. Add cocoa and water mixture and whisk until combined. Add vanilla and coffee liqueur and whisk until combined. Gradually sift in flour and salt and whisk until no trace of flour is seen. Divide the batter into three equal portions if baking one layer at a time.

3. Prepare meringue. In a clean metal bowl, beat egg whites with cream of tartar until firm peaks or just reach stiff peaks while gradually adding in castor sugar once the egg whites are foamy.

4. Quickly but gently fold the meringue into the egg yolk batter in three additions. Pour batter into prepared baking tray. Gently run a chopstick around the batter to pop any air bubbles.

5. Bake for 10 minutes. Reduce temperature to 135°C and bake for another 30-35min or until top of the cake springs back when lightly pressed and a skewer comes out clean. Cool for 5 minutes before unmoulding by hand or gently using a spatula. Cool on cooling rack with a other parchment paper over it. Not that baking time and temperature varies from oven to oven so adjust accordingly.

I assembled the cake using non-dairy whipping cream and cherries. I brushed the surface of the cake with simple syrup (1:1 ratio of sugar and water) before putting on the cream.

Using acetate sheet to surround the cake helps with neat assembly. 

I covered the naked blackforest cake with a thin layer of chiffon sheet cake before mounting the figurine on top. The most challenging part of the figurine was figuring out how to make the arms holding a book as it is a little gravity defying. I made the book out of bean paste dough as I thought bean paste is more suitable for the look of a book. I bought the recipe from a talented baking friend so am unable to share the exact recipe but you may refer to this post for my experience of making the dough. It is like fondant except that it is a lot less sweet and tastes like bean flavoured mochi. The figurine is made of dairy free vanilla chiffon sponge. I used a combination of thin sheets of chiffons and chiffon baked in small moulds to create the figurine.

Here is a peek at the works in progress state of the figurine. Looks a little spooky 😂

Thank God I managed to pull it off!

With love,
Phay Shing

Read More »

Wednesday, 28 August 2019

Totoro and Friends Chiffon Cakes


How high can you go? =p

Totoro and Friends Chiffon Cakes! 

Looking blur and cute <3 Hope this made u smile! =)

I have made a few versions of Totoro for friends in the past! This is my favorite version so far as it is so fat and cute!

With love,
Susanne


Read More »

Monday, 26 August 2019

Woodland Themed Yuzu Dark Chocolate Choux Pastry

I will be conducting a class for making fox, raccoon and bear choux pastries at Redman!


You may find this design familiar as these are featured in my Deco Choux Pastries book but in simpler form without the arms and the tree stump. I decided to choose a flavour of filling that will tantalise your taste buds. Refreshing yuzu pastry cream with bits of rind in there to provide some bite, lightened with whipped cream, and with bits of finely chopped dark chocolate to add another dimension to the filling.

Please click on this link for more information on what is covered in the class and to register.

With love,
Phay Shing
Read More »

Wednesday, 21 August 2019

Littlest Pet Shop Dark Chocolate Macarons

This was a last minute request I couldn't refuse as it was for a little girl suffering from leukemia. Littlest Pet Shop macarons!

Filled with dark chocolate ganache because she loves chocolate 

I use the French method for all small quantity bakes now so as not to end up wasting batter as well as to make the batter with the least amount of time and effort. I used this recipe but replaced caster sugar with icing sugar, to create a slightly more stable batter. I split the underfolded batter before adding the various colouring and continue folding until the right consistency. As the amount of batter per colour is really small, I didn't use the lava consistency test to test if the batter is ready to be piped. Instead, I tap the bottom of the mixing bowl after creating peaks in the batter. If the peaks melt back in to the rest of the batter, it is ready to be piped.

You may refer to my macaron recipe books, Macarons and Macaron Basics for a more systematic view of the various techniques needed to make the batter and create fancy shapes.

Just to share a couple of photos of the process...

Piped batter

Freshly baked shells! 

I used a combination of royal icing and edible marker to add in the details.
I filled the macarons with dark chocolate ganache that is still relatively firm in Singapore's hot weather.

Hope this small batch of cute macarons brings a smile to your face as it did to bless the recipient 🙂.

With love,
Phay Shing
Read More »

Friday, 16 August 2019

3D Lego Policeman Chiffon Cake


Who dreamt of being a Policeman when you grew up? 👮‍♂️

My humble take on creating a big 3D 12-inch tall Lego Policeman Chiffon Cake! =p

I took a while to conceptualize the cake as it was quite complicated in terms of the shapes and size. The core is made by combining a square chiffon cake with a lego chiffon cake.

Have a blessed weekend!

With lots of love,
Susanne


Read More »

Wednesday, 14 August 2019

Piggy Macaron Carousel

It's the first time I get a request for pig themed macaron carousel and I took the liberty of making it a little different from my usual carousels.

Somebody is being cheeky and climbed onto the roof! You can almost hear the piggy snigger 😝! 

I used the Swiss method to make the macaron shells and you may refer to this post for the recipe.

Just to share some photos of the process...

Piping the piggies 

Piping carousel frame pieces. I use Teflon sheet instead of parchment paper for larger pieces so that the base of the macaron shell can remain flat as parchment tends to wrinkle up under the piped batter for larger macarons. 

Nutella was requested as the filling but I added an outer ring of salted caramel filling for aesthetics. Dark brown filling wouldn't look as good against the blue carousel frame. The salted caramel filling is fairly firm as you don't want the piggies to slide down the pole. I will share the recipe here.

Recipe for salted caramel filling
Ingredients:
70g Salted caramel chips
10g Cocoa butter
20g Vegetable shortening
1/4 tsp Sea salt
1/4 tsp Caramel flavouring (optional)

Steps :
1. Place salted caramel chips, cocoa butter and vegetable shortening in microwave safe bowl. Heat on medium-low power for 10 seconds and mix well. Repeat heating and mixing until everything is melted nd smooth. Do not overheat or the mixture will separate. Use some force to mash the salted caramel chips against side of bowl during mixing to help it melt more evenly and more quickly.

2. Add salt and caramel flavouring. Mix well.

3. Chill the mixture in freezer for 1 to 2 min. Stir and whip until texture is lightened. You can choose to let the mixture sit at room temperature until it firm's up to toothpaste consistency without whipping as well but I prefer the former.

4. Transfer filling to piping bag and fill the macaron shells.


Filling the piggies with salted caramel and Nutella. I decorated the shells with edible marker and royal icing

Let this set overnight at cool room temperature in airtight condition. 

Fill the carousel frame macarons in a similar way. 


With love,
Phay Shing
Read More »

Thursday, 8 August 2019

Dessert Themed Raspberry Macarons (class with Redman!)

I am starting teaching at Redman in addition to teaching at ToTT! For my first class at Redman, I will be teaching how to make donut, ice-cream cone and cupcake macarons, filled with raspberry whipped ganache and homemade raspberry jam!


Although I started my macaron journey with Italian method, I have come to fall in love with the Swiss meringue method as it also produces a stable meringue, you can work with slightly smaller batches than Italian method, and it is also easier to manage. The ice-cream cone and cupcake designs are taken from my first macaron book, Creative Baking: Macarons.

Click on this link to register and view the details of what is covered in the class. The raspberry jam will be premade for you as it is time consuming but easy. I will provide the recipe for it.

With love,
Phay Shing
Read More »

Wednesday, 7 August 2019

Peppa Pig and Suzy Sheep Strawberry Macarons

Besides the Peppa Pig and family macaron centerpiece that my friend requested, these Peppa and Suzy strawberry macarons also appeared at the party!

These were individually packed as door gifts 

I used the Swiss method to make these macarons and you can refer to this post for the recipe. Ever since I discovered that I could work with a little cocoa butter substituting white chocolate for my macaron filling, I have been tweaking my default recipes as I am always eager to make the filling less sweet whenever possible. So what I will share here is my strawberry white chocolate buttercream recipe that is stable in hot Singapore weather, less sweet AND packed with strawberry flavour.

Just to share some pictures of the process first.

Piped Suzy Sheep 

Piped Peppa Pig 

Freshly baked shells! 

I decorated the shells with royal icing and edible marker

Here is the revised recipe for strawberry white chocolate buttercream.

Ingredients :
Strawberry jam
250g strawberry pureed
30g sugar (or to taste)
Pinch of salt
2 tsp lemon juice
1/4tsp strawberry emulco (optional)

Strawberry white chocolate buttercream
80g white chocolate, finely chopped or use chips
20g unsalted butter
30g cocoa butter, very finely chopped or use shavings
1/8tsp salt
55g strawberry jam

Steps :
1. Prepare strawberry jam by placing all ingredients in a saucepan and cooking over low heat, stirring frequently until mixture is reduced to about half the original weight. Let it cool to room temperature before using or you can a prepare this ahead of time and refrigerate.

2. Prepare white chocolate buttercream. Place white chocolate, cocoa butter and butter in microwave safe bowl. Heat on medium-low power for 10 seconds and mix well. Repeat heating and stirring until mixture is melted and smooth. Be careful not to overheat. You may use double-boiling method if you prefer.

3. Add salt and mix well. Chill in freezer for 2 min and mix well with spatula. Repeat freezing for 1-2min and mixing/beating with spatula until mixture resembles buttercream and appears light and fluffy.

4. Add the jam a teaspoon at a time and fold in until combined.


When assembling macarons with high water content fillings like jam, always insulate the shells with a layer of buttercream or ganache to prevent the shells from turning soggy fast.

Coat top and bottom shells with buttercream. Pipe a ring of buttercream on bottom shell. Fill the center with jam before sandwiching the shells together. 

Store in refrigerator for 24h in airtight condition before serving. When you want to serve, let the airtight container sit at room temperature for 15 min before opening to consume. This is to prevent condensation from forming on the macaron shells when you open the container. You may store macarons filled with jam for up to a week in the fridge.

With love,
Phay Shing
Read More »