
Only 4 here but I actually made 20!
Here's the original picture of the bear...

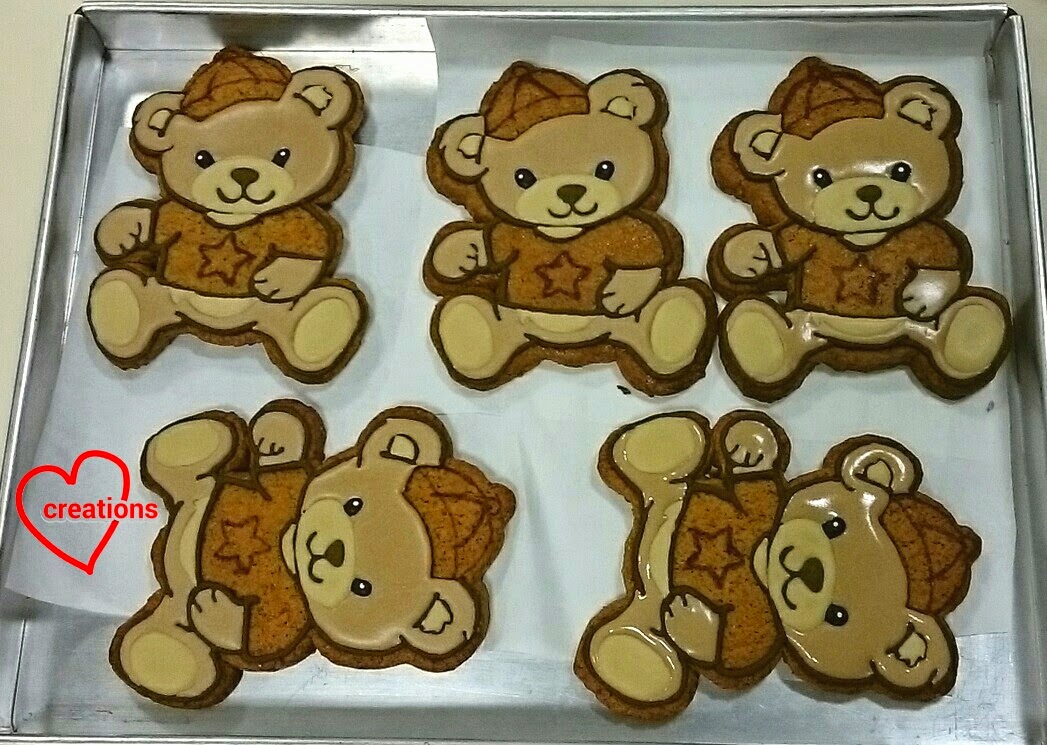
The purpose of this post is to show you how to make and ice cookies with complex designs, without the help of specialized cookie cutters or a Kopykake projector, but with the help of a cheap homemade template. If you have superb artistic skills, you may ice by freehand. But I am not that good :p. So I need a template.
First, find a line drawing of the image if possible on the internet for character cookies. If it's not possible to find one, then just work with the best image you can find. Resize the image until it is about 9-10cm and print it out. Trace the outline and some details of the image on clear plastic files that you can find from bookshops like Popular. Use a sharp craft knife to cut out the template.

Don't throw away the outer plastic sheet with the bear outline! You will need it.
Choose important details to cut out from the template.

Wash the templates thoroughly and dry them.
I used my good ol' brown sugar cookie recipe to make this. For a batch of 20 large cookies, I needed to use a little under 2.5 times of this recipe.
Use the inner template to trace the outline of the bear with a small knife onto the cookie dough. Roll the dough to a thickness of 5-6mm.

Chill the tray of cookie dough for 15 minutes before baking at 160-170°C for 15-18 minutes or until browned. Let the cookies cool completely before working on them. Preferably let them rest for a day before icing.
Use the outer template to trace the outline of the bear with edible marker. The reason why we don't use the inner template to trace the outline is because we don't want the marker to be visible on the cookie, but completely covered by icing. Use the inner template to trace whatever details you wish. Fill in the rest of the details using the traced parts as a guide. Your drawing doesn't have to be perfect. It's OK to make mistakes as it will be covered by icing.

Prepare the royal icing. You may refer to this recipe and scale accordingly for about 350g worth of icing sugar. I used charcoal for black and some cocoa powder for brown to reduce the use of artificial colouring.
Begin by icing the outline of the subject. Fill in the details later on.

Day 1 of icing!
Works-in-progress

Almost there!

I was about to call it a day on Day 2 at this point but persevered in finishing it up after the kids have gone to bed.

Finally done!

All done in two days of intensive icing!
Let the icing dry overnight in air con room before packing them. You may speed up the drying process by drying in the oven at 60°C fan mode until dry. Keep an eye on the cookies as the icing may appear patchy if left for too long in the oven.

All packed!

Another look at these bears!
It takes patience to make these as I needed a few days of work for 20 cookies! One day to prepare template, one day to bake the cookies, one-two days to trace/ draw the outline and details, and two days to ice the cookies! I have a family to take care of so quite a bit of the work was done in short sessions. Having said that, it brings me great joy to watch the subject come to life as I iced it, and the appreciative exclamations of the recipient as she received it :).
With love,
Phay Shing
Γεια σας! Είναι πραγματικά σπάνιο να συναντάς μια πλατφόρμα που καταφέρνει να συνδυάσει έναν τόσο πρωτότυπο χαρακτήρα με μια τόσο στιβαρή τεχνική υποδομή στην Ελλάδα. Η πρώτη μου επαφή με το spin granny app ήταν μια ευχάριστη έκπληξη, καθώς η ταχύτητα με την οποία φορτώνουν τα slots και η σταθερότητα του λογισμικού είναι επιπέδου 2026. Η συνεδρία μου έκλεισε με τον καλύτερο τρόπο, αφού η ανάληψη των κερδών μου ολοκληρώθηκε αστραπιαία, αποδεικνύοντας ότι πίσω από το ευχάριστο ύφος κρύβεται ένας απόλυτα επαγγελματικός μηχανισμός.
ReplyDelete