Monday, 18 July 2016

Cupcakes & Ice-cream Cone Shortbread Cookies

I have a request for a whooping 100 shortbread cookies in the shape of ice-cream cones and cupcakes. Here they are :)


These are modelled after the macarons that appear on the cover page of my Creative Baking: Macarons book. Shortbread cookies have the advantage of containing less sugar as decoration with royal icing is kept to the minimum. The sugar content in the cookie dough is not too high either.

I combined the ingredients together in a different way from how I did it previously. I have been using the method of cutting butter into flour/sugar mixture but thought of using the creaming method this time round to incorporate the colouring/ flavoring with minimal kneading after flour is added.

I made templates using clear plastic files to cut out the dough since I don't have cookie cutters for these designs. Very tedious but at least I don't and up having a huge collection of cookie cutters that I probably just use once in a lifetime. You may check out this post on how to make your own templates here.

Homemade templates and knife I use for cutting cookie dough


Ingredients:
(makes about 60 ice-cream cone and 60 cupcake cookies. About 4cm in size)

Pink/red dough
70g icing sugar
140g unsalted butter, softened
190g plain flour
20g cornflour (you may replace with plain flour)
1/4 tsp strawberry paste
1/8 tsp white gel food colouring  (optional)
1/4 teaspoon fine sea salt
Few drops of red gel food colouring

Brown dough
60g icing sugar
120g unsalted butter, softened
165g plain flour
5g cocoa powder
10g corn flour
1/4 tsp vanilla extract
1/4 tsp salt

Blue dough
60g icing sugar
120g unsalted butter, softened
165g plain flour
15g cornflour
1/4 tsp salt
Blue gel food colouring

Steps:
1. Use an electric mixer to cream butter, salt and icing sugar until pale and fluffy.


2. I will use the pink dough for illustration here. Add any liquid flavouring/colouring/extracts and mix well.


3. Add sifted plain flour and cornflour (and cocoa powder for brown colour) in a few batches. Mix until well combined with a spatula.


4. Portion out about 50g of pink dough and colour it red. Divide the rest of the pink dough into 4 or 5 batches. Place each batch between two baking sheets and roll to thickness of 4mm. Freeze or refrigerate until firm. Roll the brown and blue dough to about 5mm thick. Roll the red dough to about 8mm thickness. These thickness don't have to be too precise.


5. In order to create the ice-cream cone, use the template to cut out the outline on the brown dough. Return the dough to freezer when it softens too much to work with. I use a small knife to trace the outline with the help of the homemade plastic template. Place the cutouts on the baking tray lined with baking sheet. I find it helpful to place the dough on reusable freezer packs to prevent the dough from softening too fast.


6. Cut out the pink scoop of ice-cream and attach it to the base cut-out.


7. Sprinkle some rainbow sprinkles on the scoop of ice-cream. Gently press the sprinkles onto the cookie dough. Refrigerate the tray of cookie cut-outs while preheating the oven to 150°C.


8. For the cupcake cookies, cut out the blue base.


9. Cut out the pink cake and stick on top.


10. Use a drinking straw or a small circle cookie cutter to cut out the cherries. Carefully press the dough together where the boundaries meet.


11. Carefully sprinkle some chocolate rice on the pink cake. Chill the tray of dough cutouts.


12. Bake at 150°C for 14-17 minutes at the middle rack. Be careful not to brown the cookies.

After two days of hard work, here's what I achieved! I still had two-thirds of the cupcakes left unbaked!


Prepare white and brown royal icing. Use cocoa powder to colour the icing brown. Pipe the details on the cones and cupcakes cases.


Let the icing dry completely before storing in an airtight container.

I had to pack all 100 individually so it really tested my patience :p.


With love,
Phay Shing

Read More »

Sunday, 17 July 2016

Kaya Chiffon Cake with Yam Chiffon 'Baby Octopus'


These Asian inspired flavours Kaya and Yam was designed for my friend’s grandpa!

Kaya is a food spread, made from a base of coconut milk, eggs and sugar. Kaya bread tastes so good, I imagined kaya chiffon cake to be delicious! When I googled, there didn’t seem to be a kaya chiffon cake created before, so I attempted to make a kaya one myself and it was really good! I used nyonya kaya which has pandan inside as I find it more fragrant. I made the chiffon cake 2-toned using pandan paste for the green portion as that it’s prettier and also adds fragrance!

In the recipe below, I had also included a single tone kaya chiffon cake, in case you don't want to have 2 batters (one with more pandan) to work with. The baby octopus is made from yam chiffon cake.

Nyonya Kaya Chiffon Cake (18-cm to 20-cm tube pan)
5 egg yolks
22g castor sugar
68g coconut oil
56g nyonya kaya
17g coconut milk
2g vanilla extract
100g prima cake flour (I used 85g cake flour and 15g top flour)
¼ tsp baking powder
3g pandan paste (for green pandan kaya layer)

7 egg whites
68g castor sugar
¼ tsp cream of tartar

1. Preheat oven to 160°C. *Optional: I used steam baking, i.e. I placed a pan of water under the lowest rack before preheating – to control oven temperature, prevent cracks and for moister texture.

2. Whisk egg yolks with sugar until light, fluffy and well-mixed.

3. Add in oil and mix well. Then add in kaya, coconut milk/water and vanilla extract and whisk till well-combined.

4. Whisk in sifted cake flour and baking powder, and mix till well-combined.

5*. Divide the egg yolk batter into two. To one batter, add in pandan paste for the green portion.

OR *If you do not wish to have 2 colours, just add pandan paste to all the egg yolk batter (the pandan enhances the nyonya kaya flavour!).

6. Prepare meringue:

a. In a grease-free, dry metal bowl, using electric mixer, whisk egg whites with cream of tartar till frothy.

b. Add in ½ castor sugar for meringue and whisk at high speed till soft peaks form.

c. Add in rest of the castor sugar for meringue and whisk till firm peaks form, or just the point of stiff peak. Firm peaks give finer, softer texture.

7*. Divide the meringue into two. Gently fold in meringue gently into respective egg yolk batter 1/3 at a time.

OR *If you do not wish to have 2 colours, you may omit this step (do not need to divide the meringue by two).

8. Gently scoop the plain batter into an ungreased 7-inch chiffon tube pan, followed by one layer of green batter. Repeat another time with plain and then green batter being careful not to disturb the layer below. Gently tap on counter top to remove air bubbles.

*For one-tone batter, just pour all chiffon batter into tube pan.

9. Bake at 160°C for 15 min, 140°C for 31+ min, or until skewer inserted into centre of cake comes out clean. **If you use steam baking, you may need to bake for a few more minutes.

10. Invert pan to cool on a wire rack completely.

11. Unmould the chiffon cake by hand (see video tutorial ‘Hand unmoulding Chiffon cakes for a clean finishing’).

Yummy kaya chiffon cake!


Yam octopus chiffon cake (for one 11-cm bowl and 8-cake pop molds or 1 6-inch chiffon tube pan)
2 egg yolks
13g castor sugar
27g vegetable/corn/coconut oil
27g coconut milk
10g water
53g purple yam, steamed and mashed
1/3 tsp yam paste (from baking supplies stores)
32g prima cake flour
Pinch of baking powder

3 egg whites
30 g castor sugar
¼ tsp cream of tartar

1. Preheat oven to 160°C.

2. Whisk egg yolks with sugar until light, fluffy and well-mixed.

3. Add in oil and mix well. Then add in coconut milk, water, purple yam puree and yam paste and whisk till well-combined.

4 Whisk in sifted cake flour and baking powder, and mix till well-combined.

5. Prepare meringue:

a. In a grease-free, dry metal bowl, using electric mixer, whisk egg whites with cream of tartar till frothy.

b. Add in ½ castor sugar for meringue and whisk at high speed till soft peaks form.

c. Add in rest of the castor sugar for meringue and whisk till firm peaks form, or just the point of stiff peak.

6. Gently fold in meringue gently into egg yolk batter 1/3 at a time.

7. Spoon the batter into one 11-cm glass bowl and 8 cake pop moulds. Gently tap on counter top to remove air bubbles.

8. Bake the bowl at 160°C for 15 min, 140°C for 15+ min. Bake the cake pops at 160oC for 12 min, or until skewer inserted into centre of cake comes out clean.

9. Invert bowl to cool on a wire rack completely. Cake pop mould can be cooled upright.

10. Unmould the chiffon cakes by hand.

11. Round up the base of the cakes by cupping the base with your hands for the baby octopus.

The facial features were cut from black and pink chiffon sheet cakes and glued on using melted marshmallows. I filled the centre hole of the kaya chiffon with a 'surprise' (balls of yam chiffon cake) and used it to support the yam chiffon octopus on top. 

Enjoy your yummy kaya chiffon cake! Yam to me has a milder flavour =).

With lots of love,
Susanne
Instagram


Creative Chiffon Cookbooks with Marshall Cavendish:

Creative Baking: Chiffon Cakes


Great news for Malaysians, the cookbook can be found in Popular KL and selected outlets now =).

and Deco Chiffon Cakes (photoshoots)


Read More »

Thursday, 14 July 2016

Elsa and Olaf Macarons with Whipped Earl Grey White Chocolate Ganache

I had a last minute request for Elsa and Olaf macarons from my friend that just managed to squeeze in the night before my planned macaron mania. For those of you who know how I work, I usually work on a couple to a few orders at the same time when I plan to bake macaron shells (although decoration and assembly work take place at different times).  Sometimes I am able to accomodate last minute requests to ride on existing planned bake if the requested quantity is small. The good news is some people are happy that they managed to place an order. The not so good news is it's quite a rush job to plan for the unplanned. Because of that, sometimes I make boo-boos while baking and it happened here. Thankfully it still turned out well thanks to the forgiving nature of Italian method. I shall tell you what happened during the process and it may convince you to switch from French to Italian :p.


Looking at these, you won't suspect that I made a booboo! I made Elsa and Olaf macarons at the same time as the elephants and Minnie Mouse ribbons.

I used the reduced sugar macaron shell recipe for these but you may use the regular recipe without sugar reduction too. Please refer to my Creative Baking: Macarons book and video tutorials for the basics and piping of complex shapes. Just to share the piping process...

First I piped the base with a fairly large-tipped piping tip (6-7mm diameter). Bang tray on table to release trapped air.


Let the base shells partially dry before piping on the pop-up features. Waiting time can be anywhere from 15-30 minutes. Use your finger as a gauge instead of drying time. The shells should feel sticky but the batter should not stick to your finger. Pipe the hair and hands of Olaf with a 2mm piping tip. Add on his snout using a 4-5mm tip and use a toothpick to pull the batter in place. Pipe Elsa's nose and ears with a 2mm piping tip. Pipe alternate segments of her hair with a 3mm piping tip and use a toothpick wherever necessary. Pipe the base shell of Elsa with 6-7mm tip. Remember to bang the tray again.


After piping the above tray, I happily used up ALL the yellow batter for the yellow elephants. I looked at the Elsa and Olaf tray again and slapped my forehead. With no more yellow batter left in the piping bag but an extra elephant piped, I had no choice but to use a small spatula to scoop up some yellow batter on the baking tray from one elephant and the base shells of the Elsas and put it back into the piping bag. I re-piped the base shells and added on the extra bits of hair on Elsa.

Finally piped finished!

Let the shells dry. Bake at preheated oven for 10 minutes for 140°C at lowest rack, followed by 130°C for 7-8 minutes. If the feet still appear wet, reduce temperature to 110-120°C and bake for another 5 minutes or until feet appear dry.

Freshly baked shells!

I used royal icing to add in the features and a little black gel dissolved in vodka to make a grey paint to highlight the pop up features. This highlight is subtle and serves to accentuate the pop-up features like Elsa's hair and Olaf's snout. Fine black edible marker was used for Elsa's eyebrows. A little dusky pink lustre dust was used for the eyeshadow and peach lustre dust for the cheeks. Elsa's crown was piped on a baking sheet with the crown template underneath, oven dried before transferring onto her head.


I filled the shells with whipped Earl Grey white chocolate ganache as requested.


With love,
Phay Shing


Read More »

Wednesday, 13 July 2016

Rapunzel Chiffon Cake


This is borne from my castle chiffon cakes, a little different here as there’s only one tower, and on a two-tone pandan chiffon landscape. I loved this very much because of the medieval feel. Though there was only one tower here, it was one of my more nerve wrecking castles as it’s my tallest thus far. I made a pop-out attic, capped by a blue cone. The base is made a two-tone pandan chiffon cake – waves in Creative baking: Chiffon Cakes.

With love,
Susanne
ps: I have difficulty coping with blogging, baking and 3 kids hence the short post.. really apologize for that... and have a blessed day!

Read More »

Monday, 11 July 2016

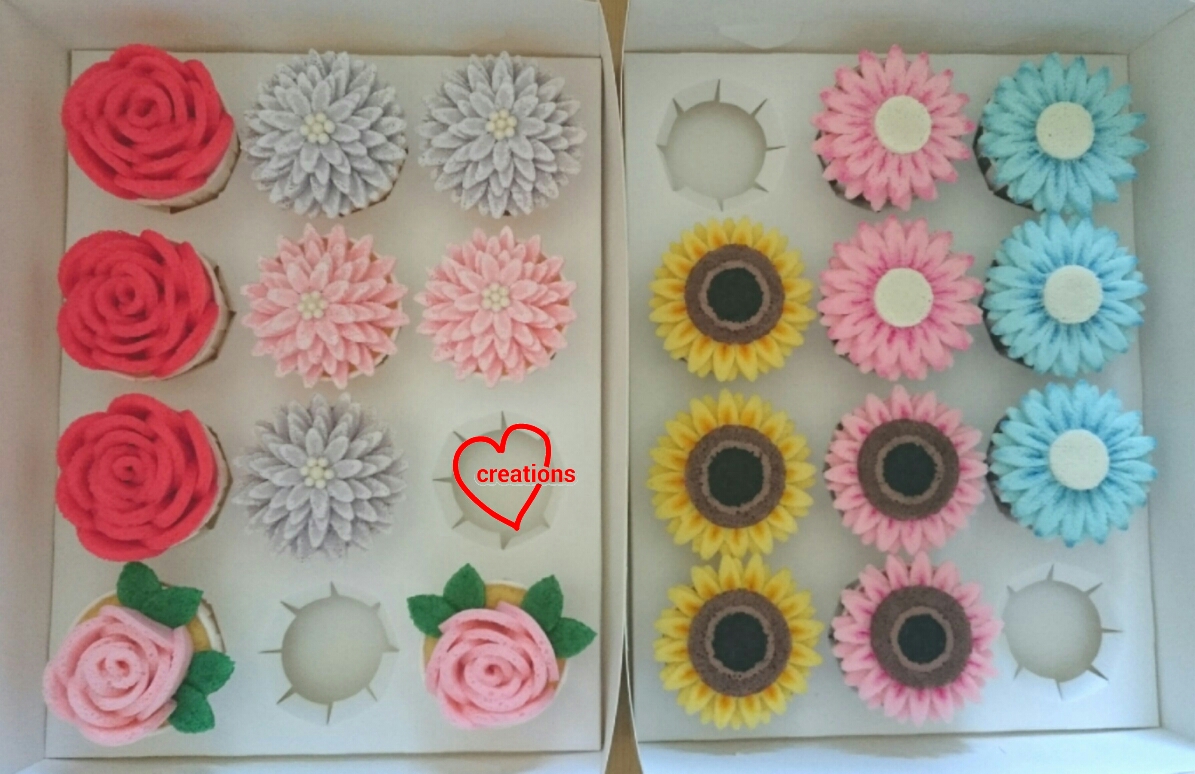
Lemon and Strawberry Assorted Flower Chiffon Cupcakes

A young lady requested for some flower cupcakes for her 21st birthday :)


This is the first time I made such a big variety of flowers and worked with so many colours. It takes some patience to piece all of them together because of this. But it's wonderful to see the whole collection of them when all the work is done :).

Recipe for strawberry and lemon chiffon cupcakes (makes about twelve 44x35mm cupcakes for each flavour)
Ingredients:
Main egg yolk batter
5 egg yolks
15g caster sugar
70g canola oil

Strawberry egg yolk batter
18g strawberry puree
18g strawberry yoghurt
1/2 tsp strawberry paste
1/2 tsp vanilla extract
46g cake flour
1/16 tsp salt

Lemon egg yolk batter
18g lemon juice
18g milk
Zest of 2 lemons (yellow part only)
1/2 tsp lemon paste
1/2 tsp vanilla extract
46g cake flour
1/16 tsp salt

Meringue
7 egg whites
1/4 tsp cream of tartar
88g caster sugar

Steps:
1. Preheat oven to 140°C with a tray of water at the base of the oven (optional) and rack set to second lowest position.

2. Prepare main egg yolk batter. Whisk egg yolks and sugar together until pale and thick. Add oil and whisk until well combined . Divide into two equal portions, one for strawberry and the other for lemon flavour.

3. Prepare flavoured egg yolk batter. Add the liquids, flavourings and zest (for lemon) into the respective egg yolk batter. Whisk until well combined. Gradually add in sifted flour and salt and whisk until no trace of flour is seen.

4. Prepare meringue. In a clean metal bowl, beat egg whites with cream of tartar until foamy. Gradually add sugar and beat until firm peaks form (just before stiff peaks).

5. Divide meringue into two equal portions. Fold meringue into egg yolk batter in three additions quickly but gently. Scoop the batter into the cupcake cases until about 1cm from the rim. Gently tap the cases on the table to release trapped air bubbles.

6. Bake at 140°C for 30-35 minutes or until skewer comes out clean. Cool completely before storing in airtight container.

I baked some thin coloured sheet chiffon cakes for the various colours of flowers using the recipe here. Due to the many layer cakes required, I baked some earlier and froze them to make the bakes more manageable. Just to share some photos of the sheet cakes....


Blue and yellow 

Red and white

I used circle, daisy and leaf cookie/fondant cutters for the flower cut-outs from the sheet cakes. Glue the pieces together using melted marshmellows with a sprinkle of water.

Assembled roses and dahlias!

Assembled daisies and sunflowers!


In order to make the flowers more life like, I added some highlights or details to the flowers. Some white dragees were added to make the centers of the dahlias. The painted highlights/details were done by using natural or artificial food colouring dissolved in sugar syrup (dissolve 5g sugar to 20g of water). Natural colourings include blue pea flower, Queen's natural pink colouring, charcoal powder and cocoa powder.

Here's a picture showing how the white highlights are added to the dahlias to make the petals appear more prominent.


Here's a close-up view of blue daisies with the petals highlighted using blue pea flower.


Brush the surface of the cupcake flowers with syrup before storing in airtight condition in the fridge.

Finally all done after a few days of interrupted hard work!


I had some leftover cupcakes so I filled the strawberry one with strawberry jam and the lemon one with homemade lemon curd by injecting the fillings into the cupcakes with a large piping tip.

Yums!


With love,
Phay Shing


Read More »

Sunday, 10 July 2016

Thomas the Train Engine Yard Chiffon Cake


I was given the challenging task of making a Thomas the train engine yard from chiffon cake for a dear mummy friend so.natty some time back. My first thought was that it was not possible. But then I realized it was actually similar to pointed waves in the new cookbook, Deco Chiffon Cakes in the pipeline. After I stuck some green chiffon sheet cake planks with melted marshmallows over, it looked like an engine shed! The trains here are not made from chiffon though haha.. I once made a chiffon Thomas and almost died! So I told her I was unable to make so many.. =p


I would like to share a great find for natural red food coloring introduced by a baking friend. I didn’t know baking supplies stores carry a PME line of natural food coloring (only available for some colors). The natural red coloring from cochineal is a great addition to red yeast rice powder for coloring the cake red naturally. The PME also carries natural green food colour. Unfortunately, blue was not available, so I had to use blue pea flowers (with a dip of wilton blue gel to brighten the shade).

Chiffon cake was lemon chiffon cake, divided 2/3 red and 1/3 blue as mentioned above.

Thankful cake was very well-received and my friend shared the lemon chiffon was really yummy!

With lots of love,
Susanne


More loving creations here:

Creative Baking: Chiffon Cakes


and Deco Chiffon Cakes (in the works)


Read More »

Thursday, 7 July 2016

Minnie Mouse Ribbon Vanilla Macarons (Reduced Sugar Shell and Filling, Template Provided)

I have a request for Minnie Mouse themed macarons. So here are some sweet pink polka dot ribbon macarons :)


Due to copyright issues, I could only make something that is related to Minnie Mouse but generic.

A request was made to make the macarons less sweet so I used the reduced sugar macaron shell recipe and reduced sugar vanilla swiss meringue buttercream recipe to make these. I actually made these ribbons along with elephant macarons, and Elsa and Olaf macarons but will just type out the full recipe of the shell for your convenience.

Here's a template for ribbons that you may print out to fit an A4 sheet. Please acknowledge the source here if you use it as I have taken time and effort to make this.


Reduced sugar macaron shell recipe
Ingredients (makes about 45-50 macarons, 90-100 shells):
Mass
210g superfine almond meal
196g icing sugar
11g rice flour
4g cornflour
1/8 tsp salt
White and pink gel food colouring
83g egg whites

Italian meringue
78g egg whites
196g castor sugar
73g water
1/8 tsp cream of tartar (optional)

Steps:
1. Prepare ribbon template and baking sheet on baking tray.

2. Prepare mass. Sift almond, icing sugar, rice flour, cornflour and salt together. Add egg whites and mix well to form a thick paste. Scoop out about 2 tbs of mass and colour it white. Colour the remaining portion pink.

3. Prepare Italian meringue. Heat caster sugar and water in a small saucepan until 115°C without stirring. In the mean time, beat egg whites with cream of tartar until soft peaks at medium low speed. Reduce speed if temperature of syrup is not reached yet. When syrup is ready, remove from heat, turn mixer speed to high and slowly pour syrup into egg whites in a thin stream, avoiding the beaters. Continue beating at high speed for 10-15 minutes or until cool, stiff and glossy. Portion about 1 tbs of meringue to stick baking sheet to baking tray. Use the formula weight of meringue = 0.51 x weight of mass to portion out the meringue for white and pink colours.

4. Macaronage. Fold meringue into masses in two additions. First addition is about a third. Please refer to this post for video tutorials of macaron basics such as how to fold the batter. You may refer to my macaron book too. The batter is ready when it falls off the spatula in a slow moving lava-like manner.

5. Transfer pink batter into piping bag fitted with 6 mm round piping tip. Pipe the ribbon by tracing the shape. Use a toothpick to pull batter in place wherever necessary. Bang tray in table to remove trapped air bubbles. Transfer white batter into piping bag fitted with 2mm piping tip. Pipe the dots while the pink batter is still wet. Bang tray again.

6. Dry the shells in aircon room and/or under a fan for about 2-3 hours (reduced sugar recipe tends to take longer to dry) or until dry to touch. You may use the regular macaron shell recipe without sugar reduction of you don't wish to wait for too long.

Piping ribbons 

7. Bake in preheated oven at 140°C for 10 minutes at lowest rack. Rotate the tray and bake at 130°C for 8 minutes. If the feet appear wet, reduce temperature to 120°C for another 5 minutes and check again. Cool completely before removing from tray.

Freshly baked!

Decorate the shells with pink royal icing. Outlining the ribbon with royal icing gives it some definition.


Fill the shells with reduced sugar vanilla Swiss meringue buttercream and refrigerate for at least 24h before serving.


With love,
Phay Shing
Read More »

Wednesday, 6 July 2016

Farmhouse Barnyard Animals Chiffon Cake (with Duck pond!)


I actually made this barnyard cake at the start of this year for a lovely friend! Still clearing my backlogs as I have difficulty blogging. The 'Farmhouse cake on a hill' is now in 'Creative baking: Chiffon Cakes'


And the Sheep yoghurt chiffon pops will be in the new cookbook in the pipeline, Deco chiffon cakes

It’s actually my second barnyard cake (my original 2-tier Barnyard here) so you may find some of the dear animals familiar, such as the pigs and the cow.

Here, I had fun going further to experiment with making a duck pond in the pandan hill! And making small yellow ducks, cut from cake pops. 

Thankful cake was very well-received!

With lots of love,
Susanne


Read More »

Monday, 4 July 2016

Floral Wreath Pandan Kaya Gula Melaka Chiffon Sponge & Pudding Cake

I have a request for a flower themed cake for my friend's mum. I feel a little shy about presenting my humble attempt as there are so many breathtaking floral wreath cakes done in buttercream, fondant or agar made by experts that you can find out there. Here's my humble attempt at floral wreath cake using chiffon sponge, adorning a Pandan kaya gula melaka sponge and pudding cake.

It's my first time experimenting with drippy pudding down the sides of the cake too!


The recipe is the same as the one I used for my flower pot cupcakes a few months ago as they received rave reviews. Please refer to that post for details. I will highlight the changes made here.

I made a 7.5" cake using springform pan for assembly. The two Pandan chiffon sponge cakes are baked in 7" round pans lined at the bottom with baking paper. I used steam baking at about 150°C for 30 minutes with the rack at second lowest position. Ingredients and method are the same as my previous post.

I will type out the portion of ingredients for the pudding as it is different here. The quantity in brackets is for the green Pandan pudding and the quantity not in brackets is for the gula melaka pudding.

Gula melaka/Pandan kaya pudding
A)
200g (200g) coconut milk
160g (40g) evaporated milk
188g (125g) Pandan water (boil several Pandan leaves in 1L water for a few minutes. Discard the leaves.)
90g gula melaka (60g white sugar)
1.5 tsp (1 tsp) agar powder
1/4 tsp (1/8 tsp) salt
1/4 tsp caramel essence, optional (1/4 tsp Pandan paste)
1/4 tsp (1/4 tsp) vanilla extract
1/4 tsp coconut paste/flavouring (optional)

B)
35g (23g) custard powder
187g (150g) Pandan water

This is the coconut paste I bought from Cold Storage during my recent trip to Malaysia 


Steps:
Prepare the gula melaka pudding following the steps in my flowerpot cupcake post. Remember to sieve the pudding to ensure any lumps are removed. Assemble the cake by alternating between pudding and sponge layers in springform pan.


Refrigerate for at least two hours or until firm. Carefully unmould. I found it helpful to lightly grease the springform pan with coconut oil this time round. The cake detaches from the pan more easily.

Ta-dah! 

Prepare the Pandan kaya pudding the same way but carefully pour the pudding down the sides with a Chinese soup spoon before flooding the middle of the cake. You could try pouring from the center and let the pudding flow down the sides but I wasn't sure I could control the flow that way. Refrigerate the whole cake again.

I baked reduced-egg yolk sheet cakes for the flowers and leaves. Details can be found in our Creative Baking: Chiffon Cakes book on how to create the chiffon roses so I will not go into detail on how to make the sheet cakes and how to shape the roses. Instead of using a flower shaped cookie cutter to make flower cutouts, I used a teardrop shaped cookie cutter to cut out five petals for each flower and stuck them together using marshmellow cream (melted marshmellows with a sprinkle of water). Use white dragees for the center of the flowers. They are stuck on using melted marshmellows as well.


I used a slightly higher liquid to flour ratio than what I previously wrote in the recipe book and baked at 170°C for 8-9minutes instead. The ingredient list below is for two 25x30cm trays and two 15x15 cm trays, four colours of batter. I spread the batter as thin as I could this time to make more realistic petals and leaves.

Recipe for ultra thin Pandan flavoured chiffon layer cakes
Ingredients:
Egg yolk batter
1 egg yolk
8g caster sugar
45g coconut oil/ vegetable oil
45g clear Pandan juice (top clear liquid after letting freshly squeezed Pandan juice settle in fridge for a few days. The dark green portion is used to bake Pandan chiffon)
1/4 tsp vanilla extract
60g cake flour
1/8 tsp salt
White, blue, purple, pink and juniper green gel food colouring*

Meringue**
4 egg whites
1/4 tsp cream of tartar
50g caster sugar

* You may use blue pea flower to reduce the use of blue gel but only a little colouring is used here as pastel shades are required. I used Queen's natural green food colouring for green to reduce the use of artificial green colouring.

** Divide the meringue ingredients into two unless you happen to have two ovens and are able to bake all four trays at once.

Remember to brush the flowers and leaves with a little syrup before storing the cake in a cakebox :). Refrigerate for a day or two for the flavours to mature!


Enjoy!

Thank God the cake was very well received! My friend said her mum was glad for once the decorative flowers on the cake can be eaten and it's yummy too!

With love,
Phay Shing
Read More »

Sunday, 3 July 2016

'Kawaii Panda' Soy Milk Chiffon Cake (with Pandan)


I made this ‘kawaii panda’ Soy milk chiffon sometime back for a lovely friend. I loved Mr Bean’s soy milk chiffon so it was a matter time I tried out that flavour. If you like soy milk, this one is for you!

I will be sharing the soy milk chiffon without the pandan waves at the bottom as the waves will be covered in a new cookbook, Deco Chiffon Cakes (to be launched later part of this year). You may be happy to know that cute pandas (although a different version) will be in Deco Chiffon Cakes too!

My recipe again is closer to ogura cake and is a special reduced egg yolk recipe for lighter, softer texture. You can also substitute some cake flour with top flour for even lighter texture!


Soy milk chiffon (8-inch chiffon tube pan)

1 egg yolk
1 whole egg
33g castor sugar
66g vegetable/corn oil
76 g soy milk
5g vanilla extract
80g Prima cake flour (or 60g cake flour, 20g top flour)
Pinch of salt
20g soy milk powder

7 egg whites
75g castor sugar
¼ tsp cream of tartar


1. Dissolve soy milk powder in soy milk and mix well.

2. Preheat oven to 160°C. *Prepare a tray of water under the lowest rack (optional) - I usually use steam baking to control oven temperature.

3. Whisk egg yolk and whole egg with sugar until light, fluffy and well-mixed.

4. Add in oil and mix well. Then add soy milk and vanilla extract and whisk till well-combined.

5 Whisk in sifted cake flour and pinch of salt, and mix till well-combined.

6. Prepare meringue:

a. In a grease-free, dry metal bowl, using electric mixer, whisk egg whites with cream of tartar till frothy.

b. Add in ½ castor sugar for meringue and whisk at high speed till soft peaks form.

c. Add in rest of the castor sugar for meringue and whisk till firm peaks form, or just the point of stiff peak. Firm peaks give finer, softer texture.

7. Gently fold in meringue gently into egg yolk batter 1/3 at a time. *Fold in unidirectional, gentle strokes and do not overfold.

8. Pour the soy milk chiffon batter into an ungreased 8-inch chiffon tube pan till 2-cm from brim. Gently tap on counter top to remove air bubbles.

9. Bake at 160°C for 15 min, then 140°C for 40+ min, or until skewer inserted into centre of cake comes out clean.

10. Invert pan to cool on a wire rack completely.

11. Unmould the chiffon cake by hand (see video tutorial ‘Hand unmoulding Chiffon cakes for a clean finishing’).

*Optional: If you wish to make the pandan grass patch, spoon out 1 tsp egg yolk batter and add 1g pandan paste. Fold this into 2 tbsp meringue and pipe the grass patch before spooning in the rest of the soy milk chiffon batter.


Thankful it was well-received!

With love,
Susanne

If you love Pink lemonade, here's recipe to a Pink lemonade chiffon cake (ombre)!


Read More »