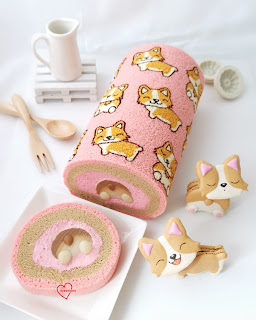
I am trying to make time for other bakes this year, not just macarons and choux pastries. For a start, I decided to create a corgi swiss roll inspired by my 3D corgi macaron design!
Everyone in my family said it looks like a corgi ran into the roll cake and got stuck😂. Once you see it, it is difficult to unsee! Here's a top view of the cake.
I made it almost dairy-free as my friend's family cannot tolerate dairy. Trace amounts is ok so I used a little butter in the strawberry diplomat cream.
This cake is made of Earl Grey strawberry vanilla chiffon sponge, strawberry diplomat cream made from lots of fresh strawberries (see the specks of red in the cream) and an Earl Grey vanilla honey oat milk agar agar jelly in the middle of the roll.
This bake begins with making the strawberry pastry cream, the Earl grey agar and vanilla honey oat milk agar. You may refer to this recipe for the strawberry diplomat cream. For a dairy free version, use non-dairy whipping cream and use a plant-based milk. I used soy milk. I also added the whipped cream into the pastry cream just before assembling the cake.
To make the corgi butt shaped jelly, I made my own customized cookie cutter from a DIY kit. You may use some condensed milk or evaporated milk if you wish. Adjust any sugar added according to type of milk you use and according to taste. The agar is quite a firm one as I wanted to be sure the jelly cutouts can keep the shape. You may reduce the amount of agar powder used if you prefer softer filling, or use fresh strawberries as the filling. You may use gelatin instead of agar but it has a softer bite than agar and melts more easily in hot Singapore so it will be more challenging to cut out shapes.
Earl grey and Vanilla honey oat milk jelly
Ingredients (makes two 7x7" trays) :
Earl grey agar
500g oat milk (or any milk of preference)
6 Earl grey teabags (adjust according to strength preference )
6g agar agar powder
Sugar (according to taste. I didn't add as oat milk is slightly sweet)
Vanilla honey agar
440g oat milk
40g honey (or according to taste)
1 tsp vanilla extract
6g agar powder
Steps:
1. Boil 500g oat milk in saucepan and steep 6 teabags for 10 minutes. Squeeze all the tea out from the bags. Let it cool to room temperature before adding agar powder and sugar (if using).
2. Bring all the contents in saucepan to roiling boil while stirring constantly. Keep it boiling for about 1min (continue stirring!) before removing from heat and pour into mould/tray lined with teflon sheet. I used 7x7" trays for setting the agar. You may reserve about one tablespoon for piping the corgi tails on a separate teflon sheet or parchment paper and let it set.
3. Prepare the vanilla honey agar in a similar way. Transfer about 1.5 tbs into piping bag to pipe out the corgi feet. I used my macaron template for piping the agar corgi tail and feet. Store set tails and feet in airtight container in a single layer until ready to assemble.
4. Set the two square trays of agar in fridge until firm, at least an hour. You can prepare this a day in advance.
5. Make customized cookie cutter and cut out the corgi butt shape. I glued the different coloured jelly together using freshy made transparent (plain) agar as glue but with a lower powder to liquid ratio (1/4 tsp agar powder to 100g water). Keep all assembled pieces in a single layer in airtight condition in fridge while preparing the chiffon sponge.
Cutting out the agar pieces with customized cutter
This is the second time I am using Keem Ooi's technique and recipe for patterned swiss roll. You may see my first attempt
over here. Please check out her Instagram page (Keempossible_2) and drop her a DM if you are interested in purchasing her recipe. I just tweaked it to flavour the sponge layers with strawberry paste and earl grey to flavour and colour the cake without additional food colouring. I used a 10x12" pan instead of 9x11" as suggested by Keem. I added about 1/2 tsp strawberry paste and used 2 earl grey teabags for the pink and brown sponge layers respectively.
Freshly baked patterned chiffon sponge
Cooling the sponge in rolled up position helps to prevent it from cracking.
Are there any additional tips I would like to highlight? Yes! Make sure the meringue for your patterning batter is whipped till really stiff but not broken. Take your time to build up your meringue slowly. These two tips will ensure you have a nice thick and smooth patterning batter that stays stable for a longer time as you pipe the design.
Instead of painting, I used edible markers to outline the corgi and add on the details as they are really small and fine. You may use paint made by dissolving gel colouring in water like what Keem does. You may wish to brush the surface of the sponge with simple syrup if the sponge dries out while you work in the open to paint in the details.
Do follow me on Instagram @phay_shing as I am most active there if you would like to see more of my work. I don't most some of my work on Facebook and the blog.
With love,
Phay Shing


