I have been wanting to put together information for something I experienced as a homebaker and when teaching in classes. I hope you find this helpful! Full detailed explanation can be found in my 6 part series of reels in Instagram (IG: phay_shing) as well as in my Youtube video.
In your journey of creating character macarons/fancy shaped macarons, you can't run away from having to deal with layering batter which you don't have to when piping simple rounds. I am using these bear coffee macarons to illustrate my point.

Typical types of batter layering in character macarons include:
1. Raised pop-up features (e.g. snout)
2. Side by side with clear boundary definition (e.g. head & ears)
3. Flat/flushed features (e.g. Inner & outer ear)

Assuming that your meringue is made perfectly, batter is macaronaged properly and baking conditions are right, you may still get macawrongs if you don't time the batter layering and/or baking correctly.
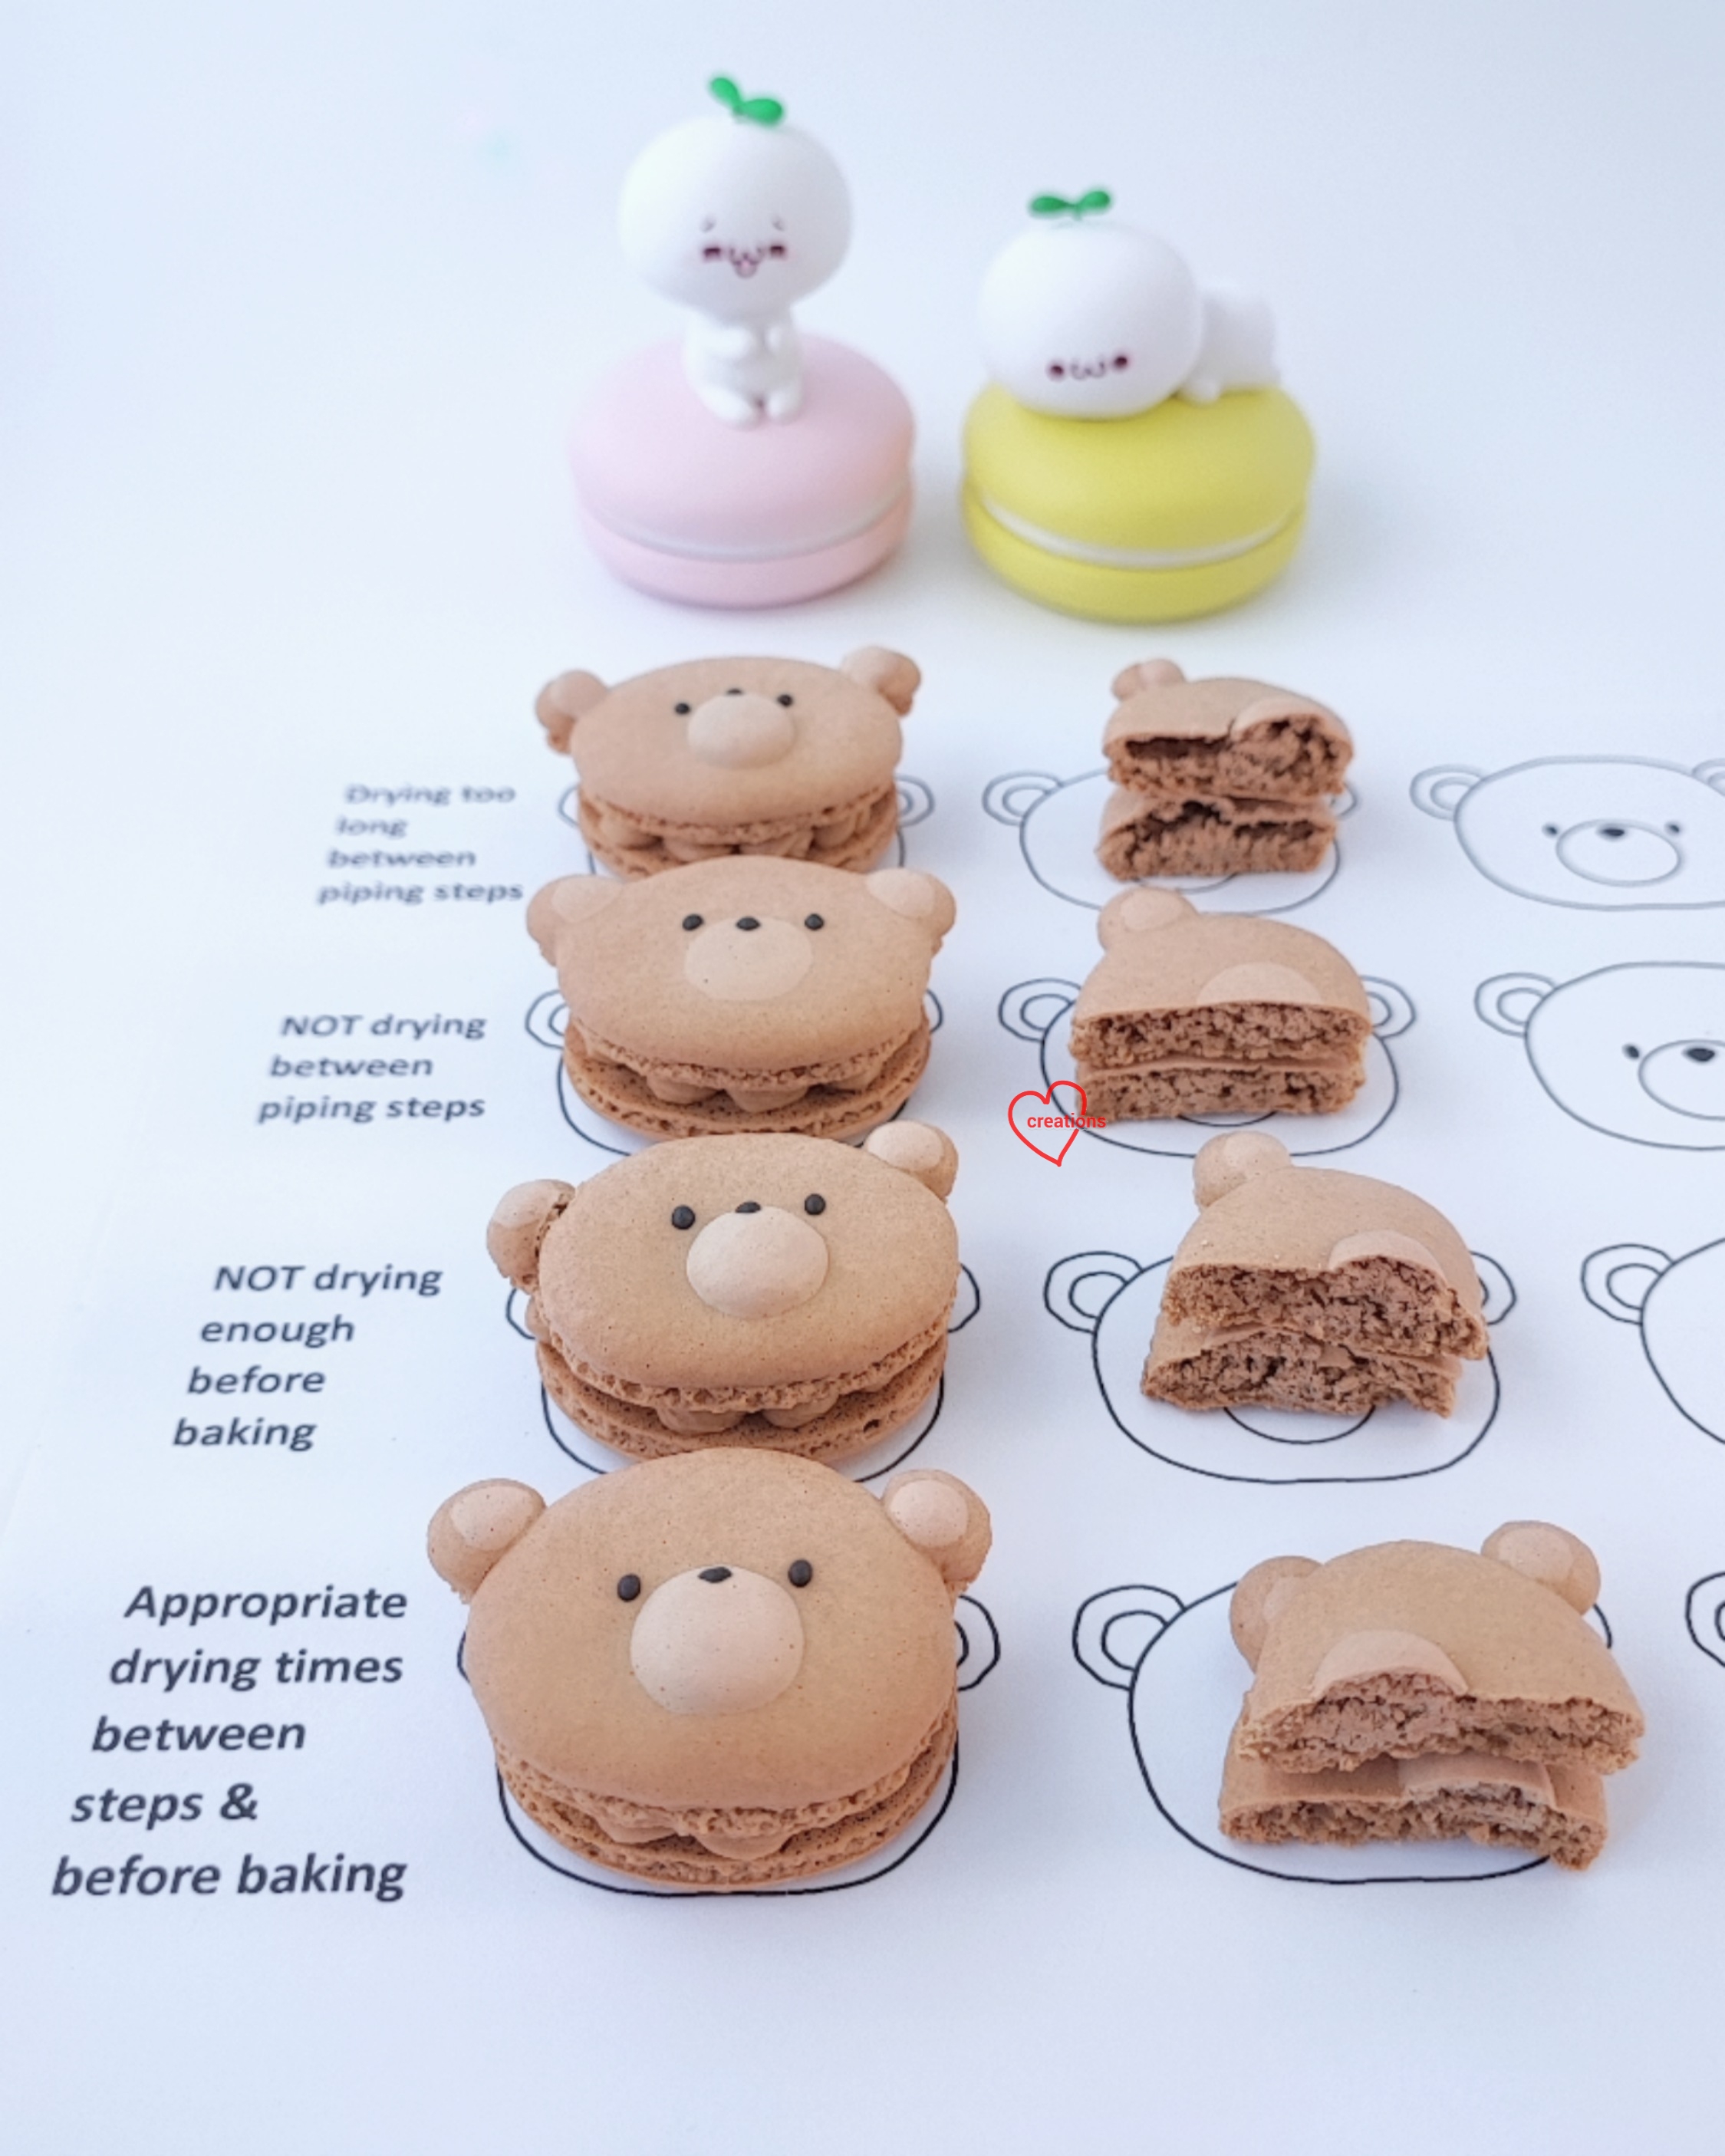
In this experiment I demonstrate 4 different cases using French method:
1. Drying too long between piping steps
2. Not drying between piping steps
3. Not drying enough before baking
4. Appropriate drying times between steps & before baking
I wanted to use the same batter, baking conditions & tray for all 4 cases. BUT this creates a handicap for cases 2-4 as they are made from batter that has been sitting in the piping bag for a long time. Due to this reason, I took Extra care in making a stable meringue by building it up really slowly (10-20 min) & eyeballed the macaronage process. As a result, I actually had difficulty creating some cracks that I had seen before despite running this experiment twice!
RESULTS
Case 1: Drying too long between piping steps
💜 Well-defined boundaries & pop-up features
💜 Feet may be receded or appear under the shells, possible lopsided feet.
💜 Shells are hollow
💜 Cracks may form along or radiate from boundaries if meringue is not elastic enough despite sufficient drying before baking.
Case 2: Not drying between piping steps
💙 Boundaries are not distinct
💙 No pop-up features
💙 Fairly full shells
💙 No cracks
Case 3: Not drying enough before baking
💚 Well-defined boundaries & pop-up features
💚 Flat/flushed features where desired
💚 Full & fluffy shells
💚 Cracks along boundaries
💚 Lopsided feet near cracks
Case 4: Appropriate drying time between piping steps & before baking
❤️Well-defined boundaries & pop-up features
❤️ Flat/flushed features where desired
❤️ Fairly full shells
❤️ No cracks
Conclusion:
✅Add on layers of batter with or without waiting for a STICKY membrane to form on your base batter depending on the type of boundary you want to create.
✅Add on layers of batter with or without waiting for a STICKY membrane to form on your base batter depending on the type of boundary you want to create.
✅ Wait for a DRY membrane to form before baking. You may get away with baking the batter while the membrane is still sticky like I almost did in this experiment but don't risk all the hard work you put into piping your characters!
✅ If meringue/batter condition isn't optimal, appropriate drying times between piping steps & before baking may prevent any potential cracks.
✅ Make sure meringue is stable & elastic, almond flour isn't oily or too dry, batter is not over or under folded, & baking temperature & time are right as far as possible. I had difficulty creating more macawrongs in this experiment because I satisfied all these!
What is a sticky membrane?
You are able to touch lightly but not swipe the surface with a finger. Batter doesn't stick to finger but membrane surface feels sticky to touch.
What is a dry membrane?
You are able to swipe a finger across the surface while applying slight pressure. Membrane should feel like clean dry skin or fabric. Drying membrane sufficiently before baking is good because it helps to strengthen it & prevents cracks during baking.
COFFEE FRENCH MACARON RECIPE
(makes 14-16 bears)
60g + 45g icing sugar*
60g almond flour (preferably superfine & not oily)
1/8 tsp cocoa powder (optional, for deeper brown color)
50g egg whites
1/4 tsp egg white powder (optional**)
1/8-1/4 tsp cream of tartar
2 tsp instant coffee granules (I used decaf)
A few drops of white gel colouring
*mine has cornstarch already added.
**some bakers add egg white powder (EWP) to help with meringue stability but I didn't add EWP in my 2nd round of experiment & it didn't crack at all! Instead, I took longer to build up the meringue and that's all it took to create a sturdier and more stable meringue.
Steps:
1. Sift together almond flour, 60g icing sugar and cocoa powder (if using).
1. Sift together almond flour, 60g icing sugar and cocoa powder (if using).
2. Make French meringue. Whisk together 45g icing sugar and EWP (if using) in a small bowl. In clean metal bowl, whisk egg whites with cream of tartar and instant coffee until it resembles bubble bath. Add icing sugar to egg whites. Whisk until sugar is wet. Whip up your meringue until stiff peaks using medium speed.
3. Scatter half of dry ingredients into meringue. Gently fold in. Scatter the rest of dry ingredients and gently fold in until just combined. Scoop out 3-4 tbs batter, add white gel colouring and gently fold in until batter consistency is right. Continue folding rest of the batter until it is able to flow off spatula SLOWLY in continuous ribbon.
4. Transfer into piping bags and pipe on prepared tray. Pipe head and wait for sticky membrane to form. Pipe snout, outer and inner ears in quick succession.
5. Rest piped batter until dry to touch.
6. Towards end of drying time, preheat oven to 160C. Turn temperature down to 140C. Bake for 15-20min (or until baked through) once tray is in. Every oven is different so adjust baking conditions accordingly.
7. Cool completely on tray before removing & decorating.
COFFEE WHITE CHOCOLATE GANACHE
100g white chocolate
40g heavy cream (80g for temperate climate)*
30g unsalted butter, room temperature (15g for temperate climate)*
2 tsp instant coffee granules
* Adjust ratios of ingredients according to taste and temperature you are serving. I live in tropical Singapore so my fillings need to be firmer.
Steps:
1. Melt white chocolate using microwave or double-boiler. Be careful not to overheat!
1. Melt white chocolate using microwave or double-boiler. Be careful not to overheat!
2. In the meantime, gently heat cream with instant coffee until granules are dissolved. Do not boil.
3. Pour hot cream onto melted chocolate. Stir (or use immersion blender if you wish) until well mixed.
4. Add butter and mix well.
5. Press cling wrap on surface of ganache & chill until toothpaste/scoopable consistency. You may whip it up to lighten texture (optional but I usually do!) before filling the shells.
6. Mature in fridge in airtight condition for at least 24h before serving. Let macarons sit at room temperature for 15min before consuming.
with lots of love,
Phay Shing
No comments:
Post a Comment