These snowskin mooncakes have either a predominantly Matcha or plain flavoured snowskin. I added a dash of vanilla for the white skin to impart a bit of flavour. The filling is a mixture of lotus paste and Azuki bean paste. You may use commercially bought red bean paste suitable for filling mooncakes if you wish. I had those two ingredients so I used them instead. Pretty good Azuki bean paste from Hokkaido! Some lotus paste was added to make the whole mixture workable (less sticky and more cohesive) and less cloying than pure Azuki bean. A little toasted melon seeds was added to add some crunch to the mixture. The hidden hearts are Matcha white chocolate truffles. It's my first time making truffles too! I thought the whole Matcha Azuki bean combination is good! Instead of just plain Matcha with lotus paste base.
Ingredients (makes about 11-12 small mooncakes):
Matcha truffles (adapted from here and here)
94g white chocolate, chopped (I used Meiji)
1/16 tsp salt
1/2-3/4 tsp Matcha powder*
30g heavy cream
6g unsalted butter
Azuki bean lotus paste filling
115g white lotus paste
85g Tsubuan (Azuki bean paste)
A pinch of salt
1 tbs toasted melon seeds (optional)
Matcha Snowskin (based on my tried and tested recipe from here)
38g cooked glutinous rice flour (糕粉)
38g icing sugar
13g vegetable shortening
63g hot water
1/3-1/2 tsp Matcha powder*
Vanilla Snowskin
Same as Matcha Snowskin but replace Matcha powder with 1/2 tsp vanilla extract and 2-3 drops of white gel food colouring (optional)
* Use a good brand of green tea if possible. Adjust amount according to how strong you want the Matcha to be. The upper limit is about as high as you should go before it starts giving a funny aftertaste.
Steps:
Truffle
1. Warm cream and butter until butter is melted. Add salt and mix well.
2. Melt white chocolate in microwave oven at medium power in 10second bursts of heating, stirring well in between each cycle of heating until chocolate is nicely fluid.
3. Add sifted Matcha to the white chocolate. Mix well. Add cream mixture and stir well.
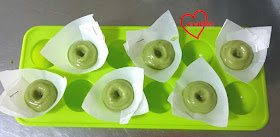
4. Transfer to piping bag. Pipe about 7g of Matcha white chocolate mixture in each paper cone made from baking sheet. I used 9g, which was too much for the hidden heart to fit nicely. Alternatively, fill round silicone ice cube tray with 10g of Matcha white chocolate mixture.
6. Chill the truffles for 30 minutes-1hour or until firm but still malleable. Use a chopstick to make an indent in the truffle-filled cones. Try to wiggle the top of the chopstick a bit to make a "V" for the dip in the heart shape.
7. Freeze the truffles for 1-2 hours until very firm. Unmould by popping truffles out of ice cube tray or tearing the paper cones.
8. Return the unmoulded truffles to freezer until time to assemble.
Filling
I used only 13g of filling per mooncake, which was too little for the mooncakes with hidden hearts. 15-16 grams would be better.
1. Combine lotus paste, Azuki bean paste and salt together until well mixed.
2. Add toasted melon seeds and knead with a spoon until well distributed.
3. Divide into 15-16g balls. Coat with some cooked glutinous rice flour to prevent it from sticking to your hands.
4. Flatten a ball of filling and place the heart shaped truffle upside down. Quickly wrap and return to refrigerator. Dust with more flour if it is sticky. Remember to place the wrapped filling with the heart upside down again!
1. Sift together flour and icing sugar in a bowl.
2. In a small saucepan, place water, shortening, vanilla extract and white gel food colouring (if using) for white snowskin. Dissolve Matcha powder in hot water before combining with shortening for the Matcha Snowskin. Heat the mixture over low heat until shortening is melted.
3. Pour into sifted flour mixture. Stir until well mixed. Cover with clingwrap and rest for 15 minutes.
4. Knead the dough until smooth, adding some flour if it is too sticky. Divide into 5-6 balls of 24g each. Keep portioned balls in a bowl that is covered to prevent the dough from drying out.
5. If you are making the different coloured heart designs, pinch a bit of snowskin (e.g. Matcha snows for white snowskin base) and press it in with a finger to cover the design. Wrap your finger with cling wrap to prevent the dough from sticking.
6. Wrap each chilled ball of filling with 24g of dough and dust with a bit of flour. Press the assembled ball into the mould. Press the mooncake out with the plunger. Remember to wrap the filling with hearts with the hearts upside down. When placing the assembled ball into the plunger, take note of the orientation of the heart too. It should be placed such that no matter how you cut the mooncake into half, you should be able to see the heart ;).
And you are done :)
Store the mooncakes in airtight container that has not too much airspace. Chill in the fridge overnight before consuming. These mooncakes keep well for up to a week without drying out.
I shared these with my family and Susanne's. Everyone loved it! So glad that this experiment was a success taste wise. Do give it a try even if you want to give the heart shaped truffles a miss (simple roundish shape will do). It was a joy to watch my dad's face light up and he went "Mmmm!" as he had a piece of this! My dad doesn't have a sweet tooth.
Update: my mum shared these mooncakes with her colleagues FIVE days after I made them and feedback was good! So do give this recipe a try!
With lots of love,
Phay Shing


No comments:
Post a Comment