Pages

Monday, 30 December 2019

Rat Choux Pastries with Mandarin Orange Pastry Cream

As the year of the Rat is approaching soon, why not make these 😊

Rat choux au craquelin filled with lightened mandarin orange pastry cream! 

This also marks the 7th consecutive year I am making mandarin orange chiffon "oranges"! They have a special place in my heart as they were my first experiment to bake chiffon in glass bowls and one of the earliest deco chiffon creations ever, which was made for my mother-in-law. Details of how to make the mandarin orange chiffons can be found here.

I will share in detail how to make the rat choux and the pastry cream. You may refer to this post on how to make the craquelin and choux batter, but adapt it as follows. Use 1/8tsp charcoal and 1/8 tsp white gel colouring for the craquelin instead of orange gel colouring . Use 1/8 tsp charcoal powder and 1/4 tsp white gel colouring instead of orange gel colouring in the batter. Feel free to adjust the shade of grey to your liking. I piped the body of the rats using a wilton #12 tip. I piped 2.5cm and 2cm circles of batter and used 3cm and 2.5cm diameter of grey coloured craquelin respectively for the piped circles. You may choose to do just one size of rats although I did two different sizes. Preheat oven to 210°C before making the batter.

I highly recommend using perforated mats to bake if possible 

Once tray is in oven, immediately reduce temperature to 190°C and bake for 10 min. Reduce heat to 180°C and bake for another 10 min. Reduce heat to 160°C and bake for another 10 min. Reduce the heat once again to 140°C and bake for another 10 min. Do note that suggested baking temperature and time is a guideline and varies with different ovens. You need to experiment to see what temperature and time profile works best to give your pastry cases a good rise in the oven while not browning it too much. If you want the pastry cases to be baked until thoroughly dry, cut a hole at the bottom of the cases and bake for another 10 min at 130°C to dry out the insides.

For the ears, tail and (if you wish) feet, change the piping tip to wilton #5. Pipe the parts as shown below. I decided not to include the feet for this version of rat choux, but included for the ones sitting in my macaron teacups (will post that soon!). You may experiment with round or oblong shape for the feet. Bake these at 170°C for 12-15 min.

Piped ears, tails and feet

For the assembly, use a toothpick to pierce the pastry cases where the ears and tail are to be inserted. Then gently insert the ears and tail. You may use melted chocolate or royal icing to add in the details. I used royal icing for the ears and other facial features, except the rounded eyes where I used rolled black candy melts and cut out little circles using small round cutters. Feel free to be creative and decorate it the way you want to!

Mandarin orange pastry cream
Ingredients:
2 egg yolks
15g Castor sugar (you may replace with stevia for diabetic-friendly version)
A pinch of salt
20g cornflour
150g freshly squeezed mandarin orange juice
50g fresh milk
1/2 tsp orange emulco (optional)
Zest of 2 mandarin oranges
20g unsalted butter
60g whip topping (or double cream/heavy cream)
Some chopped dark chocolate (optional, I didn't add but you could to add another flavour dimension to break the monotony)

Steps:
1. Sift cornflour into a heavy mixing bowl. Add sugar and whisk together. Add egg yolks and whisk together until a smooth paste forms. Set aside.

2. Place juice, milk, orange emulco and salt in a small saucepan and heat until it just starts to bubble at the edges. Remove from heat.

3. Slowly pour the hot liquid mix into the egg yolk mixture while whisking continuously. Pour mixture back into saucepan.

4. Heat the mixture over low heat while whisking continuously until it starts to thicken. Remove from heat and whisk until smooth. Return to heat and continue cooking and whisking until your desired consistency. Remove from heat.

5. Add butter and whisk until smooth. Add orange zest and whisk it in. Transfer pastry cream into a bowl and press cling wrap on surface. Chill in fridge for at least an hour or until cool. You may prepare this a day in advance too.

6. Whip the whip topping until stiff peak. If using dairy cream, be careful not to over whip. Fold into chilled pastry cream. You may fold in chopped chocolate if you wish. Transfer into piping bag and keep it refrigerated.

Lightening up pastry cream with whip topping


I recommend filling the pastry cases just before serving so that you can enjoy the pastry while it is crisp on the outside but cold, smooth and creamy on the inside!

With love,
Phay Shing

Friday, 27 December 2019

3D Cartoon Rat Chiffon Cakes (Chinese New year)


Are you looking forward to the year of the rat? 2020 is the Year of the Rat according to Chinese zodiac and the intelligent rat 🐭 is first of all zodiac animals in the race.

The little cute rats are made entirely from chiffon cake 🍰. Recipe for these cute rats are shared below:

3D Cartoon Rat Chiffon Cakes
(Makes 3)
Egg yolk batter
2 egg yolk
6g castor sugar
26g vegetable/corn oil
28g water
4g vanilla extract
40g cake flour
Natural food coloring/extracts

2 egg white
22g castor sugar
¼ tsp cream of tartar


1. Preheat oven to 140°C. Prepare egg shells by making a hole at the long side of the egg shells. Drain the egg and remove the membrane.


2. Prepare egg yolk batter:

a. Whisk egg yolk with sugar using hand whisk.

b. Add in oil, water, vanilla extract and mix well.

c. Whisk in sifted cake flour. Mix well. *Ensure no lumps are formed.

3. Divide the batter into 4 and add respective pink/yellow/brown natural food coloring or flavorings. *Some sources I have shared are here.
**You can also opt not to colour your rats or to have a single tone colour.

4. Prepare meringue:

a. In a grease-free, dry metal bowl, using electric mixer, whisk egg whites with cream of tartar till frothy.

b. Add in ½ castor sugar for meringue and whisk at high speed till soft peaks form.

c. Add in rest of the castor sugar for meringue and whisk till firm peaks form.

5. Divide the meringue into 4 and gently fold into each egg yolk batter 1/3 at a time. *Fold in unidirectional, gentle strokes and do not overfold.

6. Fill the egg shells till 2/3 full, according to the design of the rats. **You can also opt not to colour/pattern your rats.

7. Bake at 140°C for 35 min, or until skewer inserted into centre of cake comes out clean.

8. Bake the leftover batter as sheet cakes (either pour into small pan lined with baking paper or cupcake liners). 140°C for 20 min, or until skewer inserted comes out clean.

9. Allow to cool completely on wire rack.

10. Unmould the cake pops by gently cracking the egg shells.


11. Assemble the rat chiffon cake pops using melted marshmallow similar to Deco Chiffon Cake Basics (or you can refer to Pegasus Pusheen Chiffon Cake pops if you don’t have the book). This is made by popping some marshmallows with a sprinkle of water and microwaving on high for 30 seconds.

12. Stacking 2 cake pops together (like my 3D Snowman Workshops). Cut out small triangles and strips for the ears and arms from the sheet cakes. Pipe on the arms, feet and nose using melted chocolate. 

13. Decorate the facial features with charcoal sheet cake cut outs (refer to Deco Chiffon Cake Basics for picture tutorials of all the techniques), or pipe on using melted chocolate.


Hope you like these cute rat creations!

With lots of love,
Susanne


More picture tutorials are found in my cookbooks below, which are also available worldwide on Book depository:


Thursday, 26 December 2019

'Leon in a Chocolate Bomb' Earl Grey Macarons

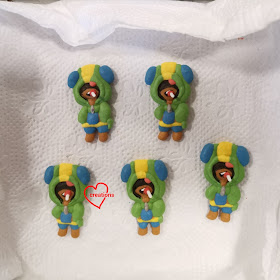
When I asked my elder kid what he wants for his birthday bake, he told me he wanted his favourite Brawl Stars character, Leon, in a pinata of sorts that can be cracked open like a pinata. He also wanted Leon to be made using macaron as the medium with Earl Grey filling. And what does Mama the baker come up with? I decided to make all the components edible as far as possible. And so I decided to hide Leon in chocolate bombs which are to be cracked open by a brown sugar cookie hammer!


I used French method to make the macarons since it is such a small quantity. You may refer to this post for the recipe. Just to share some photos of the process...

Piping Leon

Freshly baked shells

I decorated the shells with edible black marker, royal icing, and white coloured rice sprinkle for the lollipop stick

I filled the shells with Earl grey ganache. You may refer to this post for the recipe


I made the cookie hammer by using my fingers to mould a log shaped cookie dough and stuck the end of a wooden chopstick knto the dough. I wanted the cookie to be really hard so that the chocolate shell shatters instead of the cookie. To do that, I baked the cookie at a lower temperature of 145°C for 45 min but checking the progress of baking every 10 min. The brown sugar cookie recipe can be found here.

What was new in this bake and unfamiliar to me is making the chocolate bomb out of tempered chocolate. To be honest I was really nervous and out of my comfort zone but excited to try it out as well. Why nervous? Because the average ambient temperature that I work in is 28-32°C all year round. And humidity is high as well. Terrible conditions to work with chocolate but I don't have a choice. I chose dark chocolate as it is less tricky to work with than milk or white chocolate. (Although I did make the fuse of the bomb out of white chocolate). I studied two chocolate books that I bought recently on tempering chocolate and watched a few youtube videos on how to create chocolate spheres. So I am sharing my first experience properly working with chocoate in hot and humid home kitchen here.

I find that the most convenient method for me to temper dark chocolate was to use the double boiler and ice bath method. The seeding method didn't work so well since the kitchen was so warm. You need a candy thermometer as the temperature has to be very precise. I melted 270g of dark chocolate couverture over barely simmering water without the water touching base of bowl until temperature reaches 50°C. I quickly sit the bowl into another bowl with ice water and stir the chocolate with spatula while monitoring the temperature. I removed the mixing bowl out of the ice bath from time to time as the chocolate in contact with the bowl may solidify. Bring the temperature down to 28°C and put it back in double boiler. Stir and heat the melted chocolate until temperature is 31-32°C. I added a little oil based black food colouring to deepen the shade of the chocolate a little.

To create the chocolate sphere, I used a brush meant for food use to coat the insides of silicone hemisphere mould with a layer of tempered chocolate. I put it in the freezer for 3 min before adding another coat of chocolate. I repeated this so there are 3 layers. Freeze for 10 min for the last coat. Use a metal spatula or bench scraper to scrape off any bits of chocolate sticking out from the surface of the mould. This is harder to do cleanly if you are using a relatively soft silicone mould like me. But if you are using a rigid plastic mould for chocolate, this shouldn't be an issue. If the chocolate is properly tempered, it should come out of the mould easily and have a shiny appearance.

My first attempt! Happy with it! 

Do wear latex gloves when handling the unmoulded chocolate or you will risk melting it or leave smudges on the surface. Handling unmoulded chocolate was really a challenge for me since it is so warm here 😂. For the little knob on top of the sphere, I piped the tempered chocolate into a jumbo straw and let it set for 10 min in the fridge. I used a chopstick to push the hardened chocolate out of the straw. I heated a small knife over a flame and cut the unmoulded log of chocolate into short sections, cleaning the knife after each cut. I used the heat of my fingers to shape compound white chocolate chip into ropes.

Rule of thumb of gluing chocolate parts together is to place the joining surfaces on a warmed non stick frying pan to melt the chocolate surface a little, then quickly stick the melted surfaces together. Just place the pan on heat for a few seconds and turn off the heat. In instances where placing the chocolate on pan is not possible, I heat the end of a metal chopstick over a flame for a couple of seconds and use it to melt the chocolate surface.

Partially assembled bombs! I used stiff royal icing to stick the macarons down. 

After assembling the bombs, I glued some roasted ground peanuts onto the cakeboard for a "sandy" dessert scene.

Unfortunately Singapore is so warm you have to store this creation in the fridge or in ideal situation, a really cold aircon room at 16-18°C. Fridge storage does mar the appearance of the chocolate bomb but since this is for my kid, who cares 🤣! It's a fun creation nonetheless!

Finally the deed is done! 

I think I should have just done 2 layers of chocolate coating lol! Nonetheless it was still fun to crack the bomb open!


With lots of love,
Phay Shing


Sunday, 22 December 2019

Line Brown Bear Snowman Chiffon Cake


Who would like a HUG from me? <3

Line Brown Bear playing dress-up as Snowman in this chiffon cake creation!

My last post before Christmas.. Merry Christmas and love, joy and peace in advance to you and your families!!

And here's sharing my favourite verse from the bible which is the reason why we celebrate Christmas!!


With lots of love,
Susanne =)

Saturday, 21 December 2019

Strawberries n Cream Logcake

My last Christmas bake from home for the year, strawberries n cream log cake!

I decorated with a couple of reindeer I made from my masterclass! 

I have been really busy with classes/test bakes and dealing with some admin stuff for my kids for the next academic year but managed to squeeze in this bake that took me only a couple of hours to put together, including chilling in the freezer (if you don't count the premade reindeer macarons and strawberry jam filling I used). If you want it to be done really quickly, omit the homemade strawberry jam and just use whipped cream as the filling. Korean strawberries are in season now so why not take the chance to include this in your Christmas bake?

The recipe for the vanilla chiffon sponge can be found here but divide all ingredients by two if you are making only one logcake like me. I baked this sheet sponge in a 10 x 12" pan lined with teflon sheet (you may use parchment paper). Bake in preheated oven at 170°C for 12-13min and flip it onto a fresh sheet of parchment paper immediately and roll up to cool.

While cake is cooling, prepare the strawberries and filling. If you intend to use homemade strawberry jam, this should be done earlier before sponge is baked.

Strawberry jam
Ingredients:
300g whole strawberries
25g sugar (or to taste)
Pinch of salt
1 tsp cornflour dissolved in 30g water
1tsp lemon juice
1/2 tsp strawberry emulco/paste
1 tsp gelatin powder
1 tbs water

Steps:
1. Blend strawberries with lemon juice and sieve the mixture into a small saucepan.

2. Add salt and sugar and cook over low heat, stirring frequently for about 15 to 20 min or reduced to the consistency of your liking.

3. Towards end of cooking time, add the cornflour dissolved in water and continue to cook for another few minutes until the jam is thickened further.

4. Add strawberry paste and mix well. You may store this in the fridge overnight or up to a few days before assembling with cake.

5. When you are ready to assemble the cake while the baked sponge is cooling, bloom the gelatin by scattering the gelatin powder over the water in a small microwaveable bowl. Let it sit for 10 min. Melt the bloomed gelatin over medium low power in microwave oven and stir until gelatin is dissolved. Repeat heating if necessary. Stir the melted gelatin into the jam. Reserve about 1-2 tbs of jam (if you are making the pink swirls on the log cake) and transfer the rest into piping bag.

Whipped cream
You may use any of your preferred whipped cream recipe. It can simply be whipped topping which is a non-dairy whipping cream that is very stable in Singapore's hot climate, or stabilized dairy whipped cream. But I will share what I used. I used part double cream and part heavy cream. Double cream contains 45% fat whereas heavy cream contains 35% fat. Double cream is more stable at room temperature than heavy cream due to the higher fat content so it doesn't melt into a puddle that easily. Dairy cream tastes better than non-dairy cream in my opinion, but it is trickier to work with.

Ingredients:
180g double cream
120g heavy cream
2 tsp vanilla extract
20g icing sugar

Notes: you may add some melted bloomed gelatin into the dairy whipped cream if you want to stabilize it some more. Just use 1tsp of gelatin powder to 1tbs of water as the ratio to use.

Steps:
1. Chill bowl and beaters in freezer for 10 min before whipping.

2. Place all ingredients in chilled mixing bowl and beat until firm peaks. If you are adding gelatin, add in at this point. Gently whisk until stiff peaks to make sure the cream is beaten evenly. Do not overwhip.

Your cream should look like this

3. Portion out about 130g and transfer into piping bag.

Assembly
1. Cut some strawberries and pat dry cut surfaces with paper towels. It is up to you how you want to cut them. I cut the leaves and the pointy end of strawberry.

2. Unroll the cooled sponge. Pipe alternating lines of strawberry jam and whipped cream. If you are using only whipped cream, just use a spatula to apply the cream on the sponge.

3. Place the cut strawberries on top.

This was how I did it. 

4. Carefully roll the cake and freeze it for 1h. In the mean time, chill the unused whipped cream in the fridge.

5. When 1 hour is almost up, make the pink whipped cream. Mix 1-2tbs of jam with 80g of whipped cream. Add 1/4 tsp of strawberry emulco too. Transfer into piping bag fitted with a wilton #10 tip or any tip of your choice.

6. Spread a little cream on the cakeboard. Carefully slice off the ends of the swiss roll with a heated knife.

7. Place the main log on the cakeboard and cover with cream. Attach the cut off pieces, one on top and another at the side. Cover with cream. Pipe the pink swirls on the exposed cut ends.

This is what it looks like. 

8. Use a fork to create the bark patterns on the log. Add a nicely cut strawberry slice in the middle of the cut surfaces if you wish. I chose to cut heart shape because Christmas is really about God's love for us by sending us the greatest present we can have, Jesus!

Store in fridge until you are ready to serve.

Unadorned logcake! 

I decorated the cake with some extra loose pieces of reindeer macarons from my first macaron carousel masterclass!

Here is a peek at what we did over 2 intensive days! 

Have a blessed Christmas everyone!

With love,
Phay Shing


Wednesday, 11 December 2019

Chocolate Stump Cake with Meringue Mushrooms

I don't usually accept last minute requests but this one I couldn't refuse. My mum asked for a logcake I can make at my convenience, so I decided to let this request ride on a planned bake that involves making my ultimate chocolate cake. I usually bake chocolate chiffon sponge for log cakes as the sponge is soft and flexible enough to roll into swiss roll. Since the sponge I use for my ultimate chocolate cake isn't suitable for making swiss rolls, I make a stump cake instead 😊

Mushroom meringues as deco! 

I followed my original recipe closely, except that I tweaked the chocolate ganache to make a firmer one for the bark patterns, and I made chocolate whipped cream for the rings on the stump.

When I shared the photo of the mushroom meringues on social media, some were interested how I made them crisp and non sticky in humid Singapore. I will share the detailed recipe and tips in this blog post. I applied what I learnt from macaron making to create a meringue that remains crisp for a longer time.

Recipe for mushroom meringues
Ingredients (makes about 25 mushrooms) :
40g egg whites (about 1 large egg)
70g icing sugar (with cornflour added)
1 tsp cornflour
1/8 tsp fine salt
1/8 tsp cream of tartar
Cocoa powder (for dusting)

Notes
Traditional meringues are made using caster sugar insted of icing sugar. I chose to use icing sugar as it is much finer in texture and therefore more easily dissolved in the egg whites. Any undissolved sugar grains in the meringue will cause meringues to collapse a little during baking. Traditional recipes don't call for the addition of more cornflour but I recommend adding a little to help the baked cookies remain crisp and dry longer. Salt is optional but I included to balance the taste. Cream of tartar may be substituted with lemon juice if you prefer. The ratio of egg whites:sugar is traditionally about 1:2. I reduced it a little. Don't reduce by too much as it will affect the stability. Some people make swiss or italian meringues for better stability but what I am sharing here is the simplest method.

Steps:
1. In a small bowl, mix icing sugar, fine salt and cornflour. Set aside. Preheat oven to 100-110°C as read by the thermometer (no higher than that). Line baking tray with parchment paper.

2. In a clean metal bowl, beat egg whites with cream of tartar until foamy. Gradually add sugar mixture and beat at medium high speed until firm peaks form like below. This should take about 10 minutes.


3. Transfer meringue into piping bag fitted with a wilton #12 tip (about 8mm diameter). To pipe the mushroom caps, gently squeeze the bag with the tip placed 1cm away from baking tray surface until a mound forms. Release pressure and twirl the tip horizontally to try to release the tip from meringue without forming a peak. Dont worry if a peak forms. Just use a damp finger (not dripping wet) to tap down the peak gently. To pipe the mushroom stems, pipe a vertical column about 2cm tall by slowly moving the tip away from baking tray surface as you pipe. Tap down the peak gently with damp finger. You may pipe mushrooms of varying sizes for some variety.

4. Lightly dust the mushroom caps with a little sifted cocoa powder if you wish.

Piped and dusted with cocoa powder

5. Bake at middle rack without the fan on for 2 hours. Make sure the oven temperature doesn't exceed 110°C or the meringues may crack. If you don't mind a little cracking happening to make the mushrooms look a little more rustic, you may increase the temperature to 120°C. Open the oven every half an hour to release the steam build up in the oven. Traditional baking temperature is 90°C but I find that this may not dry the meringues out sufficiently and the surfaces may remain sticky.

To assemble the mushrooms, cool completely inside the oven. Dig a little hole at the base of the mushroom caps such that the stems can sit inside comfortably.  You may attach the caps onto the stems using melted chocolate or in my case, I used royal icing but dried the assembled mushrooms  in the oven for half an hour at 100°C.

Cute meringue mushrooms! 

Store the meringues in airtight container at room temperature.


You may refer to this post for the chocolate sponge and chocolate custard recipe. The portion is suitable for 7 to 8 inch sponge cake. I used only three-quarters of it as I used the rest of the batter for another bake. This stump cake that I made has three 6" sponge layers. The other bake I did concurrently had a small amount of homemade raspberry jam which I used to brush the sponge layers during assembly. This is optional but I used it since I have it. You may bake the cake layers in square pans if you dont have round ones and just cut to the desired shape and size using a clean cakeboard as your template. I actually baked the 3 sponge cakes in three 7x7" square trays, and then used a 6inch cakeboard as my template to cut to size.

Dark choc ganache (for bark) 
Ingredients:
150g bitter dark chocolate couverture 74%*
150g dark chocolate couverture 56%*
200g whipping cream

* you may use one type of couverture

Steps:
1. Place all ingredients in a heatproof bowl and set it over a pot of freshly boiled water without the water touching base of bowl. Let it sit for a few minutes. Use a spatula to stir the mixture until all the chocolate is melted and ganache is smooth.

2. Set aside to firm up at room temperature

Chocolate cake filling
Ingredients:
200g chocolate custard
150g dark chocolate ganache

Steps :
1. Portion out 150g of dark chocolate ganache above and chill it briefly in the freezer for 2 min. Use an electric mixer to whip the ganache until it is lightened in texture but smooth and creamy.

2. Fold the whipped ganache into the chocolate custard.

3. Transfer filling into piping bag fitted with a round piping tip of your choice.

Chocolate whipped cream (for rings on stump) 
50g whip topping (or double cream/ heavy cream)
40g dark chocolate ganache
10g chocolate custard

Steps:
1. Beat chilled whipping cream until firm peaks form. Be careful not to overwhip if you are using full dairy cream.

2. Fold in chocolate custard and chocolate ganache in a few additions until mixture is smooth.

3. Transfer into piping bag fitted with a wilton #12 tip (or any round piping tip of your choice)

Assembly
1. Apply a little ganache on cakeboard. Place first layer of sponge on top. Brush with syrup or jam if desired.

2. Apply a thin layer of custard with a spatula

3. Pipe the filling as shown below (3rd picture). Place the second sponge on top and press down gently. Repeat with the next layer.

4. Coat the top sponge with some chocolate whipped cream and use a spatula to smooth it out.

5. Coat the sides of the cake with dark chocolate ganache. Don't worry about being neat as you don't have to be!

6. Pipe rings of the stump on top using chocolate whipped cream. Use a fork to draw out the bark patterns by running the tines upwards.  Chill the cake in fridge until ready to serve. This chocolate cake tastes the best after 3 or 4 days of storage when the flavours have matured!


Unadorned cake! Still looks good! 

Decorate the cake with meringue mushrooms as you wish. You can add on other plastic christmas cake deco as well!

With love,
Phay Shing

Tuesday, 10 December 2019

Gingerbread man Chiffon Cake


Help! My yummy Gingerbread man ran out of my oven!

Anyone can help me catch?? =p

Made this cute cake for my dear niece's birthday! The kids had such fun imagining this was a real Gingerbread man who could jump out, cutting the cake and sticking candles!

Gingerbread man blazing.. with too many candles..

The aftermath.. poor Gingerbread man!

The cake was gone is seconds! Thankful it was well received.

Blessed Christmas in advance!

With lots of love,
Susanne

Monday, 9 December 2019

Chinese New Year Macaron Teacup Class

I finally mustered enough courage to conduct a class for creating something with hemispherical macaron shells!


Auspicious looking teacup macarons filled with dark chocolate ganache, yuzu mandarin orange curd and yuzu mandarin orange Swiss meringue buttercream!

It will be the first time I am teaching at ArtZ Baking and  Culinary studio so I am excited about this collaboration! Please click on this link to register and for more class details. Not only will I cover the basics of making macarons using the Swiss meringue method, I will teach you how to work with royal icing in decorating and assembling macaron structures, and you will also have hands on experience making 3 different delectable fillings! You will also get to bring home the silicone mould required to make the hemispherical macaron shells. This mould is multi-purpose and not just for making hemispherical macaron shells. You can use it for no-bake desserts like jellies, puddings, mousses and chocolates, as well as for baked goods like chiffon cakes and other cakes!

So hurry and register as spaces are limited!

With love,
Phay Shing


Wednesday, 4 December 2019

Sumikko Gurashi Chocolate Choux Pastries

I made some Sumikko Gurashi choux au craquelin for hubby's birthday as well as for my friend. Both of them love dark chocolate so the pastries are filled with dark chocolate pastry cream 😊.

Tonkatsu is hubby's favourite because he has such a cute and sad back story, and looks really cute too. And of course I had to include Tonkatsu's favourite pal, Ebi.

I have to admit that this set wasn't entirely the easiest to work with due to the shape. It would have been easier if everyone was just a round choux bun lol. Creating them oval shaped requires me to make my own template for cutting out the cookie dough for craquelin instead of using regular round cookie cutters. Piping the choux pastry batter and baking was also a challenge as I had to balance between retaining the colour while at the same time not have the pastry case collapse in the oven. It helps to keep the size of the piped batter less than 3.5cm to fulfil both criteria.

Please refer to this post for the detailed recipe for the craquelin and choux pastry batter, and guide for baking conditions. I didn't take many photos while working on this project. But here is the photo for the craquelin I cut out using homemade templates. As a rule of thumb, I usually cut the craquelin about 5 to 6mm larger than the area of piped batter.


I used my default chocolate pastry cream recipe as it is not too sweet, not too cloying but nice and chocolatey. I lighten the pastry cream with whipped cream to lighten the texture.

Top picture shows the rich chocolate pastry cream and whipped cream. Bottom picture shows the two combined 

Hubby loved his present and savoured the pastries over a few days 😊.

With lots of love,
Phay Shing

Monday, 2 December 2019

3D Olaf Chiffon Cake


"Do you want to build a Snowman?" <3

Have you watched Frozen 2?

I loved it so much, so here's my first full 3D chiffon cake Olaf!

He made me laugh so much in the show =D. So this is my humble work of love.

The last time I made Olaf was 5 years ago when Frozen just came out. It is a much simpler semi-2D version. I had forgotten how to make it though, for this cake, I actually redid the eyes for this cake 2 times! It is not easy to capture the look of characters really.

Do you like Olaf in summer or in winter?


Hope this adorable Olaf cake made you smile too!

With lots of love,
Susanne


Friday, 29 November 2019

Toy Story Alien Chiffon Cake


Who likes Toy Story Alien?

This Toy Story Alien is made from pandan chiffon cake (top) and blue pea flower chiffon cake (bottom), and the cake is 12-inches tall!

Thank God it was well-received! Hope this made you smile =).

With love,
Susanne

Thursday, 28 November 2019

Pikachu and Torchic Lychee Choux Pastry on Pandan Kaya Cake

My friend wanted me to do a Pokemon themed bake for her nephew's birthday but with pandan kaya cake as the cake base. She also wanted choux pastries for the characters and I told her some of the Pokemons are very good candidates as deco choux creations. Here it is 😊


I will focus on the choux pastry part as the recipe for the pandan kaya cake can be found in this post. I just replaced Stevia with caster sugar for the pandan chiffon and the pandan gula melaka pudding.

Detailed recipe for choux pastry batter and the craquelin (cookie dough) can be found in this post. As a rule of thumb, I try to colour the batter as close as possible to the same shade as the craquelin for creating various characters.

Craquelin on top of piped batter for Pokeball and the heads and bodies of Torchic and Pikachu 

The rest of the small body parts are made from piped choux pastry batter without the use of craquelin.


I love the look of this rainbow choux!

Freshly baked pastry cases

I used royal icing to decorate as well as join the parts together.

I had fun giving Pikachu various expressions! 

I provided lychee pastry cream lightened with non-dairy whipped cream in piping bags for my friend to fill just before the pastries are consumed at the party. The recipe can be found here.

"Are you also surprised that choux pastries can be made into someone like me? "

According to my friend, everyone at the party, the neighbouring tables of diners and the service staff at the restaurant had the same expression as the Pikachu above 🤣. I hope this bake brings a smile to your face too! After the initial surprise.

With love,
Phay Shing