Pages

Thursday, 30 May 2019

'Yin Yang' Grass Jelly-Soy Milk Dual Flavoured Chiffon Cake (Nine Fresh Signature Dessert)


Specially created a "Yin Yang" Grass Jelly-Soy Milk Dual Flavoured Chiffon Cake creation for Nine Fresh's 7th birthday, modeled after their signature dessert! 🥣💕

The Grandma was a lady from Jiu fen (Taiwan) who inspired the whole Nine fresh dessert chain. So I recreated a 3D version based on their sketches and memories of the grandma =).

I am doing a cake giveaway of this creation on Instagram if you are interested!

Here is a top view of the "Yin yang" chiffon cake and the "liao" on top! It has their signature sweet potatoes, nuts and red/green beans =).


And here is a better view of the "Yin yang" chiffon cake.

The black portion is made from Grass jelly chiffon cake, and the white from "Tau huey" or Soy milk chiffon cake. This is an original creation and the recipe for this "Yin yang" chiffon cake is shared below. Do tag me if you try it! =)


Some people call this combination "Michael Jackson" in Singapore =p


"Yin yang" Grass Jelly- Soy Milk Chiffon Cake (7-inch tube pan)

Grass Jelly Chiffon Cake batter 
*you can also use the recipe for just the Grass jelly in a 6-inch tube pan

2 egg yolks
6g castor sugar
26g vegetable/corn oil
33g grass jelly or chin chow water
1g vanilla extract
40g cake flour, sifted
Pinch of salt
Pinch of charcoal powder

3 egg whites
27g castor sugar
Pinch of cream of tartar


Soy Milk Chiffon Cake batter
*you can also use this recipe for a 6-inch tube pan

2 egg yolks
6g castor sugar
26g vegetable/corn oil
5g soy milk powder
35g soy milk
1g vanilla extract
36g cake flour, sifted
Pinch of salt

3 egg whites
27g castor sugar
Pinch of cream of tartar


Grass Jelly Batter


1. Whisk egg yolks with sugar until light and well-mixed.

2. Add in oil and mix well. Then add chin chow or grass jelly water (with small bits optional but nicer) and vanilla extract and whisk till well-combined.

3. Whisk in sifted cake flour with pinch of salt and charcoal powder, and mix till well-combined.

4. Prepare meringue:

a. Using an electric mixer, whisk egg whites with cream of tartar till frothy.

b. Add in ½ castor sugar for meringue and whisk at high speed till soft peaks form.

c. Add in rest of the castor sugar for meringue and whisk till firm peaks form, or just the point of stiff peak.


5. Gently fold in meringue gently into egg yolk batter 1/3 at a time. *Fold in unidirectional, gentle strokes and do not overfold.


Soy milk Batter

1. Dissolve soy milk powder in soy milk and mix well.

2. Whisk egg yolks with sugar until light and well-mixed.

3. Add in oil and mix well. Then add soy milk and vanilla extract and whisk till well-combined.

4. Whisk in sifted cake flour with pinch of salt, and mix till well-combined.


5. Preheat oven to 140°C.

6. Prepare meringue:

a. Using an electric mixer, whisk egg whites with cream of tartar till frothy.

b. Add in ½ castor sugar for meringue and whisk at high speed till soft peaks form.

c. Add in rest of the castor sugar for meringue and whisk till firm peaks form, or just the point of stiff peak.

5. Gently fold in meringue gently into egg yolk batter 1/3 at a time. *Fold in unidirectional, gentle strokes and do not overfold.

** You can also prepare meringue for 6 egg whites and divide into two. Then fold each half into the 2 different egg yolk batters. 
I actually did it this way, but wrote the recipe in such a way that you can make a plain Grass Jelly chiffon cake or Soy milk by itself.

6. Pour the Grass jelly and soy milk chiffon batter into each half of an ungreased 7-inch chiffon tube pan till 2-cm from brim. Try to pour at the same speed. If you have difficulty, you can choose to spoon in on each side gently to fill each half. Gently tap on counter top to remove air bubbles.


7. Bake at 140°C for 55-60 min, or until skewer inserted into centre of cake comes out clean.


8. Invert pan to cool on a wire rack completely.


9. Unmould the chiffon cake by hand (see video tutorial ‘Hand unmoulding Chiffon cakes for a clean finishing’).


Piped words/logo: I used the deco-roll technique, ie, piped the patterns, bake for 2 min. Allow to cool while I prepare the chiffon cake batter for the sheet cake. Pour the chiffon batter over the patterns and bake normally.

Nuts/beans: Cut from small round cake pops (baked from silicone cake pop molds) using bubble tea straw.

Sweet potato tubes: sliced from small cupcakes (baked in mini soufflé cupcake liners).

Grandma: Face baked in a bowl, hair bun from egg shell (fill to half), hands from cake pop molds.


Hope you this work of love made you smile too!! =)) I loved the soy milk chiffon, but thought the grass jelly could come out a little stronger. But overall still nice =). Hope you like it!

With lots of love,
Susanne =)


More loving chiffon cake creations here:


Naturally Coloured No-Bake Galaxy Tarts (Junior chef class)

I was helping my younger kid with some experiment using homemade universal indicator recently and it inspired me to come up with this class. Why not conduct a class that incorporates some fun science fact as well! Presenting my version of naturally coloured galaxy tarts!


This is another "baking" class for kids that I am planning to conduct with the theme of natural food colouring. I mention "baking" because this is actually a no-bake tart! Did you know that you can create an edible galaxy design by using natural ingredients and changing the pH of the mixture? Come and join me for this fun class suitable even for older preschool children (5-6 yo) as I teach a little bit of Science along with basic kitchen skills that little hands can manage such as crushing, mixing, pouring and simple decoration techniques such as creating nebula swirls and the splatter of stars on the galaxy canvas.

Please click on this link for more information and to register.

With love,
Phay Shing

Monday, 27 May 2019

Unicorn Pusheen Lychee Choux Pastry

I finally made Choux pastry again and this time, it's Pusheen as a unicorn wannabe!

The horn is made out of choux pastry too!

I must admit that I was quite apprehensive about getting the pastry to retain it's shape well enough while not browning too much during baking. I am glad I managed both! The key to this is good temperature control and a perforated mat. Do note that each oven is different so use the baking temperature and time as a gauge only.

I have written a detailed recipe for Choux au Craquelin so you may refer to this post. The only difference is I used charcoal powder to colour the cookie dough and pastry batter. I added a little white gel food colouring for the cookie dough and to colour the batter for the horn.

Just to share some pictures of the process ...

Piping pastry batter for the horns

Piping batter for the main body and topping it off with cookie dough. I make my own templates. Baking the main pastry case on perforated mat helps the pastry to retain it's shape better

Freshly baked case with choux pastry horn!

I added on the fine features using royal icing and the tail using candy melts. I coloured the candy melts before shaping it. As Singapore is rather warm, I had to work in an air-conditioned room when shaping the candy melts. I reshaped the pastry case base so that Pusheen is able to "stand up" instead of lie flat. I made a video tutorial for making such cases for the penguin Choux entry in my Deco Choux Pastries book. Store baked and assembled choux pastry cases in airtight condition at cool room temperature.

My friend requested for lychee filling so I made lychee pastry cream with chunks of chopped lychee, and lightened with some whipped cream. I have made lychee pastry cream before but without whipping cream added so I will type out the updated recipe here.

Recipe for lychee pastry cream with added whipping cream
Ingredients:
2 egg yolks
20g cornflour, sifted
25g castor sugar
A pinch of salt
1.5 tsp freeze dried lychee powder*
200g fresh milk
1/2 tsp vanilla extract
12g unsalted butter, slightly softened
150g chopped canned lychee, woody part removed
100g whipping cream (I used non-dairy for better stability)

* If you are unable to get this, you may replace 50-80g of milk with strained lychee puree.

Steps:
1. Place milk, vanilla extract, lychee powder (or lychee puree) in small saucepan and heat on medium-low heat until bubbles just start to appear around the edges.

2. In the mean time, whisk together cornflour, sugar and salt in a heavy mixing bowl. Add egg yolks and whisk until a smooth paste forms.

3. Once the milk is sufficiently heated up, remove from heat and pour in the slow thin stream into egg yolk mixture while whisking continuously. Pour the egg mixture back into saucepan.

4. Cook the custard by whisking continuously and heating over medium-low heat. Once the mixture appears to thicken, remove from heat and continue whisking vigorously until smooth. Return back to heat and continue whisking and cooking until your preferred consistency, removing from heat to whisk whenever necessary. Do not use high heat or you may end up with scrambled eggs.

5. Remove from heat and mix in unsalted butter until smooth. Strain the mixture through a fine sieve into a clean bowl if there are any lumps formed. Press a cling wrap onto the surface and refrigerate until cool, at least half an hour. You may prepare this a day in advance.

6. Remove pastry cream from fridge and beat it briefly with spatula to loosen it up. Fold in chopped lychee a tablespoon at a time.

7. Whip up the cold whipping cream until firm peaks form. Fold into pastry cream in a few additions until smooth.

Folding whipping cream into pastry cream

Store covered in the fridge for up to a few days.

Remember to fill your pastry just before consuming in order to enjoy the crisp pastry case with cold and refreshing lychee pastry cream! I always don't recommend filling the cases way in advance as it will turn the cases soggy.

Please click on this link for more unicorn Pusheen bakes in other forms!

With love,
Phay Shing

Wednesday, 22 May 2019

'Basket of Roses' Pandan Kaya Cake (diabetic friendly)

This is a bake that I mulled over the design and details for a couple of months, and took time to pick up a new skill for it too. Presenting my version of diabetic friendly "basket of flowers" pandan kaya cake!

I did a partial basket weave with chiffon sponge because I feel the insides are too pretty to be hidden!

Why the focus on it being diabetic friendly? Because I made this for mum's birthday and she has diabetes. The pandan Gula melaka chiffon sponges and pandan Gula melaka pudding are made using half Stevia (ilite brand) and half coconut palm sugar (Gula melaka). Coconut palm sugar has a glycemic index a third of refined white sugar and imparts a wonderful aroma to the bakes. And Stevia is a sugar replacement. I was hesitant to use any sugar replacements in my bakes for fear of weird chemical after taste or a less stable meringue for the chiffon sponge but was encouraged to try this brand since I have heard reviews that it's not that noticeable especially if there are other strong flavours in the bake.

The flowers aren't made of chiffon for once. They are made of bean paste and I colour it naturally using purple sweet potato, blue pea flower and raspberry powder. I took time to learn how to make bean paste flowers just for this bake and perhaps for future bakes. Check out my earlier blog post for details! Bean paste flowers also contain a lot less sugar than regular sugar paste flowers. They taste like bean flavoured mochi. These can be made ahead of time and stored airtight in the fridge or left out in the open with good ventilation for a couple of days.

Making bean paste roses for the cake

Making bean paste leaves too! I used gel food colouring for the leaves 

The Pandan chiffon cake is adapted from neo_sook_bee (Instagram). She uses the cooked dough method all the time so the recipes for chiffon sponges are using this method. I didn't use my regular pandan Gula melaka chiffon recipe although it is also refined sugar free and always has great reviews as this time I am baking it in a round tin with removable base and I wasn't sure if it will work out the same way. But as usual, I prepare concentrated pandan juice a few days before baking for a more intense flavour and colour. I blended and sieved out the juice and let it settle in fridge for a few days, using only the dark green part that settled at the bottom for baking.

Recipe for diabetic friendly pandan chiffon cake
Ingredients (makes one 6" round cake):
Yolk batter
22g coconut oil
35g pandan juice concentrate
20g coconut milk
1/8 tsp salt
1/4 tsp vanilla extract
1/4 tsp pandan paste
60g cake flour, sifted into mixing bowl
3 egg yolks

Meringue
3 egg whites
1/5 tsp cream of tartar
22g granulated Gula melaka
22g ilite sugar (Stevia)
1/2 tsp cornflour

Steps:
1. Preheat oven to 160℃. Place rack at second lowest position. Place a tray of water at base of oven (optional but I used it as I didn't do a slit cake).

2. Make the yolk batter. Place all ingredients for the yolk batter except egg yolks and flour into a small saucepan. Heat until 80℃. Remove and pour into mixing bowl with sifted flour. Mix well until a soft dough forms. Leave it to cool for a few minutes. Add egg yolks one at a time and mix well between each addition.

3. Prepare meringue. Combine sugars and cornflour in a small bowl and whisk everything together. In a clean metal bowl, beat egg whites with cream of tartar until firm peaks form, gradually adding in sugar mixture once the egg whites are foamy. Take your time to build up the meringue by beating at low or medium-low speed and to avoid making huge bubbles in your meringue.

4. Quickly but gently fold the meringue into yolk batter in two or three additions. Pour batter into 6" tin with removable base. Use a chopstick to run around the batter to pop any air bubbles.

5. Bake for 15 minutes. Reduce temperature to 135℃ and bake for another 60 minutes or until skewer comes out clean and the top of the cake springs back when lightly pressed. Cool upside down. I didn't have the special cooling rack for the tin so I used two identical ceramic mugs to support the tin. Note that baking temperature and time varies from oven to oven.

6. Carefully unmould by hand when cooled completely. Slice the cake into three layers before assembly. Each layer is about 2-2.5cm in my case.

Freshly baked cake!

Recipe for diabetic friendly pandan Gula melaka pudding
Ingredients:
A)
240g coconut milk (may replace partially or all with other milk of your preference)
110g water
10g pandan juice concentrate
30g granulated or finely chopped Gula melaka
30g ilite sugar (Stevia)
1/4 tsp vanilla extract
1/8 tsp pandan paste
1/8 tsp salt
1/4 tsp green food colouring (optional)
1/8 tsp caramel essence (optional)
1 tsp Agar powder

B)
26g cornflour
130g water

Steps:
1. Prepare B). Place ingredients in a jug and stir to mix well. Set aside.

2. Put all ingredients in A) in a saucepan and bring to a boil while stirring continuously. Make sure that all agar powder is dissolved.

3. Stir B) again and pour in a thin stream into saucepan while stirring contents of saucepan continuously. Keep stirring and bring mixture to a boil. Let it boil for another minute while stirring.

4. Remove from heat and strain the mixture to remove any lumps that may have formed. Press a cling wrap onto the surface to prevent a skin from forming if you aren't ready to assemble yet.

5. When ready to assemble, place a layer of pandan cake on cakeboard and wrap an acetate sheet around it to form a wall. Gently scoop some pudding on the cake. Let it rest for a few minutes in the open or a minute in the fridge to set it a little. Stir the pudding in the bowl frequently to prevent it from setting. Carefully place second layer of sponge on top and press it down to release any trapped air bubbles. Repeat layering pudding and last sponge layer. Measure the height of assembled cake for reference for making basket weave. Cover the top with cling wrap and refrigerate for at least two hours. Remove the acetate sheet before assembling with basket weave.

Assembling pandan sponge and pudding

Recipe for diabetic friendly pandan Gula melaka chiffon sponge
Ingredients (makes one 10x12" and two 7x7" thin cakes. You may not need all the sponge for basket weave depending on how much cake you want to cover with the weave. Use whatever baking tray size you have to bake. Just make sure you spread as thin a layer of batter as you can):

Yolk batter
35g coconut oil
57g pandan water (boil some water with 5-6 pandan leaves cut into shorter strips for about 10 min, sieve out leaves and cool)
57g cake flour, sifted into mixing bowl
1/8 tsp salt
1 tsp cocoa powder (optional, for colouring cake a darker brown shade, sift together with flour if using)
3 egg yolks

Meringue
3 egg whites
22g granulated Gula melaka
22g ilite sugar (Stevia)
1/2 tsp cornflour

Steps:
1. Preheat oven to 180℃. Set oven rack to second lowest position. Do not use steam bake for this. Line baking tray(s) with Teflon sheet or parchment paper.

2. Prepare batter the same way as pandan cake above.

3. Spread the batter as thin a layer as possible in baking trays. Bake for 8-9min. Remove from oven and immediately flip the cake onto fresh sheet of parchment paper. Cool completely before cutting pieces for assembly.

I didn't take photos for in-between steps of making the basket weave but essentially it's the same technique as making the weave with fondant or buttercream so you can google for videos of those to have an idea. I cut the thin layer of sponge into pieces and glue them onto the pandan kaya cake using melted marshmellows. If your sponge is baked right and baked thin, you shouldn't have issues making the weave with the rope patterned border. If the sponge layer is thick, it will break easily. I flatten the baked sponge a little after baking by pressing it between two sheets of parchment paper.

I absolutely love the view of this unadorned cake 😍😍

I just arranged the flowers onto the cake, leaving a short segment of the wooden skewer on each rose so that it is easy to insert into the cake.

Top view of the cake! I nearly forgot to take a photo of it and only remembered as I was packing into cake box 😆

Do brush the exposed sponge with some syrup (10g sugar dissolved in 20g hot water) to keep it moist during storage in the fridge. Store it in airtight condition. Best served a day or two after assembly.

Here's the cake at mum's birthday celebration lunch.


Here's a peek at the insides...


My dad wanted the service staff and one of the restaurant chefs to try the cake so they had a slice each too.  They loved the cake and said it tastes really good, not too sweet like commercially sold ones! Even hubby with picky palate said the balance of flavours is spot on. It's a pity I didn't take a photo of mum eating one of the bean paste roses 😆. Just to show you that they can be eaten too!

Those of you who would like to make a diabetic friendly bake that is flavourful but doesn't taste too sweet, you can give this recipe a try 😊. My regular pandan Gula melaka sponge and pudding cake that uses only Gula melaka as sweetener is more diabetic friendly than cakes baked with refined sugar but still raises blood sugar a little. With half of it being replaced by Stevia in this cake, the glycemic load is even less.

With lots of love,
Phay Shing


Monday, 20 May 2019

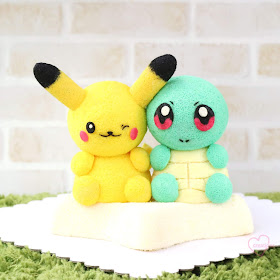
Pikachu and Squirtle Chiffon Cakes


Have you watched the latest Pokemon Detective Pikachu movie?💕 I think the Pikachu is soooo furry and cute!! Pikachu and Squirtle Chiffon Cakes 💖🤗

Almost 3 years since I last made Pikachu for my mum's birthday! It feels really nostalgic making this again. The Pikachu cake was also featured in Today Online in 2016 (I'm really thankful). To accompany Pikachu, this is my first Squirtle. Made from pandan chiffon cake, the eyes are piped and I used knife to make indents for the shell. Don't we love the huge eyes? =)


Hope this loving creation made you smile! 

With lots of love,
Susanne


Friday, 17 May 2019

Totoro and Friends Matcha Dark Chocolate Macaron Tree

My friend wanted to give a special gift for a Japanese girl's birthday. Anime themed macaron carousel was suggested but I thought why not put a fun twist to my macaron carousel and change it into something livelier 😉.

Totoro and friends around a tree!

Of all the animes, I chose Totoro because although I watched the movie years ago, I remember it being magical and full of charming Japanese folklore. Quite a timeless classic from Studio Ghibli. We decided on Matcha and dark chocolate flavours, something Japanese. Immediately, I thought the tree has to be the centerpiece of the "carousel" and got pretty much excited and carried away by my imagination 😆.

I couldn't resist adding an element of fun behind the main characters as well 😆. I have to thank hubby for this whimsical and brilliant suggestion

I used the Swiss meringue method to make these macarons. I made them concurrently with unicorn Pusheen macarons (will post in the near future). I am so comfortable with this Swiss method that I am honestly a little reluctant to go back to Italian method, which was my default method when I first started macaron making 😅. Just to share some photos...

Piping the macaron shells. 

You may refer to my macaron books, Macarons and Macaron Basics for more details on the techniques involved in piping and baking macaron shells such as these. I also have various video tutorials on the blog that you may refer to.

I decorated the shells with royal icing and edible paint (gel food colouring mixed with a little vodka).

I dissolved some gel food colouring in vodka to paint the shells for tree foliage to create a slight ombre green effect.

Filling the shells

I used a combination of dark chocolate ganache and matcha white chocolate ganache, both are whipped for a lighter texture. I used less cream than the original recipe to create a firmer ganache for a structure such as the tree. 

I was really charmed by how the assembled base and tree look!

You may wonder how I assembled this in warm Singapore without a heart attack from fear that things would collapse. I used wooden skewers to support the trunk of the tree as well as the larger characters on the display. Although the idea of this macaron tree is a simple one, I must stress that the macaron shells have to be well made for you to pull this off as it's a top heavy structure, so from an engineering point of view, it is unstable.

I hope this creation charmed you as much as it did for those who saw it :).

With love,
Phay Shing

Thursday, 16 May 2019

Giraffe Chiffon Cake


My newest version of Giraffe chiffon cake! Finally had the courage to try a standing version. This is for a lovely church friend =). It is actually similar to my previous work, but an improved version. You can refer to the previous links for orange-chocolate chiffon and pandan chiffon cake.
My daughter is now fully well yet hence the slow down in blogging.
Hope this creation brings a smile to your faces too!

With lots of love,
Susanne


Monday, 13 May 2019

Sumikko Gurashi Raspberry Macarons

Many people in this day and age still think that depression is something you can think your way out of through positive self talk. It doesn't work that way. What depression sufferers need is lots of love, patience and support. I made some Sumikko Gurashi macarons for hubby and a friend who are fans of Sumikko Gurashi and they have depression. The characters are holding little hearts because depression suffers need all that love ❤.


I filled the macarons with homemade raspberry jam and raspberry whipped white chocolate ganache. Feedback was great in terms of looks and taste!

Due to my fairly packed schedule, I decided to break down the bake into two separate days, and each day baking only a small quantity of macarons. That means choosing the French method to make these because Swiss and Italian methods are best for larger batches although my preference is to use either of these two if I need to work with multiple colours because you can colour the almond paste before meringue is added in, reducing the risk of overfolding.

I used this recipe which is French method stabilized with cornflour. Just to share some photos of piping the batter...


I ran out of blue 😆

You may refer to my macaron books, Macarons and Macaron Basics for more details on the techniques involved in piping and baking macaron shells such as these. I also have various video tutorials on the blog that you may refer to.

Partially decorated macaron shells. I used royal icing and black edible marker to decorate the shells 

I filled the macaron shells with raspberry whipped ganache and homemade raspberry jam. I make it a point to make my own jam from scratch as it is more intense in flavour and I can control what goes in there. I don't necessarily stick to the same ingredient proportions for the jam as it depends on how tart I want it to be, but I don't use thickeners such as cornstarch. Since hubby requested something not so sweet, I made the jam really tart. You may adjust the quantities according to taste.

Raspberry jam
Ingredients:
180g fresh raspberries
20g sugar
Pinch of salt
1 tsp lemon juice

Steps:
1. Place everything in a small saucepan over low heat, stirring often to prevent jam from burning. Reduce the liquid until consistency is to your liking.

2. Press the jam through a sieve to remove the seeds. Store in fridge in airtight glass container for up to a month.


Here's another view of them all lined up neatly!

Spreading the love around

With lots of love,
Phay Shing

Sunday, 12 May 2019

Empowerpuff Powerpuff Girls Chiffon Cake


Happy Mother's Day to all the super Power mums!! <3 I am super honored and humbled to be on Cartoon Network for Mother's day as an Empowerpuff. This cake was specially commissioned by them for the special campaign. You can watch the full video here.


Sorry for the break in posting. Some of you may have known, my youngest daughter was warded in hospital for the whole week so I wasn't home. It was a difficult time for us, but also a time I felt the love and support of our church. Our pastors, DG mates and friends all reached out to pray for us.

Praise the Lord for the best Mother's day gift ever: my daughter is discharged and miraculously healed today! We are still amazed and will be monitoring her at home, but super grateful!!

Anyway such a coincidence, that Cartoon Network's campaign was also on Mother's day. It is really not easy to be a mother, but it is also such a blessing to have children too. My heart is full of gratitude for this Mother's day!


With lots of love,
Susanne =)

And some photos of the Powerpuff Girls Demo on Mother's day at Plaza Singapura:


Tuesday, 7 May 2019

Naturally Coloured Bean Paste Roses

I thought it's quite timely to post this since Mother's Day is coming soon. I have always admired the beauty of handmade edible flowers but was never really interested in learning how to make them because they were either inedible (gum paste) or contain too much sugar (fondant or sugar paste). And then I saw what my talented baker friend, Helen (IG account: @bakepeoplehappy), did with bean paste. The flowers were breathtakingly beautiful, hyper realistic and flexible. What intrigued me most was the fact that the dough is made of beans and contain significantly less sugar than traditional sugar paste. After having tried it, I have to add that it tastes like a bean flavoured mochi too!

I was determined to try working with bean paste dough so I bought the recipe from her and she guided me along by answering my many questions and providing useful sugar paste flower modelling video tutorials that I could refer to. I am not able to share the recipe in this post as Helen has taken time and resources to develop the recipe that is not easily available on the internet at the moment. But I can share my learning journey in this post 😊.

I was curious to know how the bean paste flowers would turn out if I used natural sources of food colouring. Here is my very first attempt at bean paste roses and leaves!


I have to admit that the bouquet isn't entirely made using natural food colouring. The leaves are coloured using gel food colouring. The pink flower has a little pink gel added.  I experimented with a few food sources as the dough base and for colouring: white beans, mung beans, purple sweet potato, blue pea flower and freeze-dried raspberry powder.

Making the dough may be a fairly lengthy process. The preparation method of the bean paste is very much like making mung bean paste for mooncake filling. I steamed the soaked mung beans. I did both with and without blue pea flowers.

Before steaming

After steaming. See how the beans absorb the blue colour after steaming!

I also prepared blue pea flower coloured and plain white bean paste.

Freshly made bean paste. I used the same treatment using steamed purple sweet potato to make the paste out of it too. I should have cooked the purple sweet potato paste longer as it was wetter than the bean based ones but it was 12am and I needed my zzzzs 😆.

Bean paste dough before steaming. I created one colour of dough using half blue pea flower coloured mung bean paste and half purple sweet potato paste (top left corner) so there are six portions instead of five.

Freshly made bean paste dough that has been steamed, kneaded and wrapped tightly

Helen provided a few video tutorial resources I could refer to since I am learning how to model roses without any hands-on expert guidance. You may refer to this video on how to shape the roses, this video on how to colour the sugar roses, and this video on how to make the rose leaves. I watched the earlier videos in the series by chef Nicholas Lodge as well to have an alternative view of how to shape the roses. Like me, you may not have the necessary shaping tools. Not to worry. You can use your fingers to shape and pinch where necessary. Won't be as professional looking but still nice enough. The videos mention the use of gauge wires to work with the flowers. I used wooden skewers and a styrofoam board instead. The glue I used is also simply made out of some of the dough dissolved in water instead of edible glue sold in baking supply stores.

An assembled rose made with some purple sweet potato dough so there are tiny specks of the potato on some petals. Mounted on wooden skewer to dry a little.


I managed to get a leaf veiner and I already have a fondant rose leaf cutter at home so I could make the leaves.

Veining the leaf with the leaf veiner

The roses would look even more realistic if I had a petal veiner but I didn't get one.

I absolutely love how the natural colours turn out!

Anticlockwise from the top left: plain mung bean dough, plain white bean dough, half purple sweet potato half blue pea flower mung bean dough, blue pea flower mung bean dough

I tried colouring some white bean paste naturally with freeze-dried raspberry powder but it turned rather dull so I added a little bit of pink gel colouring. The resulting colour is a sweet dusty pink colour!


Check out how soft and flexible the rose petals are when freshly made!


I dusted the flowers only with a little petal dust as I felt they look rather nice on their own without dusting.

My parents were around when I made these roses so they got to try. They love the taste of it! Mum chose the colours of roses that she would like on top of the cake I will be making for her later this month too.

There could be some concern about the short shelf life of these flowers based on the information that's out there on the internet. But with proper drying and storage, these flowers didn't turn mouldy even after a week in the fridge or out in the open (with adequate ventilation) in Singapore! Helen said just don't store them airtight at room temperature where they will turn mouldy fast.

Blessed Mother's Day to all mums out there!

With love,
Phay Shing