Wednesday, 18 November 2015

Banana Steamed Cupcakes

This is going to be my first demo class with hands-on for participants! I was told to keep things as simple as possible for my first try. The focus of my demo will be on showing the technique of beating egg and sugar with the electric mixer, and folding in the rest of the ingredients. The Singapore flag snowskin mooncake was purely demo so it was less involved. Here's my easy-peasy banana steamed cupcakes!

Banana Nutella flowers with MnMs ladybugs!

A peek at the texture and banana filled cupcakes...

I sliced off the top of the dome a little because it was smeared with Nutella.


I have a short downtime before the madness of icing/decorating over 200 macarons and filling about 250 macarons begin for the creative macaron book so I took the chance to make the steamed banana cakes for photography and taste test. I made steamed banana cupcake earlier on but with cat and bear designs. This design is simpler :). There is not much change in recipe except for the change in type of cupcake cases I used. As mentioned in my previous steamed cake post, I have chosen to use a method that involves beating whole eggs with sugar instead of just mixing wet and dry ingredients together with a hand whisk or spatula. The resulting texture is lighter and fluffier.

Ingredients (makes six 50x50mm cupcakes):
2 large eggs (at least 60g)
80g brown or white sugar (use more if you prefer sweeter cake. Mine is a lower sugar version.)
80g vegetable oil or melted butter (I used extra light olive oil but do use butter if you prefer the buttery fragrance)
140-150g mashed overripe banana (about 2 large bananas. Choose really really ripe ones for a more banana-y flavour)
1 tsp vanilla extract
140g cake flour*
2 tsp baking powder*
1/8 tsp salt*
1/4 tsp baking soda

Decoration:
Fresh small bananas
Lemon juice
Nutella
Red MnMs (optional)
Edible black marker (optional)

* You may replace with self-raising flour.


Clockwise from top left corner: 1) eggs, 2) mashed bananas with vanilla extract, 3) cake flour, baking powder, baking soda and salt sifted together, 4) brown sugar and 5) extra light olive oil. 


Steps:
1. Beat egg and sugar in a mixing bowl with electric mixer on high speed for at least 10-12 minutes, scraping down the sides of the bowl every 3-4 minutes with a spatula. Mixture should more than double in volume. When you drop the mixture from the beaters forming a letter "O", it should be able to hold the shape for several seconds before fading back into the bowl of mixture.


2. Drizzle oil onto the mixture and gently fold in a little at a time with a spatula. Be really gentle to avoid deflating the beaten egg mixture.

3. Add in mashed banana with vanilla extract a little at a time and gently fold in.


4. Add sifted flour, baking powder, baking soda and salt gradually and gently fold in.


5. Fill cupcake cases until almost full with batter. You may choose to add 1/2-1 tsp of nutella when the cases are about 2/3 full and fill the cupcake cases with more batter until almost full. Tap the cases on the table a few times to release trapped air bubbles. Do not use cupcake cases that have overlapping folded sides or it will open up during steaming. If you are using cases with folded sides, place the cupcake cases in a heatproof container that are slightly bigger than the cases like the smaller cupcake example below.


6. Steam for 20 minutes or until a toothpick comes out clean.

Freshly steamed!


You may decorate the cupcakes with some banana slices and nutella.


Dip the banana slices in freshly squeezed lemon juice for about a minute before patting dry on paper towels. This will prevent the slices from browning quickly.


 Slice off the dome of the cupcake if you have trouble balancing the banana slices on top of the cake. Add a bit of Nutella in the middle, place the banana slices on top and top up the middle with more nutella. You may use a piping bag like I did or simply use regular plastic food bags or ziplock bags.


 I added some ladybugs for photography. These little critters are actually red MnMs with patterns drawn using black edible marker.


Please place them on the nutella patch instead of the banana slices if you do use MnMs for decoration. The red colouring will bleed onto the banana slices within a few minutes!

I hope you can try this simple "bake" at home :). I managed to make this for my kids within a busy morning with other things to do. Both kids gave this a thumbs up as they had it for dessert after lunch :). My parents had some the next day and they were still good and even better after re-steaming!

With lots of love,
Phay Shing


Read More »

Tuesday, 17 November 2015

Cinderella Carriage Tier Chiffon Cake


This is a sweet fairy tale Cinderella cake I made for a friend’s friend’s little girl. The cute little Cinderella princess (chibi version =p) was provided by her and I was given the challenging task of making her carriage. I sought to use soft sweet colours that were Cinderella themed. Blue, as was the gown she wore to the party, and light pink, her mother’s gown, and of course cream colour for a classic look. I have shared recipes for the Vanilla chiffon cake (reduced egg yolk) for top tier, and Strawberry yoghurt chiffon cake for top tier. The Cinderella carriage was crafted from 2 vanilla bowl (Glass bowl, Iwaki brand, 11.5 mm OD) chiffon cakes. I stuck them together and did some carving for the pumpkin shape. The details on the carriage were added using layer chiffon cakes, which I also used to create the ribbons, frills and letters. I rolled some of the pink layer cake into mini swissrolls for the carriage wheels. I used marshmallow cream (made from melting some marshmallows with a sprinkle of water in the microwave) to join them on.

Thankful the mummy shared everyone loved the cake.. and the little girl really looked like a princess beaming with her cake!

Don’t we all love fairy tales?

With lots of love,
Susanne

Read More »

Monday, 16 November 2015

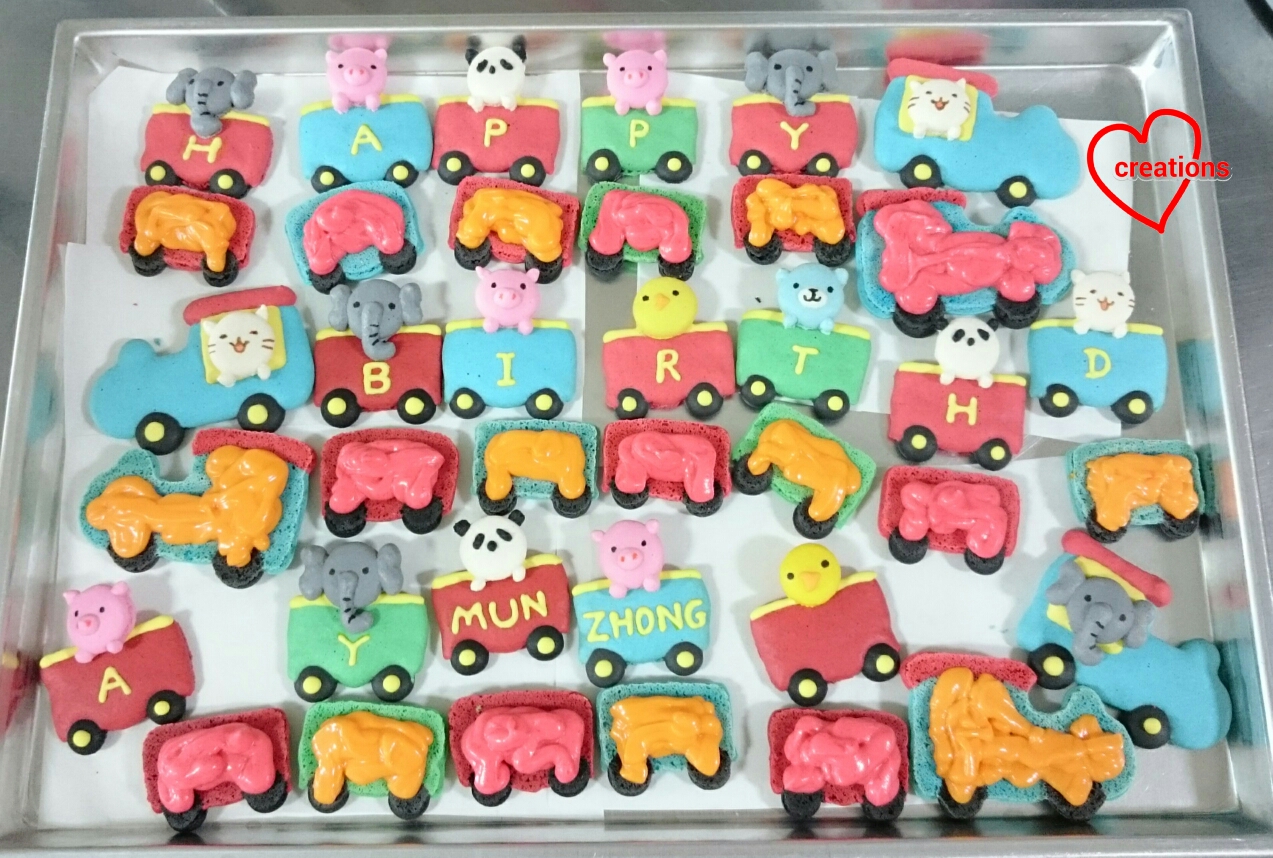
Animal Train Macarons (update on orange white chocolate filling)

I made this for my younger kid's birthday :).

Choo-choo!


I have to confess that this came at a time when I was really busy with bakes for the Creative Baking: Macarons book so I had to make do with whatever designs I am already making for the book and play around with whatever leftover batter I had. The macaron shells were actually made over a couple of session due to this reason. Thank God they freeze well! Remember to place the shells in airtight container with baking paper between each layer of shells when freezing. Completely thaw before opening the container.

The train macarons are going to appear in the macaron book but with a slightly different design. Keep a lookout for it :).

The basic macaron and strawberry white chocolate recipe can be found here. I found that the orange white chocolate recipe can do with some improvements so I will type out the updated recipe here. I opted for non-refrigerated filling for ease of transport and handling as I have to bring it to school by public transport.

The key to improving the flavour of filling is the addition of orange zest and a good brand of orange extract/ essence, while toning down on the emulco as I find that it gives off a slightly artificial taste. The strawberry white chocolate on the other hand is really yummy even with the use of emulco as I add rose water to it to enhance the strawberry flavour.

The orange essence I use


Use the ratio of 0.55 for weight of Italian meringue/ weight of mass when portioning out for the various colours.

Just to share some photos of the process...

Piping out the train!

See how small the animal shells are!

Decorating the little animal shells with edible marker and royal icing

Finished icing!

Filling with orange white chocolate and strawberry white chocolate.

Orange white chocolate filling
Ingredients (fills about 10 macarons):
60g white chocolate, finely chopped
10g vegetable shortening
3/4 tsp orange extract/essence
1/4 tsp orange zest
1/8 tsp orange emulco
1/8 tsp salt
1 drop orange gel food colouring (optional)

Steps:
1. In a small saucepan, combine shortening, orange extract, zest, emulco and salt. Heat over low heat until shortening is melted and some moisture has evaporated from the mixture to prevent the white chocolate from seizing. Take about 3 minutes to do this. Set aside to cool a little.
2. Melt chopped white chocolate in microwave oven in 10 second bursts at medium power, stirring well after each round of heating. Alternatively, you may melt the white chocolate using the double boiling method. Melted chocolate should be smooth and flowy. If it is hard and rough, you have overheated it.
3. Gradually add the orange mixture into melted chocolate, stirring well with each addition.
4. Add a tiny drop of orange gel food colouring if you wish. Mix well. Leave the white chocolate to stand at room temperature for 5 minutes and check the consistency. If it has a toothpaste-like consistency, it is ready for piping onto the macaron shells. If it is still too runny, let it sit a while longer.


A closer look at the awesome feet on the shells!

Blessed birthday Mun Zhong! May you grow up to love God more and more each day!

With lots of love,
Phay Shing
Read More »

Sunday, 15 November 2015

Froggy Pandan 'Magical' 3-ingredient Chiffon Cake (from Ochikeron)


I shared before I get many of my ideas from dreams at night (that was how I made the first patterned chiffon cake Sakura matcha). I dreamt of making this Froggy pandan chiffon cake the night I saw Ochikeron’s 3-ingredient chiffon cake. The chiffon cake recipe that required No oil, No milk/water and No egg separation must have gotten me so curious I dreamt of it, and in Froggy version too! So I woke up and made it together with a Peppa cake I was making with similar colour theme. The original recipe from Ochikeron is from here. I added ½ teaspoon of pandan paste for pandan chiffon flavour and scaled it down to 3 eggs in a 6-inch chiffon tin (I had a little bit of excess batter for a small cupcake). Just to share, I found that my hand mixer was heating up quite a bit after 10 min and there was no further increase in volume after 12 min mixing. So I would feel 12+ min would suffice but maybe it depends on the individual mixer.

*I've added in measurements in g (converted from tbsp) as I got some queries for the recipe in g.

Pandan 3-ingredient Chiffon Cake (from Ochikeron) - it's very short! =p
3 eggs
4.5 tbsp castor sugar (~ 56 g)
3.75 tbsp cake flour (~ 23 g)
1/2 tsp pandan paste

Directions:

1. In a bowl, place eggs and sugar. Beat on high speed with an electric mixer for 12-15 minutes until white and fluffy, until no further increase in volume (top pic).

2. Preheat the oven to 160°C.

3. Sift in cake flour, half at a time, and mix on low speed with an electric mixer for a minute or two in total until just combined (bottom pic).

4. Pour the batter into the ungreased 6-inch tube pan and drop it lightly on the counter to raise the air bubbles out of the batter.

5. Bake at 160°C for 20 min then 150°C for 10 min, then 140°C for 15 min (or until skewer comes clean). *Do not open the oven door.

6. When it's done, drop the pan lightly to prevent shrinking.

7. Turn the pan upside down and place it on a bottle or on a wire rack so it is suspended over the counter to cool.

8. Let it cool completely before hand unmoulding the chiffon cake (video tutorial).


Verdict: In terms of texture, the chiffon cake is really very soft, but not exactly like the chiffon cakes made from normal egg separation chiffon cake recipes. It is not as springy and deforms easily (doesn’t spring back to its original volume after being pressed), so much so that I had difficulty cutting clean slices and it’s probably even harder to work with for decorative chiffons.

In terms of taste, it does taste somewhat like pandan chiffon cake, only lacking a bit of the 'pang' from coconut milk. It's probably also on the sweet side though still ok. But I didn’t dare reduce the sugar as it was required for the eggs to fluff up. I also noticed it browns more easily, probably due to the higher sugar content. I also didn’t feel that I saved time as I took 15 min to whip the egg-sugar mixture (usually only 5 min for meringue) =p and my mixer was heating up! So I would probably go back to my preferred egg separation method =p.


BUT it’s an SUPER easy and yummy bake, especially for those who have fear of whipping meringue, and the chiffon cake is soft and nice =), great for home consumption.

With lots of love,
Susanne


Read More »

Thursday, 12 November 2015

Matcha Azuki Bean Chiffon Sponge & Pudding Mini Cakes

I am supposed to be busy filling hundreds of macarons but I couldn't resist trying this out as I baked some layer cakes for my friend's son's birthday cake. Presenting my first attempt at Matcha Azuki bean sponge and pudding mini cakes!


I have only baked lychee rose flavoured sponge and pudding cake so far but I already have some requests for this type of cake as it is also fondant and cream-free but has the addition of pudding layers to soft chiffon sponge that lends an interesting texture to the whole cake. Perfect for eating after a heavy meal! It is lighter and more refreshing than mousse cakes as it is not heavy cream based. Low in fat and not too sweet! Since nobody would like to order something that is totally untested, I decided to experiment and get some feedback from my family and neighbours.

Recipe for Matcha and Azuki layer cake
Ingredients (makes one 25x30 cm layer cake for about nine-ten 5cm diameter mini cakes):
Matcha egg yolk batter
1 egg yolk
7g caster sugar
14g canola/ vegetable oil
14g hot water
2g Matcha powder
1/8 tsp vanilla extract
14g cake flour
A pinch of salt

Azuki egg yolk batter
1 egg yolk
5g caster sugar
10g canola oil
15g smooth Azuki bean paste (aka Koshian. I only had Tsubuan at home so I had to press the paste through a sieve to get the smooth version)
1/2 tsp water (add to Azuki paste)
1/8 tsp vanilla extract
16g cake flour
A pinch of salt
6 drops of Queen's natural pink food colouring (optional)

Meringue
3 egg whites
1/5 tsp cream of tartar
30g caster sugar

Steps:
1. Line baking tray with parchment paper. Set oven rack at second lowest position. Preheat oven to 160°C. Dissolve Matcha powder in hot water. Set aside to cool.
2. Prepare egg yolk batters. Whisk egg yolk and sugar until pale and thick. Gradually add oil and mix well. Add Matcha/ Azuki paste and vanilla extract. Mix well. Gradually whisk in sifted flour and salt. Add pink food colouring if you wish.
3. Prepare meringue. Beat egg whites with cream of tartar until soft peaks form in a clean metal bowl. Gradually add sugar and beat until stiff peaks form and bowl can just be overturned without meringue falling out. Don't overbeat.
4. Divide the meringue into two. Quickly but gently fold the meringue in 3 additions for each egg yolk batter. Pour the batters into the pan side by side each other.
5. Bake for 12 minutes or until skewer comes out clean. Immediately flip onto another baking sheet and gently peel the baking sheet off.
6. Cool completely before cutting out circles with a cookie cutter. The circles should be slightly smaller than the paper cupcake cases/ silicone moulds. I used paper cases. Slice each circle into two thinner circles if you would like 2 Matcha and 2 Azuki sponge layers in the cake like what I did. If you prefer not to, it is OK to leave the circles as it is for 1 Matcha and 1 Azuki sponge layers in the cake.


Recipe for Matcha Azuki pudding
Ingredients:
(A)
180g evaporated milk
375g water
42g hot water
3.5 tsp Matcha powder
2.5 tsp vanilla extract
85g granulated/caster sugar
1/8 tsp salt
3+1/8 tsp agar powder
125g smooth Azuki bean paste (Koshian)

(B)
60g custard powder
350g water

You may have extra pudding if you don't intend to use the excess for piping on pudding decoration designs.

Steps:
1. Mix (B) together in a jug. Set aside. Dissolve Matcha powder in hot water.
2. Place all ingredients in (A) except for Azuki paste in a saucepan. Bring to a boil on medium heat while stirring constantly.
3. Stir (B) again and pour into (A) while stirring constantly.
4. Keep stirring until mixture thickens and starts to boil. Remove from heat.
5. Scoop out about 5 tbs of pudding mixture and mix well with Azuki bean paste.
6. Transfer Azuki bean pudding mixture into piping bag with a hole cut at the end.

Assembly
1. Spoon some Matcha pudding into the cupcake cases.
2. Place an Azuki (or Matcha) layer cake on top.
3. Pipe some Azuki pudding over the sponge layer and carefully spoon some Matcha pudding around the sides and over the Azuki pudding.
4. Place a different flavoured sponge and repeat step 3.
5. Keep repeating the layering until all 4 (or 2) sponge cakes are used up.
6. Chill the cakes in refrigerator for 2 hours or until firm.


7. Carefully unmould the cakes. It is easier to unmould from silicone moulds. You have to be careful when tearing the paper cupcake case if you are using. If the surface is not as smooth as you would like, fret not. You can still pretty up the cake by piping Arabesque patterns on the surface like I did ;). Transfer excess Matcha pudding into piping bag with a small hole. If the pudding has set too much to be easy to pipe, reheat the mixture and stir over low heat until consistency is just right to pipe.

You may also wish to leave the cakes in the cupcake cases and decorate it this way...


8. Chill the cake until firm again if you piped on pudding decorations. Leave the cake chilled overnight before consuming.

My neighbour, Susanne and my kids loved this cake although hubby felt that the pudding was too soft. Boiling the pudding mixture a little longer would do the trick of firming up the pudding a little more. Overall the cake is still refreshing and has a good balance of Matcha and Azuki flavours.

Feel free to use any combination of Azuki and Matcha sponge and pudding according to your preference. I used both flavors for sponge and pudding but for simplicity you may choose to make Azuki sponge and Matcha pudding or vice versa.

Keep a lookout for berry yoghurt flavoured sponge and pudding cake which I will post in the near future!

With love,
Phay Shing
Read More »

Wednesday, 11 November 2015

'Little Mermaid' Chiffon Cake


"Under the sea...Under the sea..
Darling it's better, down where it's wetter, take it from me.." =)

As I am writing this, this cute song by Sebastian the crab goes in my head! I remember this cartoon when it came out while I was still a young girl in MGS! I loved it so much I probably watched this over 8 times and can sing all the songs! ;)

This Little Mermaid Cake was super fun for me as it’s my first ‘Under-the-sea’ chiffon cake, though I’ve made a few nautical theme cakes. I had to chance to make Corals, Seaweeds and Clams from chiffon cake!

The base chiffon cake is a 2-tone Blue pea flower (vanilla)-chocolate chiffon cake, like my Cars. It seems blue with brown can be used for various themes, both ‘under-the-sea’ and desert lands. The 2-tone chiffon cake was actually unintended, but the birthday girl loved chocolate and so asked it chocolate flavour can be incorporated into the cake, hence we came up with this ‘Sea-seabed’ Blue-Brown chiffon cake scheme. Since the chiffon cake is inverted after unmoulding, the way to make the ‘Sea-seabed’ 2-tone chiffon cake is to pour Blue pea flower (vanilla) chiffon cake batter in first to fill the base to more than half, then deposit humps of blue batter, then fill with Chocolate chiffon cake batter.

The seaweeds are made from pandan chiffon layer cake. I happened to have a cute dino cutter in which I used the spikes to cut out zigzag seaweeds shapes (make a double cut side-by-side).
I made 2 types of corals, both the tube-like ones as well as the sheets. For the sheets corals, I baked a similar vanilla layer chiffon cake and cut out holes of different sizes using a circle cutter. For the tube corals, I baked strawberry chiffon cake in mini cake pop molds and then used a straw to punch out a hole for the tube ones. The clams were made using a clam mold which I have.

Thankful the kids loved the cake! Phay Shing made some beautiful mermaid macarons to go along with them.

With lots of love,
Susanne

Read More »

Monday, 9 November 2015

Pirate Assorted Macarons -- sea themed macarons part 2

Here are some pirates who are too cute to be the stereotyped badassed pirates :p. I made these along with the mermaid macarons.


The octopus and dolphin macarons are going to be featured in my upcoming Creative Baking: Macarons book so keep a lookout for them :).

You may refer to this post for the basic macaron recipe, and this post on how to pipe complex shapes. The pirates are fairly easy to pipe compared to the mermaids. Keep in mind the ratio I use for weight of Italian meringue/ weight of mass = 0.55 when portioning out for the various colours.

Begin by piping the base shells for top and bottom shells.


Wait for 15 minutes or until a thin sticky membrane forms. Pipe the nose, ear and little tuft of cloth on the head scarf. Wait until the shells are dry to touch before baking.


Freshly baked shells!

Prepare royal icing and add on the white polka dots, eye and eye patch. Use edible black marker to draw the mouth. I used some royal icing to stick on a silver pearl for the ear rings.

Freshly decorated and looking cute!

Filling up with the same non-refrigerated assorted flavours as mermaid macarons. There's dark chocolate, Earl Grey, orange and strawberry white chocolate.

Individually packed!


Here's another look at all the macaron shells from the sea themed collection!


I hope this short series puts a smile on your face as it did to mine :).

With love,
Phay Shing
Read More »

Sunday, 8 November 2015

Baby 'My Melody' Vanilla Chiffon Cake


Making this sweet cake made me really happy because the Baby My Melody is so sweet!

The cream light yellow base chiffon cake below is a 9-inch Vanilla Chiffon Cake. My friend said it was super yummy! As I was afraid the base chiffon cake colour would clash with the Melody (also cream colour), the base chiffon cake is not a reduced egg yolk version, and I added a few drops of natural Queen’s turmeric-based coloring to give it a tinge of sweet pale yellow. 

Vanilla Chiffon Cake (9-inch chiffon tin)
7 egg yolks
47g sugar
89g vegetable oil
97ml water
140g cake flour
12 ml vanilla extract

9 egg whites
105g sugar
1/4 tsp cream of tartar

1. Preheat oven to 160°C. Prepare a tray of water at the bottom of the oven (I used the lowest rack to bake the cake). *You may omit steam baking; I like to use it to control my oven temperature rise.
2. Beat egg yolks with sugar with whisk till pale yellow before stirring in oil, water and vanilla extract.
3. Add in sieved flour and whisk till no trace of flour found.
4. Meringue: Beat the egg whites with ¼ tsp cream of tartar till stiff peak, mixing in caster sugar in 2 additions.
5. Fold in the meringue gently into the batter 1/3 at a time.
6. Pour the batter into the chiffon tin from a height.
7. Gently tap the tin on table 3x to remove air bubbles
8. Bake the chiffon cake for 15 min at 160°C and then at 150°C for 10 mins and 140°C for 20 min, then 130°C for 15 min.
9. Invert immediately once out of the oven to cool
10. Unmould by hand after the cake is cool. Gently pull the cake from the sides of the tin at each angle and push the removable base up to unmould the sides. To unmould the cake from the base, gently lift up the cake from the base using hands, repeating this at each angle before turning the base over (see 'Hand Unmoulding Chiffon Cakes for a Smooth Finishing' video tutorial).

The pink My Melody is made by prepiping the white vanilla chiffon batter in a bowl, and then baking strawberry batter over it (similar to Hedgehog but replacing the cocoa powder with few drops of strawberry paste). The ears were cut out from strawberry chiffon similarly. The body required additional small round bowl cake and 4 cake pops (for limbs) using the same vanilla chiffon cake recipe.

Happy belated birthday to Renae!

With love,
Susanne

Read More »

Friday, 6 November 2015

'Busy Bee' Giant Macaron on Lychee Rose Sponge & Pudding Cake

My friend requested for a birthday cake for her aunt who is a superwoman busy bee!


Pardon the poor photography. I was in a hurry to take the photo and quickly packed up.

The Bible reference is for Ee Janet to be reminded of what's important :p. This is another lychee rose chiffon sponge and pudding cake which I did concurrently with my grandma's birthday cake. It's my first attempt at using pudding and giant macaron as decorative items so there's room for improvement. Nonetheless, thankful that the cake was well received! Feedback was exactly what I hope the cake would be, that it was perfect for eating after a heavy sumptuous birthday meal as the cake is light, refreshing and not too sweet.

As I was in the middle of baking big batches of macaron shells for my creative macaron book with little time but some macaron batter to spare, using macaron as decorative item was the way to go. You may refer to this post for the basic macaron shell recipe (omit strawberry emulco and pink and green colouring) and this post for the lychee rose chiffon sponge and pudding recipe. This busy bee cake is a smaller 6" cake so do downsize the recipe for the cake a little. Baking huge macaron shells is slightly different from smaller shells. Baking time is about 30-35minutes but with the temperature set at a low value of 110-120°C for the last 10 minutes or so.

I originally filled the bee with lychee rose pudding but didn't realise it was a mistake until I finished assembling the cake and was about to stick the bee in to take a photo. The pudding turned the macaron shells soggy! I had to throw the destroyed macaron away and redo the bee from scratch. Fortunately I had time and could squeeze in a round of macaron bake before the cake was due. Lesson learnt! Only fill macarons with tried and tested fillings with high fat content like buttercreams, ganaches, pastry cream, peanut butter, nutella or melted chocolate.

Just to share some photos of the process...

Piped macaron shells. Running out of white batter :p

Filling with lychee flavoured swiss meringue buttercream

Freshly baked chiffon sponge cakes

Assembled cake without macaron cake topper

Another lesson I learnt is not to use contrasting colours for layers of pudding that are in contact with each other as decorative pieces. Diffusion of colours will happen over time as the cake is stored for a couple of days. The result is not so pretty after two days. I stuck with a single colour for my grandma's cake so this wasn't an issue.

Glad that at least the cake was yummy :p. If I don't experiment I will save myself a lot of grief but I will learn a lot less. Will know what to do and what not to do for my next few lychee rose cakes! Apparently this flavour is popular and I already have a few requests for it in November!

Blessed belated birthday Auntie Janet!

With love,
Phay Shing
Read More »

Wednesday, 4 November 2015

Safari Animals Giraffe Chiffon Cake (Chocolate-Orange)


This was one super difficult cake to make! Both in terms of the giraffe patterns for the chiffon cake as well as the detailing for the different animals! I had to work OT for this cake :p. So I’m so super thankful it was well-received, thank God!

The Giraffe Chiffon Cake was made from Chocolate Chiffon Cake with Orange Chiffon patterns (chosen by my friend). It is also a super big 10-inch chiffon cake using a total of 15 eggs! I had to work super quickly with the piping and there was so much to pipe as it was so big. I’m also really thankful that my freehand piping of giraffe patterns more or less ‘passed’ as I’m not really artistically inclined and was never good at drawing apart from cute pigs =p.


Chocolate-Orange Giraffe Chiffon Cake
Chocolate Chiffon Cake (10-inch tin)
10 egg yolks
82 g sugar
149 ml vegetable/corn oil
165 ml boiled water
17 ml vanilla extract
198 g cake flour, sifted
66 g Dutch-processed Cocoa powder
1/4 tsp baking powder
A pinch of salt

Meringue
13 egg whites
1/4 tsp cream of tartar
150g sugar

Orange Chiffon Cake (lines)
Egg Yolk Batter
1 egg yolk
10 g sugar
20 ml vegetable/corn oil
23 ml orange juice
31 g cake flour, sifted
1 drop orange emulco

Meringue
2 egg whites
23 g sugar
1/4 tsp cream of tartar

1. Preheat oven to 160°C. *I used steam baking for oven temperature control and it makes the chiffon more moist but it is optional.
2. Prepare batter for chocolate chiffon cake.
a. Beat egg yolks with sugar with whisk till pale yellow before stirring in oil, water and vanilla extract.
b. Add in sieved flour, cocoa powder, baking powder and salt, and whisk till no trace is found. *If you are using natural cocoa powder (not Dutch-processed), please add 1/3 tsp baking soda for the acidity to prevent big holes.
3. Prepare batter for orange chiffon cake (for lines).
a. Beat egg yolks with sugar with whisk till pale yellow before stirring in oil, juice and a drop of orange emulco.
b. Add in sieved flour and whisk till no trace is found.
4. Prepare meringue for orange chiffon cake (2 egg whites). Beat the egg whites with ¼ tsp cream of tartar till frothy, add in ½ of the castor sugar and beat the egg whites till soft peaks. Add the remaining castor sugar and beat the egg whites till firm peaks.
5. Gently but quickly fold in the meringue into the orange chiffon batter 1/3 at a time.
6. Transfer the batter into a piping bag and cut a 2 mm hole. Pipe giraffe lines at the bottom and sides of the tin. Bake at 160°C for 2 min.
7. Prepare meringue for chocolate chiffon cake (13 egg whites). Beat the egg whites with ¼ tsp cream of tartar till frothy, add ½ of the castor sugar and beat the egg whites till soft peaks. Then add the remaining castor sugar and beat the egg whites till stiff peaks.
8. Gently but quickly fold in the meringue into the chocolate chiffon batter 1/3 at a time.
9. Pour the chocolate chiffon batter into the tin, covering the patterns, and bake the chiffon cake for 15 min at 160°C and then at 150°C for 10 min, 140°C for 30 min and 130°C for 15 min. *Temperature gradient helps prevent browning.
10. Invert the chiffon cake once removed from oven.
11. Unmould the chiffon cake by hand gently (see 'Hand Unmoulding Chiffon Cake for Clean Finishing' Video tutorial).

For the giraffe, I made an orange chiffon swissroll with chocolate polka dots using the same orange chiffon recipe as above. I inverted the patterns to use chocolate spots instead of the other way around as I thought the giraffe was cuter with brown spots instead of realistic lines. I aliquoted out 1 tsp of batter and added 1/3 tsp cocoa powder for the spots. I made a big roll for the giraffe body and 4 small rolls for the feet. The head was cut out from excess roll cake. 


For the rest of the animals, I had the benefit of using animal cake molds that a dear friend helped me to get from overseas. Using the same orange chiffon recipe from above, I prepiped the orange chiffon cake batter in the faces, and then baked chocolate chiffon over them. The hippo was made using orange batter coloured with charcoal powder. I added in eyes and other details using chiffon cake cut-outs and some carving.

Thankful it received lots of good feedback, together with Phay Shing's safari macarons!

With lots of love,
Susanne

Read More »

Tuesday, 3 November 2015

Mermaid Assorted Macarons -- sea themed macarons part 1

When I received this request for mermaid macarons, my first thought was "Is this even possible?!" I did a quick search. Apparently it has been done before :p. I have to thank the requester for providing the opportunity to stretch my abilities for piping macaron batter! Here's my first attempt at mermaid macarons along with some starfish and seashells!


The starfish and seashells are going to be featured in the upcoming Creative Baking: Macarons book published by Marshall Cavendish so keep a lookout for those! Keep a lookout for my next macaron post which has more sea themed macarons too :). All fillings are non-refrigerated as these are given out as door gifts. There's Earl Grey, strawberry and orange white chocolate (new flavour!), and dark chocolate flavours.

You may refer to this post for the basic macaron recipe.  Omit the strawberry emulco and colouring ingredients that are not relevant. You may refer to this post for piping complex shapes as a guide on how to create virtually any shape of macaron. As this subject has many colours, keep in mind to use the ratio of 0.55 for weight of Italian meringue/ weight of mass as you portion out the batter for the various colours. Use the area of each colour as a gauge of how much your should portion for each colour. Create skin colour by using a tiny dip of orange gel food colouring. As you can see, there is a lot of planning and math involved before embarking on such a complex design. Thank God for my Engineering background :p.

Just to share some photos of the process...

Piping the skin-coloured parts along with the hair, which is coloured using charcoal powder or cocoa powder.


Piping out the rest of the parts

Wait for the skin-coloured batter to form a sticky membrane before piping on the bra or the mermaid will appear flat-chested :p.

Freshly baked shells!

Prepare some royal icing to add on the flower and crown. The crowns were piped onto baking sheet, thoroughly oven dried at 60°C fan mode before transferring onto the mermaid. The facial features were drawn on with black edible marker. Peach coloured lustre dust was brushed on for rosy cheeks.

Freshly iced and decorated shells!

Non-refrigerated filling was requested so I selected a few to include in this assortment. I have tested out a new flavour for this batch. Orange white chocolate filling! You may refer to the respective recipes for strawberry white chocolate and Earl Grey white chocolate.


Dark chocolate filling is made by simply melting 50g chopped dark chocolate with 5g shortening and 1/10 tsp salt.

 Here's the recipe for orange white chocolate but I strongly recommend you to refer to my updated recipe for a yummier filling.

Orange white chocolate
Ingredients (fills about 8-9 macarons):
50g white chocolate, finely chopped
1/2 tsp orange emulco
7g vegetable shortening
1/10 tsp salt

Steps:
1. Melt white chocolate in microwave oven in 10 second bursts at medium-high power, stirring well in between bursts of heating. You may melt using the double-boiling method too.

2. Place the rest of the ingredients in a small saucepan and heat over low heat until shortening is melted.

3. Stir the orange mixture before adding a little at a time into the melted chocolate. Stir the chocolate well with each addition.

4. Transfer to piping bag and pipe onto macaron shells. Let the white chocolate sit for a few minutes at room temperature if it is too runny to pipe. Consistency should be like toothpaste before piping.

Store the macarons in airtight container in a cool and dry place.

First time changing to this type of packaging for individual macarons...


White chocolate pearl covered with pearlescent lustre dust were used as the "pearls"


Mermaids, seashells and starfish weren't the only shells I made for this batch of sea themed macarons. Here's a sneak preview of all the shells I made!


Keep a lookout for part 2 of the sea themed series!

Thank God the macarons were very well received and feedback was they were yummy and not too sweet despite being white chocolate based :).


With love,
Phay Shing

Read More »

Sunday, 1 November 2015

Peppa Pig Train 2-Tier Chiffon Cake


This is another Peppa pig creation, this time, Peppa pig and George are sitting into a Chiffon Cake Choo Choo train!

This cake is somewhat a marriage of my 3D Peppa and George 2-Tier Chiffon Cake (or Liam’s cake, as many call it ;)) and my Rainbow Train Chiffon Cake. The challenge this time was to craft and design my chiffon cake carriages and train based on the size of the Peppa and George toppers! And also due to these considerations, the train goes merry-go-round the top tier hee but I kind of like it as it uses the chiffon cake donut shape nicely. I filled the centre hole with a surprise and covered it up with a 'grass patch' made from layer pandan chiffon cake. The train carriages were cut from chiffon cake, with the front carriage assembled using both cut pieces and a swissroll for the front. Engineering chiffon cakes are a lot of engineering work too as chiffon cakes are very soft, so dowel support is needed for pieces not to crush the base chiffon cake. I used a 50:50 ratio for blue pea flowers and pandan chiffon cake this time. This cheerful landscape chiffon cake will be out in the Creative baking: Chiffon cakes book soon! I used cut-outs made from layer chiffon cake for the details like the Peppa house and trees.

I’m super thankful the cake was well-received and it was a joy making the cake! Happy birthday to Evan!

With lots of love,
Susanne

Read More »