Pages

Friday 29 November 2019

Toy Story Alien Chiffon Cake


Who likes Toy Story Alien?

This Toy Story Alien is made from pandan chiffon cake (top) and blue pea flower chiffon cake (bottom), and the cake is 12-inches tall!

Thank God it was well-received! Hope this made you smile =).

With love,
Susanne

Thursday 28 November 2019

Pikachu and Torchic Lychee Choux Pastry on Pandan Kaya Cake

My friend wanted me to do a Pokemon themed bake for her nephew's birthday but with pandan kaya cake as the cake base. She also wanted choux pastries for the characters and I told her some of the Pokemons are very good candidates as deco choux creations. Here it is 😊


I will focus on the choux pastry part as the recipe for the pandan kaya cake can be found in this post. I just replaced Stevia with caster sugar for the pandan chiffon and the pandan gula melaka pudding.

Detailed recipe for choux pastry batter and the craquelin (cookie dough) can be found in this post. As a rule of thumb, I try to colour the batter as close as possible to the same shade as the craquelin for creating various characters.

Craquelin on top of piped batter for Pokeball and the heads and bodies of Torchic and Pikachu 

The rest of the small body parts are made from piped choux pastry batter without the use of craquelin.


I love the look of this rainbow choux!

Freshly baked pastry cases

I used royal icing to decorate as well as join the parts together.

I had fun giving Pikachu various expressions! 

I provided lychee pastry cream lightened with non-dairy whipped cream in piping bags for my friend to fill just before the pastries are consumed at the party. The recipe can be found here.

"Are you also surprised that choux pastries can be made into someone like me? "

According to my friend, everyone at the party, the neighbouring tables of diners and the service staff at the restaurant had the same expression as the Pikachu above 🤣. I hope this bake brings a smile to your face too! After the initial surprise.

With love,
Phay Shing

Thursday 21 November 2019

Precious Moments-inspired Gymnast on a Piano Chiffon Cake


Precious Moments-inspired Gymnast on top of a Piano, made from chiffon cake! Does she look like a cute little champion gymnast? <3

Inspired by my friend's daughter who is a very talented pianist and gymnast, I was also inspired to try my best and challenge the boundaries!

What is it that you are passionate about?

This is one of the most challenging cakes I made tried so far. And also a lot of work.

Initially I had told me friend I couldn't do it. Thank God for the inspiration that I suddenly thought I could use a heart pan as a base to create the shape of the grand piano! I had to carve out the rest of the piano details.

I have been wanting to try Precious Moments for a while but didn't have the courage to try. Thank God it turned out pretty ok!

School holidays are here. Wish everyone a blessed restful holidays!

With love,
Susanne


'McDull in Animal Suit' Pandan Kaya Cake

I first came across McDull about a little more than 10 years ago, watching the original cartoon in Cantonese. It is not as widely known to younger kids nowadays probably because of the origin of this character, which epitomises how some kids grow up in Hong Kong. But anyway, I am glad to have a chance to make this lesser known character 😊

McDull donning various animal suits! 

My university classmate was the one who requested for this bake. Although peppermint dark chocolate was requested for the filling, the cake requested was pandan kaya cake.

I used this french method recipe for making the macaron shells as this is a small quantity bake and the batter is stable enough for dividing into so many colours. Just to share some photos of the process...

Piping McDull. Be sure to use piping tips that are of the right size for better shape retention. For really small parts like the eye patch and black panda parts, you may just cut a small hole in the piping bag 

Freshly baked shells. Check out the feet! 

I filled the macarons with firm peppermint dark chocolate ganache as some of tbem are going on a mini tower

Recipe for firm peppermint dark chocolate ganache
Ingredients:
90g 73.5% bitter dark chocolate couverture
10g unsalted butter
24g heavy cream
1/8tsp salt
1/2 tsp vanilla extract (optional)
1/2 tsp Kahlua coffee liqueur (optional)
1 tbs peppermint extract

Steps :
1. Place all ingredients except extracts and liqueur in a microwave safe bowl. Melt on mdium low power for 20 seconds and stir. Repeat as necessary until smooth and melted.

2. I like to whip my ganache to lighter consistency so I chill the ganache in freezer for 1 to 2 min and then whip with spatula. I repeat chilling and whipping until texture resembles buttercream.

3. Gradually add extracts and liqueur and mix well after each addition. Transfer into piping bag and fill the shells. Store assembled macarons in airtight container in the fridge for at least 24 h before consuming. This type of stiff ganache filled macarons can keep in fridge for two weeks.

I assembled the mini tower with extra pieces of round macaron shells and stiff royal icing 

The recipe I use for the pandan kaya cake is same as the one I used for my mum's birthday except that I used regular caster sugar instead of Stevia. I also used a 6 inch pan without the central tube to bake the 6 inch chiffon cake. The pandan kaya cake recipe can be found here.

Freshly baked 6" pandan chiffon cake slightly more earthy hue due to the gula melaka used. 

I added the words "Happy Birthday" using a separate gula melaka chiffon sponge with some cocoa powder added for a deeper brown colour.

Remember always store macaron cake toppers separately from the cake to prevent the cake from turning the macarons soggy.

With love,
Phay Shing

Thursday 14 November 2019

Safari Animal Cookies n Cream Choux Pastries

My first attempt at making a variety of animals for a single choux pastry request. Safari themed this time!


On hindsight there are things I would do differently to improve the looks of things but I didn't have time to rebake and it is honestly yummy enough. Just the perfectionist in me talking 😂. If I had a next time, I would make all the heads slightly smaller such that the pastry cases need higher temperature baking only for a shorter time, and add white food colouring to the light brown part of the monkey's face as well as to the yellow face of the lion for better colour contrast. These colours tend to brown more.

You may refer to this post for the detailed recipe for the choux pastry case. I will share the detailed filling recipe later in this post that is different from the 5-minute version I shared in this blog post as it is made with proper pastry cream for a yummier taste. What might be of interest to you is how I made the craquelin for the monkey face and the various small parts of the face of the animals. I made use of round and heart shaped cookie cutters to get the shape of the monkey's face.

Cut out rounds and hearts on separate trays. Use the heart cutter to cut out part of the brown circle and fit the heart shape in. Gently press the seams of the different coloured dough together. Use round cutter to cut off excess portion from the uncoloured heart dough

Use coloured choux pastry batter to pipe out the various body parts. Pipe similar sized parts on the same tray. Here is a tray of monkey, lion and leopard ears

I use perforated mat for baking the main body (or head in this case) for a more even expansion in the oven. Try to match the colour of batter to craquelin. 

Recipe for lightened cookies n cream pastry cream
Do note that you may adjust the amount of crushed oreo cookies, as well as the whipped cream according to personal preference. This recipe is for a fairly strong chocolatey oreo flavour with slightly heavier texture so I provided extra whipped cream for those who prefer a lighter texture and less intense chocolate cookie flavour in separate piping bags. I always recommend filling the pastry cases just before or shortly before eating.

Lightened cookies n cream pastry cream and plain non dairy whipped cream

Ingredients:
3 egg yolks
30g cornflour, sifted
35g caster sugar
Pinch of salt
300g fresh milk
1 tsp vanilla extract
25g butter, softened
160g Whip topping (non dairy whipping cream. You may use double cream or heavy cream. You may increase amount of cream for lighter texture, up to 1:1 ratio with plain pastry cream)
200g crushed oreo cookies without the cream (use less if you prefer less chocolatey)

Steps:
1. In a heavy mixing bowl, whisk together cornflour and sugar. Add egg yolks and whisk until a smooth paste forms.

2. Place milk, vanilla and salt in a saucepan and heat over medium low heat until steaming or just starting to bubble at the edges.

3. Slowly pour hot milk in a thin stream into egg mixture while whisking the egg mixture continuously. Pour the contents back into saucepan.

4. Heat the egg mixture over medium low heat while whisking continuosly. Keep an eye on the consistency. Once it starts to thicken, remove from heat and whisk vigorously until smooth. Place saucepan back on stove and whisk until pastry cream is cooked to your preferred consistency.

5. Remove saucepan from heat and add butter. Whisk until well combined.

Nice and smooth plain pastry cream! 

6. Transfer pastry cream into a bowl and press cling wrap on the surface to prevent a skin from forming. Refrigerate until cool.

7. Whip the whipping cream until firm peaks form. If using full dairy whipping cream, be careful not to overwhip. Adding whipping cream lightens the texture of pastry cream.

8. Loosen the chilled pastry cream with spatula. Fold in the whipped cream in a few batches.

9. Fold in crushed oreo cookies. Transfer into piping bag and keep chilled until ready to fill the cases. Pastry cream can keep in the fridge for a few days. Do not freeze.

Do check out my Deco Choux Pastries book for more techniques and designs of creating cute choux pastries!

With love,
Phay Shing


Wednesday 13 November 2019

Sesame Street Elmo, Abby and Cookie Monster Chiffon Cake


Which is your favorite character?💖 Elmo, Abby and Cookie Monster? Hope this happy creation made you smile! =))

With love,
Susanne

Thursday 7 November 2019

Brawl Stars Cookies N Cream Macarons

This is an unprecedented project due to the amount of details and quantity involved. Because it is for my younger kid and my friend's nephew's birthdays. I baked and decorated more than 70 of these!

Nita, Spike and Tick cookies n cream macarons! 

Now that I am teaching at two studios, I have to plan my time more carefully. Due to the scale of this project, I baked two characters in advance and froze the undecorated shells, planning to defrost them only when I was ready decorate nearer the date.

I used the Swiss meringue method for these and baked one character at a time, spreading the baking over 3 separate days.

Just to share some photos of the process...

Piping Nita

Piping Spike

Piping Tick

I layered the baked shells between pieces of parchment paper in an airtight container and froze it. To defrost, leave the container at room temperature overnight without opening. 

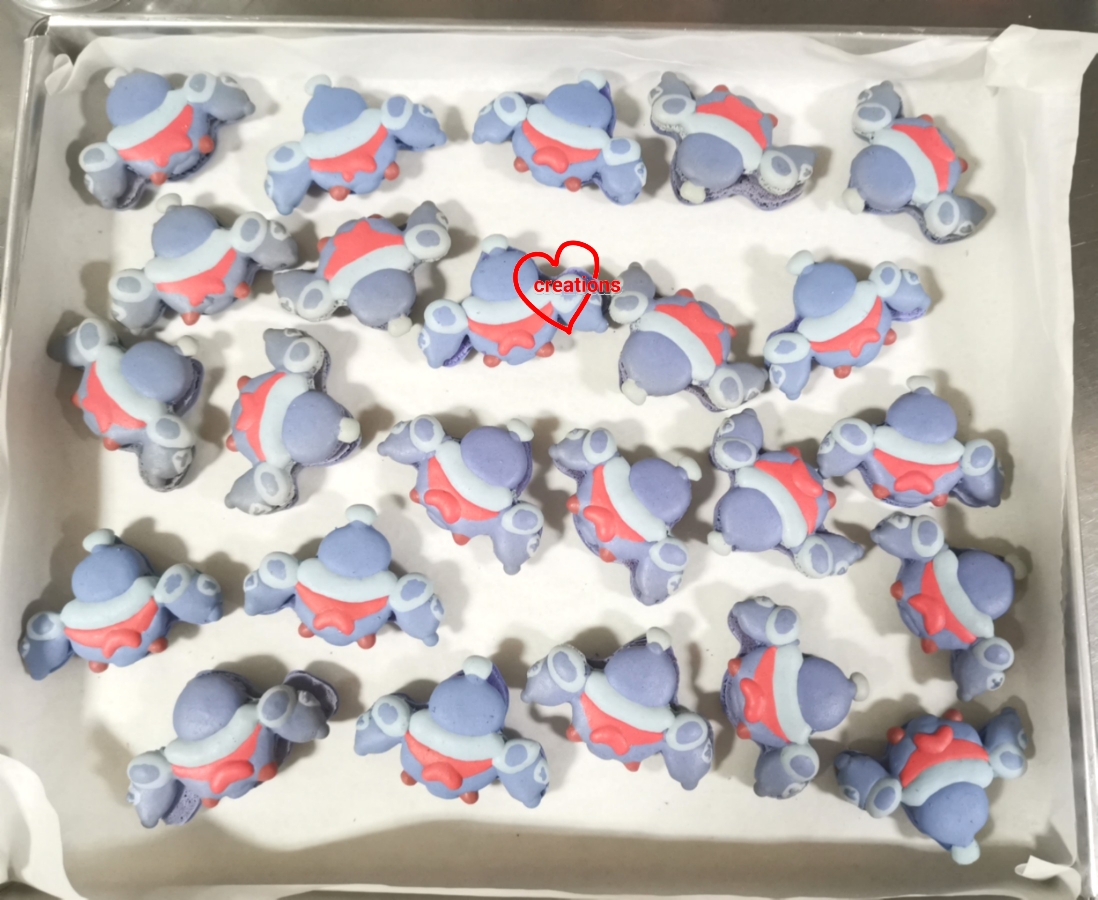
Freshly baked Tick! I didn't freeze these as I baked them closer to the date. 

Decorating the shells with edible marker, homemade paint* and royal icing is not a job for the faint hearted. It took me one and a half days of intensive work to finish all 70 plus pieces. This was just day 1 of work. 

*I made edible paint in dark green colour for Spike by dissolving some gel food colouring in vodka.

All that hard work was worth it when you see the fruits of your labour 😊.

This is only about a third of the decorated macaron shells! 

I made a Swiss meringue buttercream based cookies n cream filling.

Recipe for cookies n cream filling (fills about 30-35 macarons) 
Ingredients:
50g egg whites
1/8tsp salt
35g caster sugar
80g unsalted butter, cut to small pieces and slightly softened
1 tsp vanilla extract/ bean paste
70g oreo cookies without cream, crushed

Steps:
1. Place egg whites, salt and sugar in mixing bowl set over a pot of simmering water without the water touching base of the bowl. Whisk continuously while monitoring the temperature with a candy thermometer.

2. When temperature reaches about 70°C, remove the mixing bowl from heat and beat the egg whites with electric mixer at medium high speed until stiff peaks form and meringue is cooled to room temperature.

3. Add butter about a tablespoon at a time and beat with mixer until incorporated before adding more. Don't worry if mixture appears to curdle. It will come together in the end. Continue to beat at high speed after all butter is added for 2 min.

4. Add vanilla and beat until incorporated.

5. Fold in crushed oreo cookies. Transfer filling into piping bag to fill the macaron shells. Store filled macarons in airtight container in fridge for at least 24h before serving. Always leave the airtight container at room temperature for 15-20min before opening and serving the macarons because condensation will appear immediately on the shells if you expose them to the air when they are cold.


Thank God that it was really well received!

A peek at the insides of a macaron for my younger kid, which I filled with pistachio white chocolate ganache and salted caramel instead.

Nice and full shells! 


With love,
Phay Shing

Wednesday 6 November 2019

BT21 Chiffon Cake


Which BT21 character is your favourite?? I like BTS, so was very happy I finally had the chance to try this cake for my dear schoolmate all the way from primary school! 


Mang (horse-masked character) - J-Hope
RJ (fluffy alpaca) - Jin
Koya (sleepy koala) - RM
Chim Chim (hooded dog) - Jimin
Shooky (small cookie) - Suga
Kookie (muscular bunny) - Jungkook
Tata (heart-shaped alien) - V
Van (space robot) - ARMY

Which is your favourite?

I had a few PMs after my post on instagram on what mold I used for the base cake. Its a silicone mold from silikomart. The rest of the characters were cut from egg shells or cake pop molds.

Have a blessed week!😘

With love,
Susanne